Developer Guide
- 1. Introduction
- 2. Setting up, getting started
- 3. Design
-
4. Implementation
- 4.1 Find by name or NRIC feature (by Cao Qin)
- 4.2 Add Patient + Medical Record URL feature (by Cedric Lim Jun Wei)
- 4.3 Sort feature (by Chong Jia Le)
- 4.4 Count feature (by Chong Jia Le)
- 4.5 Appointment feature (by Gabriel Teo Yu Xiang)
- 4.6 Show Appointment feature (by Peh Jun Siang)
- 4.7 Help feature (by Peh Jun Siang)
- 5. Documentation, logging, testing, configuration, dev-ops
- 6. Appendix: Requirements (by Gabriel Teo Yu Xiang)
- 7. Appendix: Instructions for manual testing
1. Introduction
Hello, fellow developers!
Welcome to Hospify, a desktop application for a digital medical record management solution. In this developer guide, you will learn more about how this application is implemented and the design choices behind them.
Hospify is primarily adapted from the AddressBook Level-3 program, which is subsequently modified to serve as a medical record storage solution targeted at administrative staff in clinics to reduce their dependency on printed medical records. The software provides basic functionalities required on a daily basis by clinic administrative staff, including adding, editing, finding, deleting and sorting medical records, as well as medical appointments of patients.
For easy navigation around this developer guide, hyperlinks to individual implementations have been provided at the top of the page. For ease of reading, we will be discussing the high-level implementation details first before zooming in to each design component and the implementation details.
2. Setting up, getting started
Please refer to the guide Setting up and getting started for more information about how to set up and configure the project in your computer.
You may also wish to refer to the source code here.
3. Design
In this section, we will be discussing the general design of the software. We will begin with its overall architecture to understand the high-level design of Hospify, followed by a closer look into each of the four major components, namely UI, Logic, Model and Storage.
3.1 Architecture
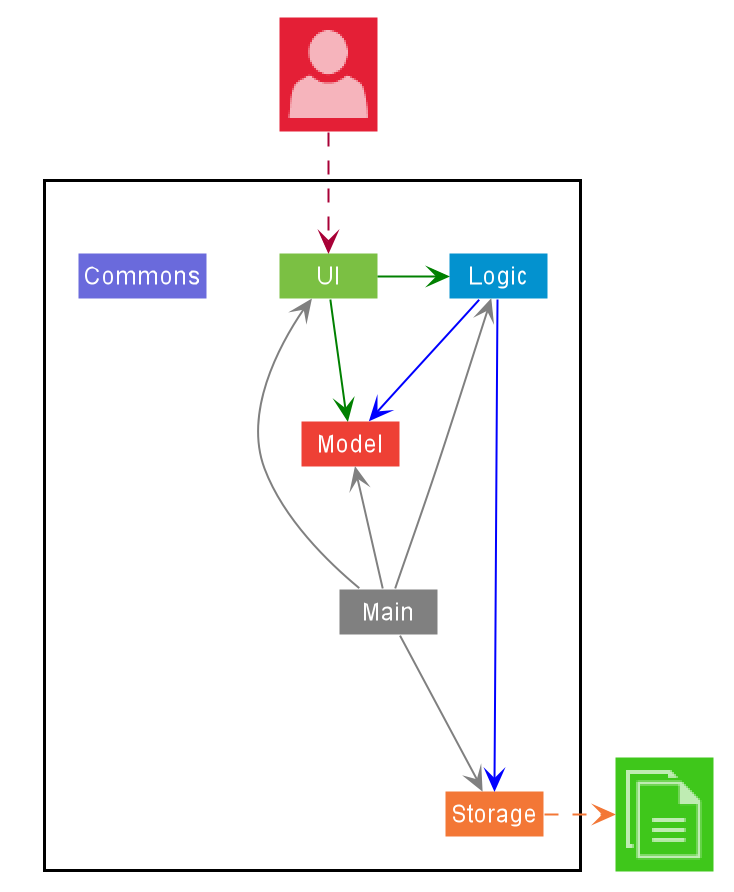
The Architecture Diagram given above explains the high-level design of the App. Given below is a quick overview of each component.
Main has two classes called Main and MainApp. It is responsible for,
- At app launch: Initializes the components in the correct sequence, and connects them up with each other.
- At shut down: Shuts down the components and invokes cleanup methods where necessary.
Commons represents a collection of classes used by multiple other components.
The rest of the App consists of four components.
-
UI: The UI of the App. -
Logic: The command executor. -
Model: Holds the data of the App in memory. -
Storage: Reads data from, and writes data to, the hard disk.
Each of the four components,
- defines its API in an
interfacewith the same name as the Component. - exposes its functionality using a concrete
{Component Name}Managerclass (which implements the corresponding APIinterfacementioned in the previous point.
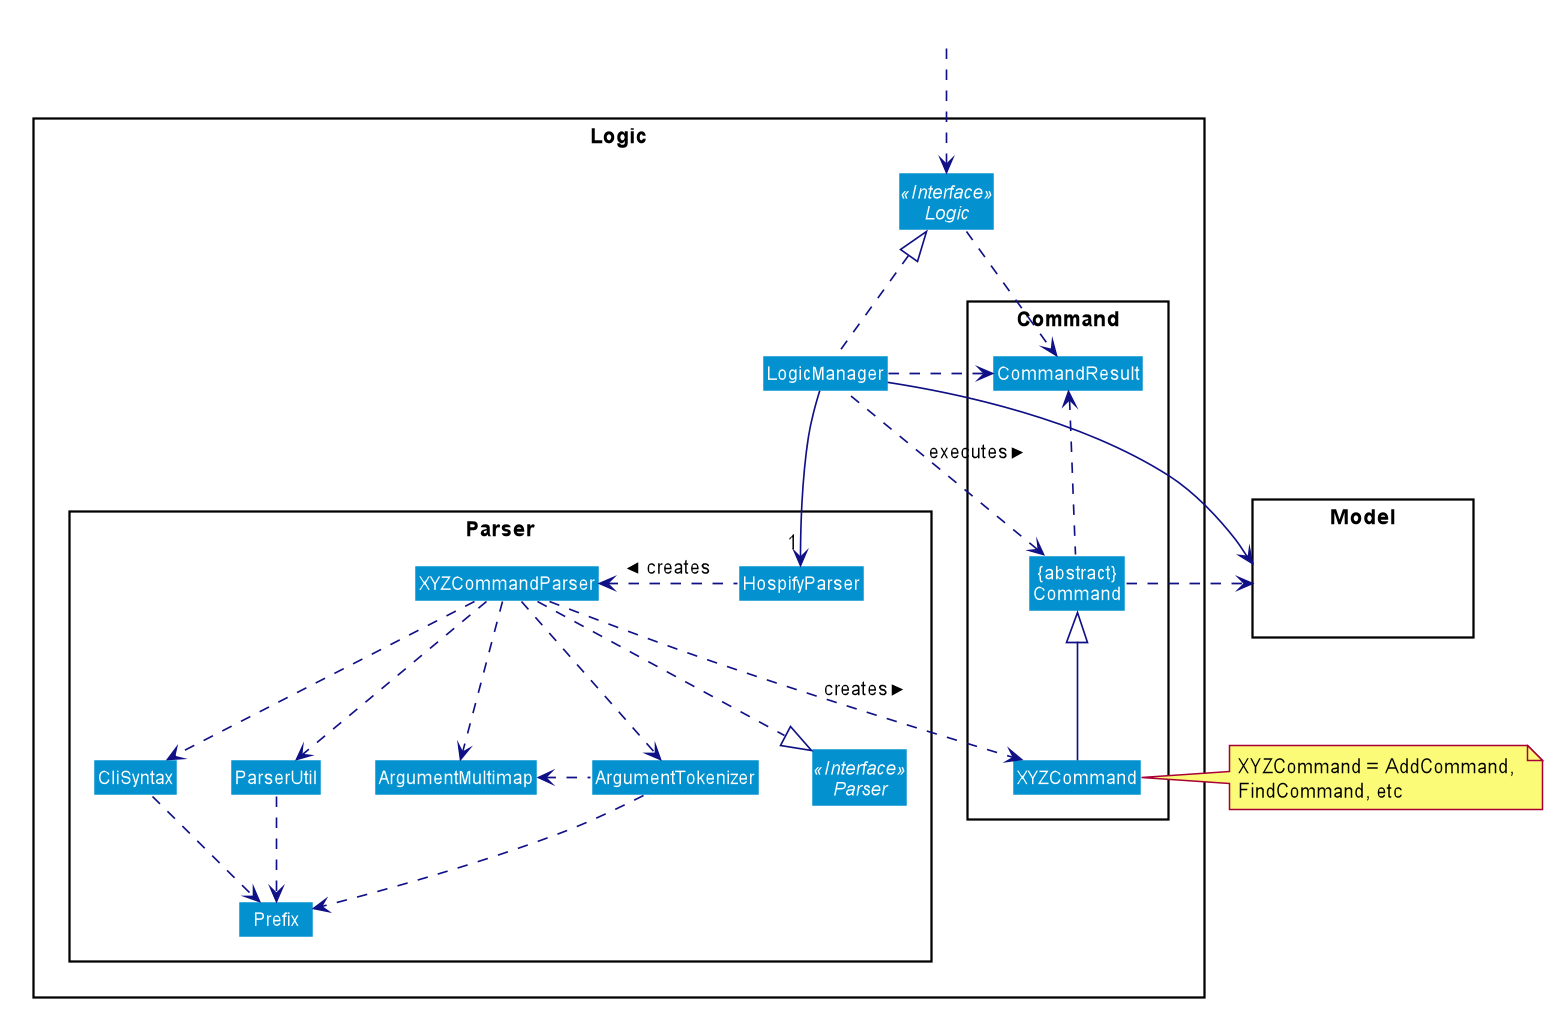
For example, the Logic component (see the class diagram given below) defines its API in the Logic.java interface and exposes its functionality using the LogicManager.java class which implements the Logic interface.
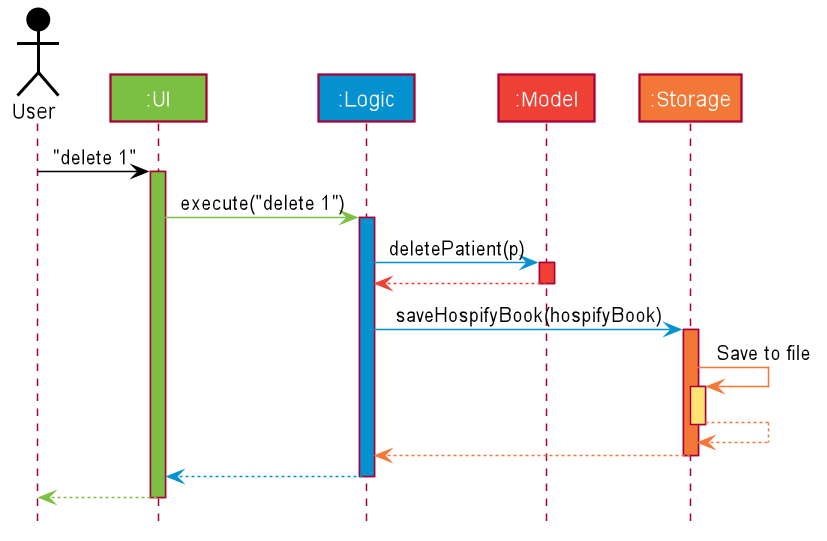
How the architecture components interact with each other
The Sequence Diagram below shows how the components interact with each other for the scenario where the user issues the command delete 1.
The sections below give more details of each component.
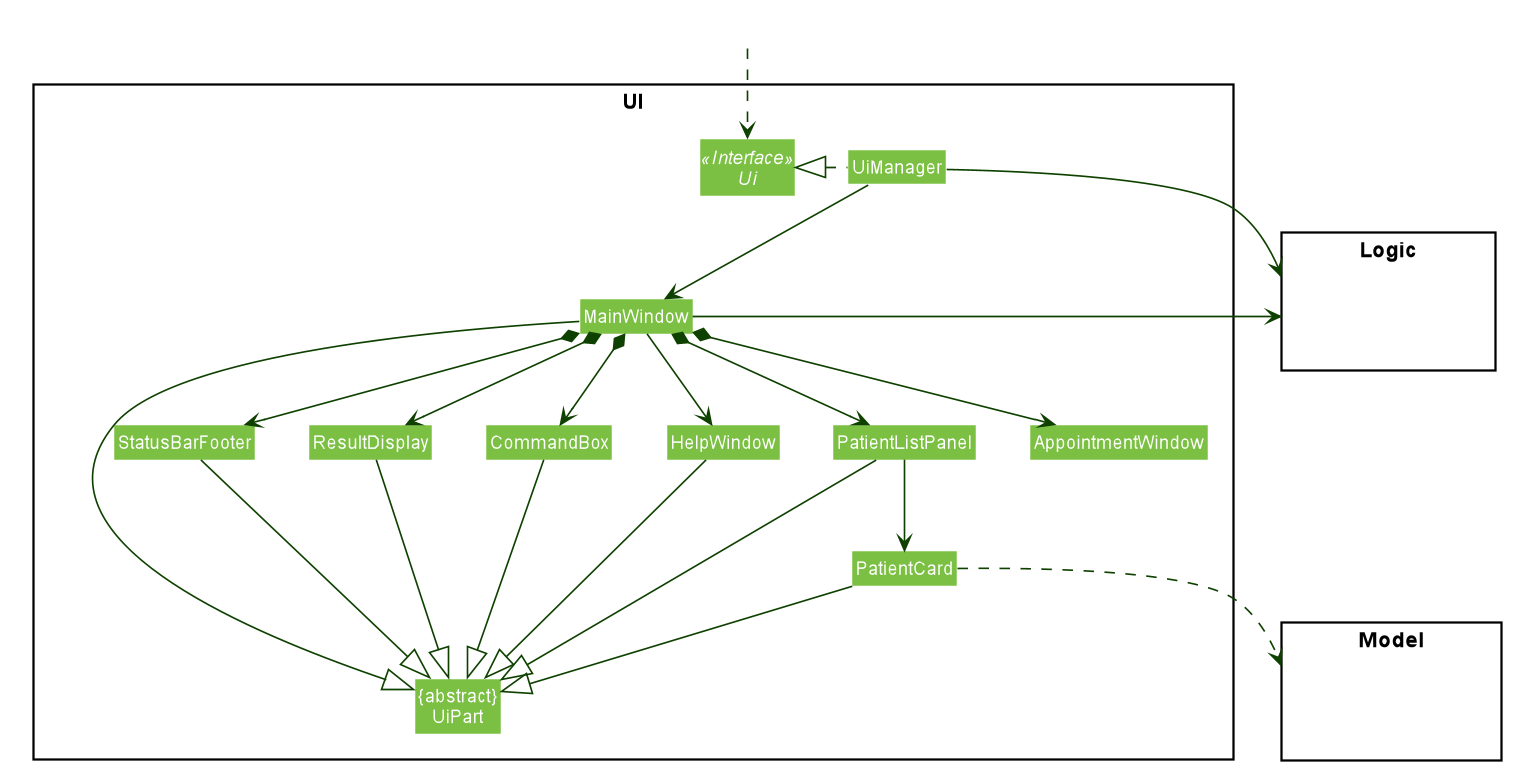
3.2 UI component
API :
Ui.java
The UI consists of a MainWindow that is made up of parts e.g.CommandBox, ResultDisplay, PatientListPanel, StatusBarFooter, AppointmentWindow etc. All these, including the MainWindow, inherit from the abstract UiPart class.
The UI component uses JavaFx UI framework. The layout of these UI parts are defined in matching .fxml files that are in the src/main/resources/view folder. For example, the layout of the MainWindow is specified in MainWindow.fxml
The UI component,
- Executes user commands using the
Logiccomponent. - Listens for changes to
Modeldata so that the UI can be updated with the modified data.
3.3 Logic component
API :
Logic.java
-
Logicuses theHospifyParserclass to parse the user command. - This results in a
Commandobject which is executed by theLogicManager. - The command execution can affect the
Model(e.g. adding a patient). - The result of the command execution is encapsulated as a
CommandResultobject which is passed back to theUi. - In addition, the
CommandResultobject can also instruct theUito perform certain actions, such as displaying help to the user.
Given below is the Sequence Diagram for interactions within the Logic component for the execute("delete 1") API call.

DeleteCommandParser should end at the destroy marker (X) but due to a limitation of PlantUML, the lifeline reaches the end of diagram.
3.4 Model component

API : Model.java
The Model,
- stores a
UserPrefobject that represents the user’s preferences. - stores the Hospify data.
- exposes an unmodifiable
ObservableList<Patient>that can be ‘observed’ e.g. the UI can be bound to this list so that the UI automatically updates when the data in the list change. - does not depend on any of the other three components.
Allergy list in the Hospify, which Patient references. This allows Hospify to only require one Allergy object per unique Allergy, instead of each Patient needing their own Allergy object.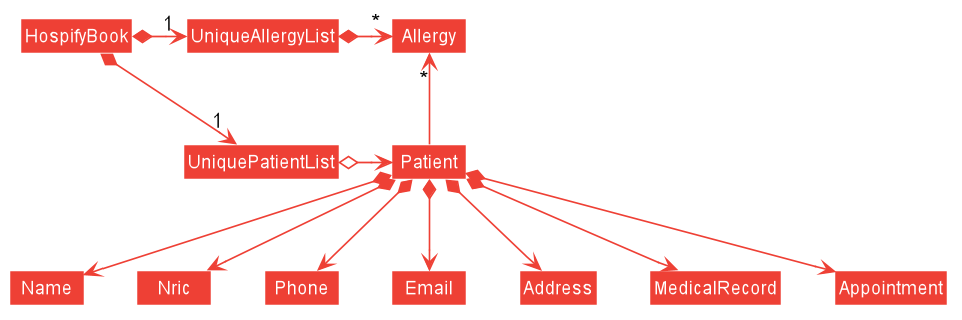
3.5 Storage component
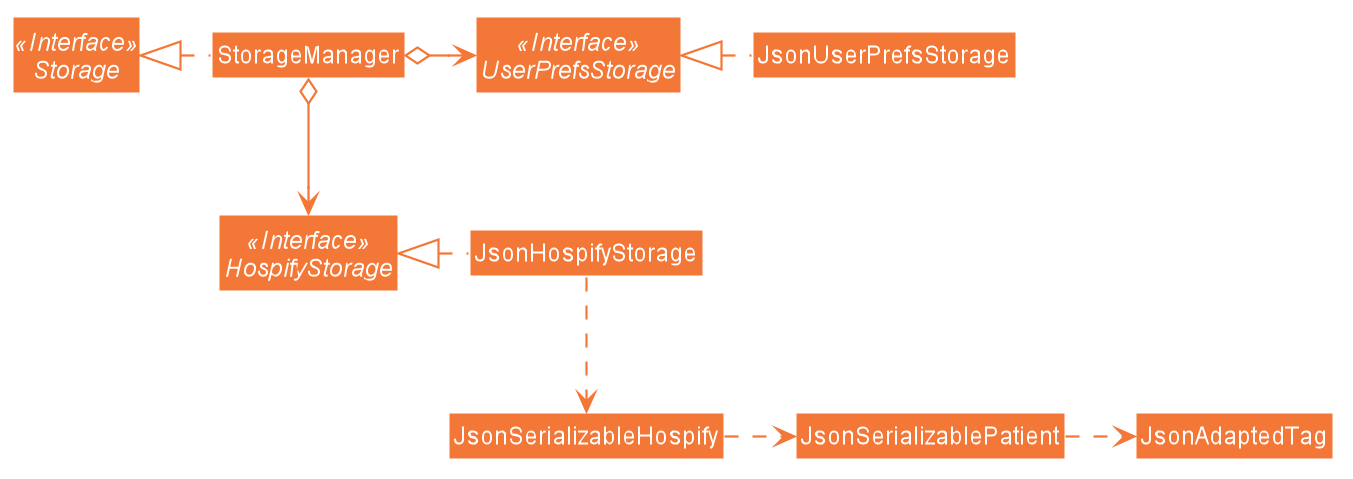
API : Storage.java
The Storage component,
- can save
UserPrefobjects in json format and read it back. - can save the Hospify data in json format and read it back.
3.6 Common classes
Classes used by multiple components are in the seedu.address.commons package.
4. Implementation
In this section, we will be highlighting some key features and how they are being implemented. Example usage scenarios are provided to showcase how the features can be used. Lastly we will also be looking at other design choices and the rationale behind the current implementations.
4.1 Find by name or NRIC feature (by Cao Qin)
The find feature enables users to find patients by specifying their names (anyone from their first names, middle names, or last names) or Nric numbers.
4.1.1 Implementation
The following are the changes made to achieve this feature:
- A
KeywordPredicateclass is added under themodel/patientpackage. -
FindCommandclass is modified to keep a KeywordPredicate object as a field. -
FindCommandParserclass is modified to parser both patients’ names and nric numbers.
Given below is a usage scenario of this feature using both name and Nric as inputs.
Step 1. The user executes add n/Alex Yeoh ic/S0000001A p/87438807 e/alexyeoh@example.com a/Blk 30 Geylang Street 29, #06-40 mr/www.sample.com/01 to add a patient named Alex Yeho and with a Nric number “S0000001A”.
Step 2. The user executes add n/Bernice Yu ic/S0000002A p/99272758 e/berniceyu@example.com a/Blk 30 Lorong 3 Serangoon Gardens, #07-18 mr/www.sample.com/02 to add a patient named Bernice Yu and with a Nric number “S0000002A”.
Step 3. The user executes find Yeoh command to find a patient with the name “Yeoh”.
Step 4. The user executes find S0000001A command to find a patient with the Nric number “S0000001A”.
Step 5. The user executes find Alex S0000002A command to find 2 patients: one with the name “Alex” and one with the Nric number “A0000002S”.
Step 6. The user executes list command to view the full list of patients.
The sequence diagram below illustrates the interaction between Logic and Model components when the user executes find Alex S0000002A command as in Step 5.

![]() Note on sequence diagram:
Note on sequence diagram:
- The lifeline for
findCommandshould end at the destroy marker (X) but due to a limitation of PlantUML, the lifeline reaches the end of the diagram.
In the Logic Component, when user inputs find Alex S0000002A, these are the key methods invoked:
-
LogicManager#execute("find Alex S0000002A"): TheLogicManagertakes in the command text string (“find Alex S0000002”). -
HospifyParser#parseCommand("find"): TheHospifyParserparses the users’ input and recognizes the command word, “find”, and aFindCommandis created. -
FindCommand#execute(model): TheFindCommanduses theupdateFilteredPatientListmethod ofModelto update the displayed patient list and returns aCommandResultobject which represents the result of a command execution.
In the Model Component, This is the key method invoked:
-
Model#updateFilteredPatientLis(predicate):Modeluses this method to update the displayed patients list.
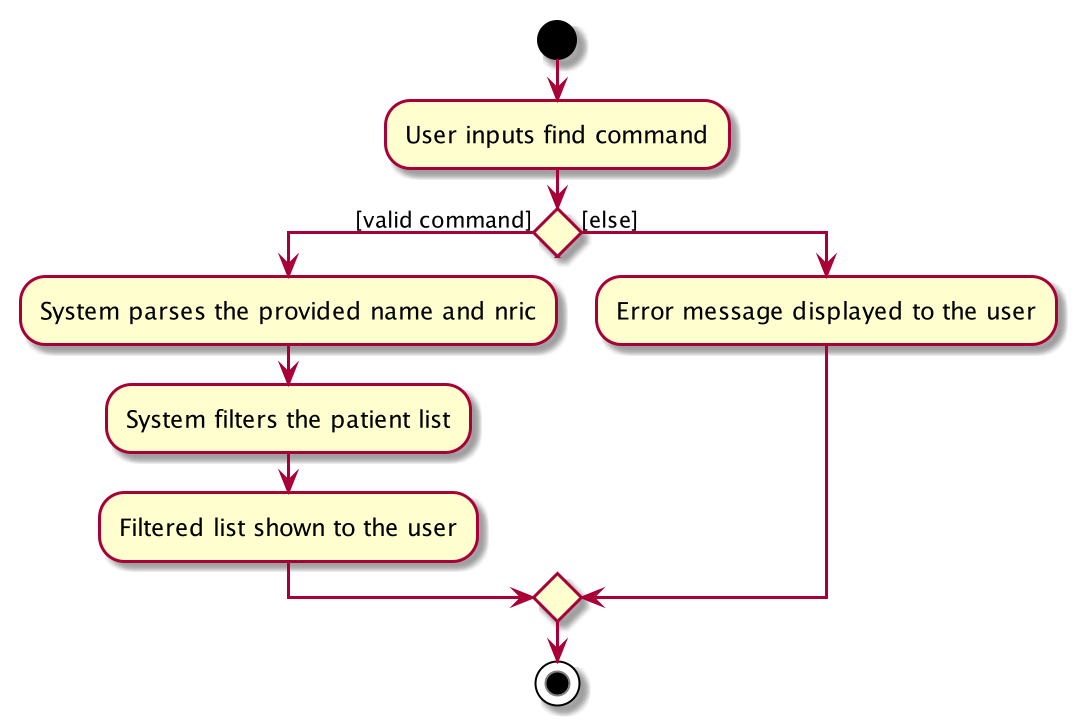
The following activity diagram summarizes what happens when the user inputs a find command.
4.1.2 Design Consideration
Aspect: What to use as reference to find the wanted patient?
-
Alternative 1 (current choice): Requires users to enter names or Nric numbers or both of the patients wanted.
- Pros: Easier for users to find the patients wanted if they know either the wanted patients’ names or Nric numbers.
- Cons: Harder to implement because the input may contain a mix of names and Nric numbers.
-
Alternative 2: Users can only enter Nric numbers of the patients wanted.
- Pros: Easy to implement, and the finding results are accurate(the list will display the exact patients with the given Nric numbers).
- Cons: Inconvenient for users if they only know the patients’ names.
4.2 Add Patient + Medical Record URL feature (by Cedric Lim Jun Wei)
4.2.1 Implementation
The Medical Record URL (MR URL) feature enables users to add medical records of patients by specifying a URL containing his/her online medical record document. The following are the additions required for this feature:
- A
MedicalRecordclass is added under thepatientpackage. - A new prefix
mr/is created to be used with theaddandeditcommand to allow users to specify the url. - A new
MR URLbutton is added to individual patient’s tab to allow users to copy the medical record url onto the system clipboard.
To understand how the Medical Record feature can be used, let us take a look at how the add command is implemented first.
-
After the input is entered by the user, the
LogicManager#execute(String commandText)method calls theHospifyParser#parseCommand(String userInput)method for Hospify to parse and interpret the user input. -
Based on
addcommand word, anAddCommandParserobject is created and theAddCommandParser#parse(String args)method is called for theAddCommandParserto parse and interpret the arguments in the user input. -
Subsequently, an
AddCommandobject is created and returned as an output to theLogicManager#execute(String commandText)method. -
The
LogicManager#execute(String commandText)method then calls upon theAddCommand#execute(Model model)method, which in turn calls theModel#addPatient(Patient patient)method to add the new patient into Hospify. -
Finally, a new
CommandResultobject is returned with a success message when the patient is added to Hospify.
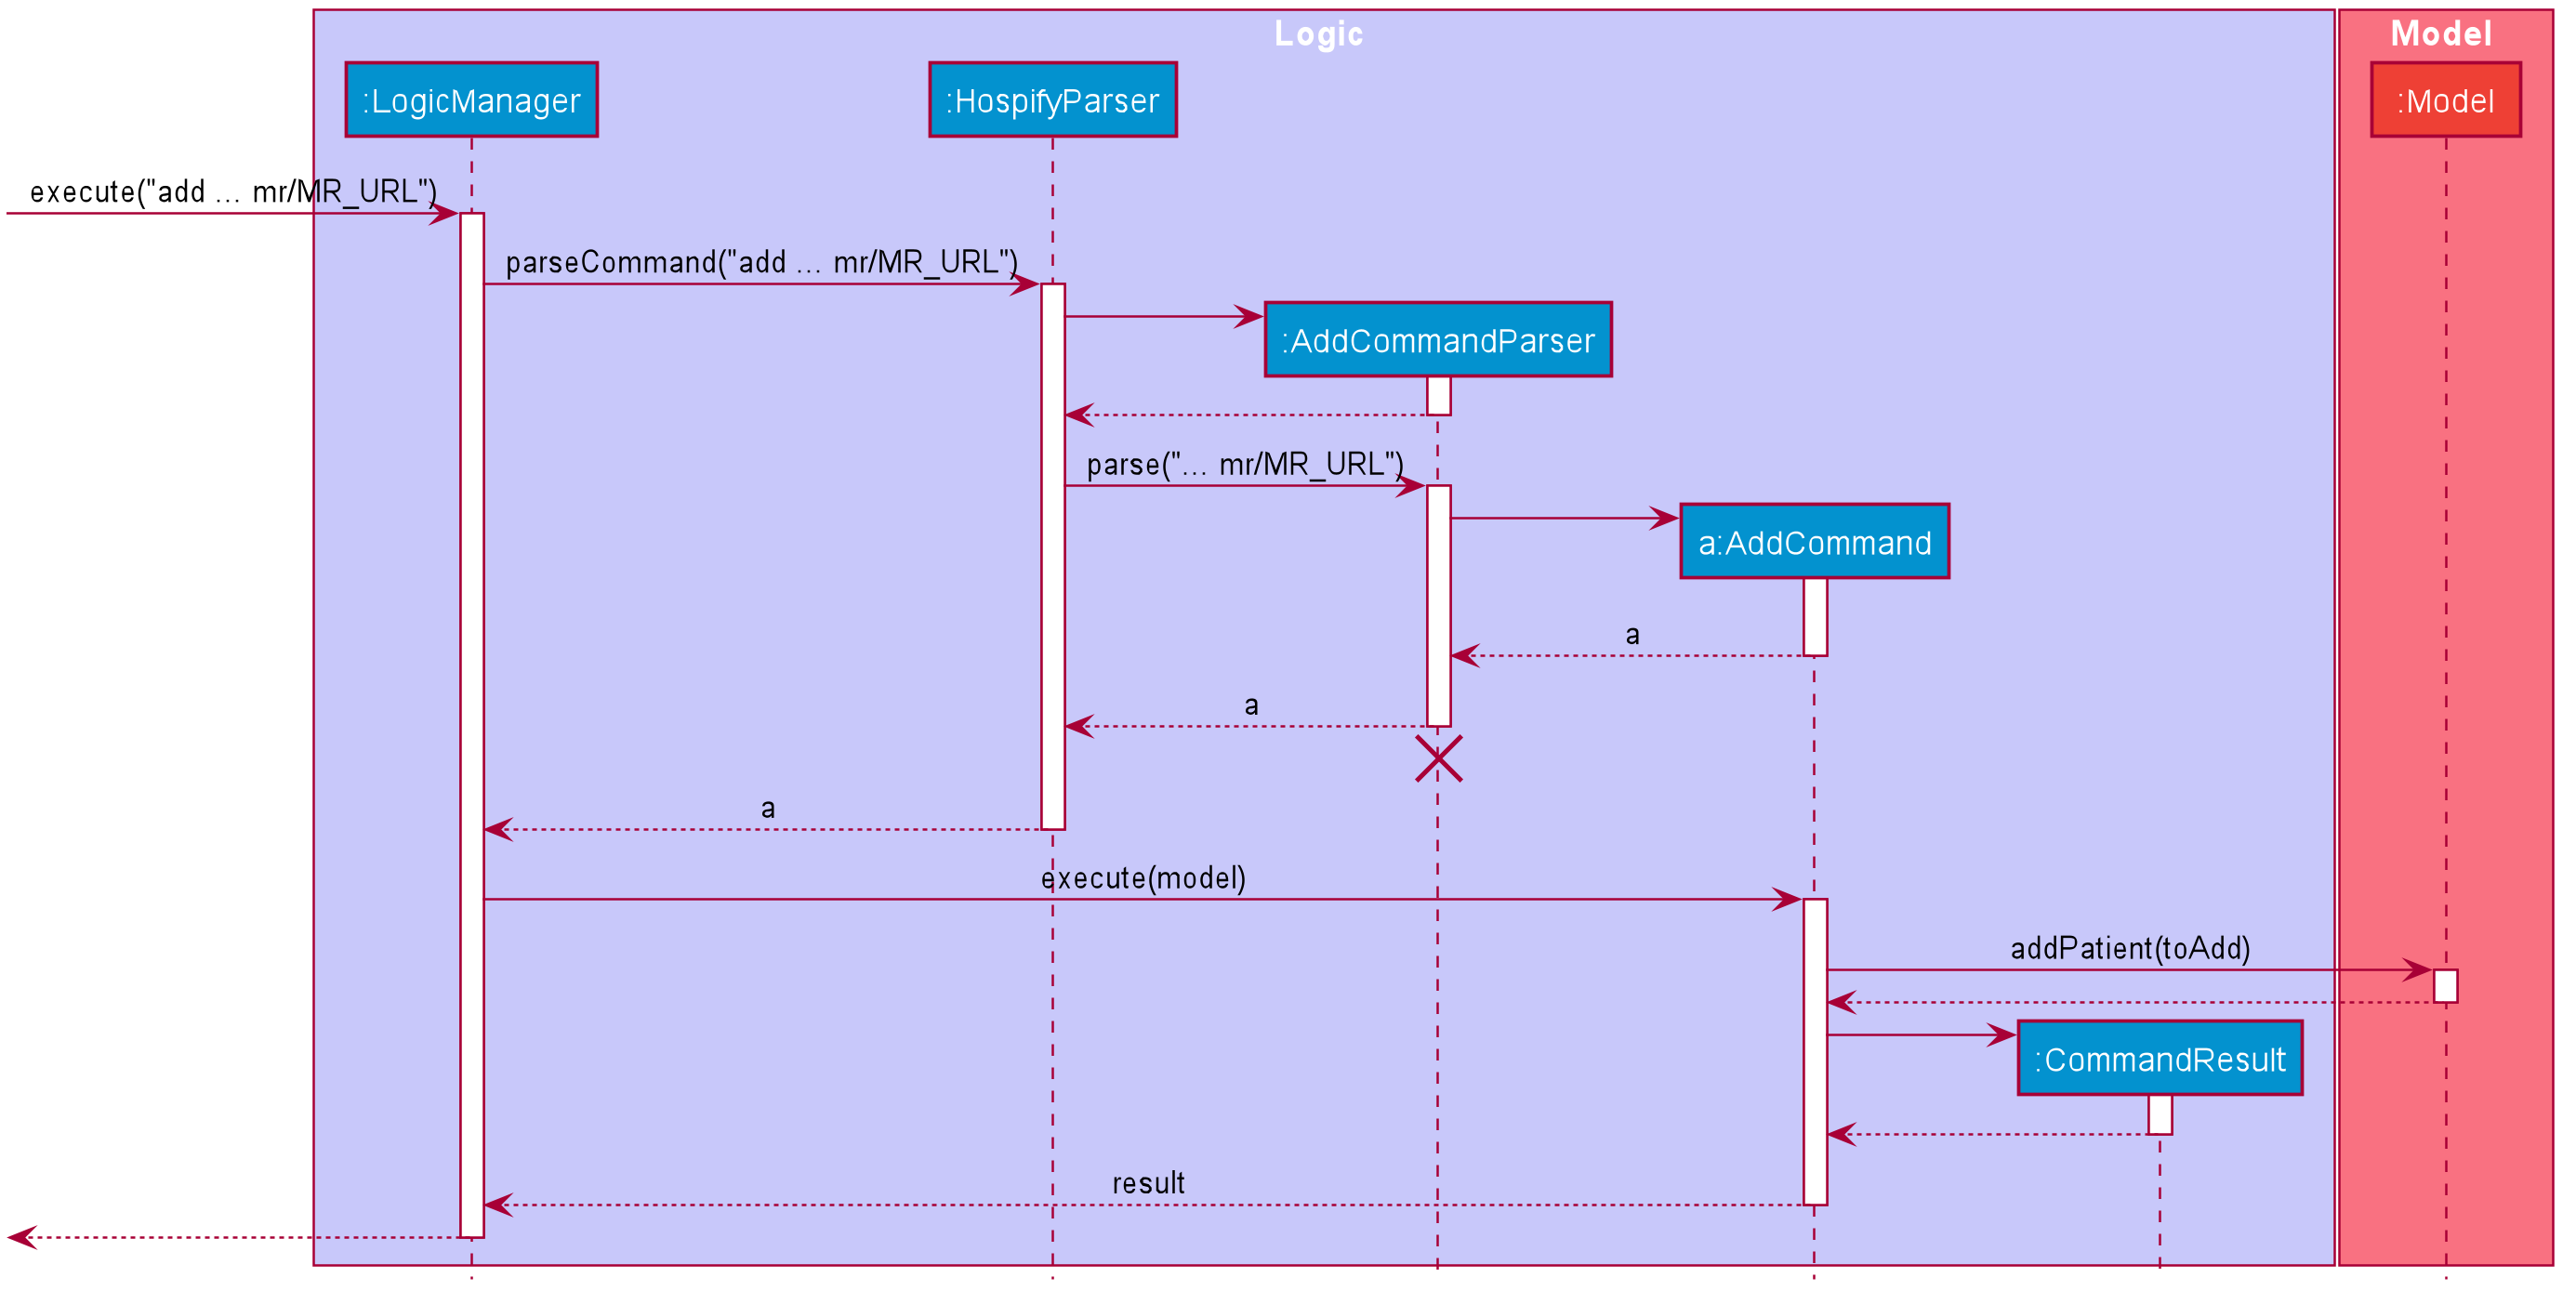
The sequence diagram below illustrates how the operation of adding a patient works.
![]() Note on sequence diagram:
Note on sequence diagram:
-
The lifeline for
AddCommandParsershould end at the destroy marker (X) but due to a limitation of PlantUML, the lifeline reaches the end of diagram. -
For simplicity, the complete line of user input for the
addcommand is omitted, showing only themr/www.medicalrecorddoc.com/patients1234567portion, which is further simplified tomr/MR_URLin the sequence diagram. -
The
Patientobject created is shown astoAddin the sequence diagram. -
The steps above illustrates a typical successful execution of the
addcommand. In the activity diagram below, we will summarise all possible outcomes of executing this command.
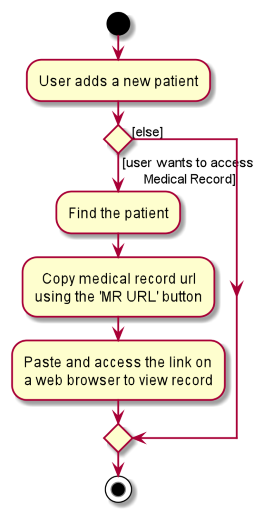
The MR URL is one the required fields that users must provide for the add command. Given below is an example usage scenario.
Step 1. The user executes add n/John Doe … mr/www.medicalrecorddoc.com/patients1234567 command to add patient John Doe in Hospify.
Step 2. The user now decides to access the medical record of patient John Doe and can then do so by clicking on the MR URL button located at the bottom right corner of the patient’s tab.
In doing so, the PatientCard#copyUrl() is called on the mouse click and the link to the medical record url is copied to the system clipboard.
Step 3. The user opens his/her preferred web browser and paste the url that was copied in step 2, and can then access the online medical record.
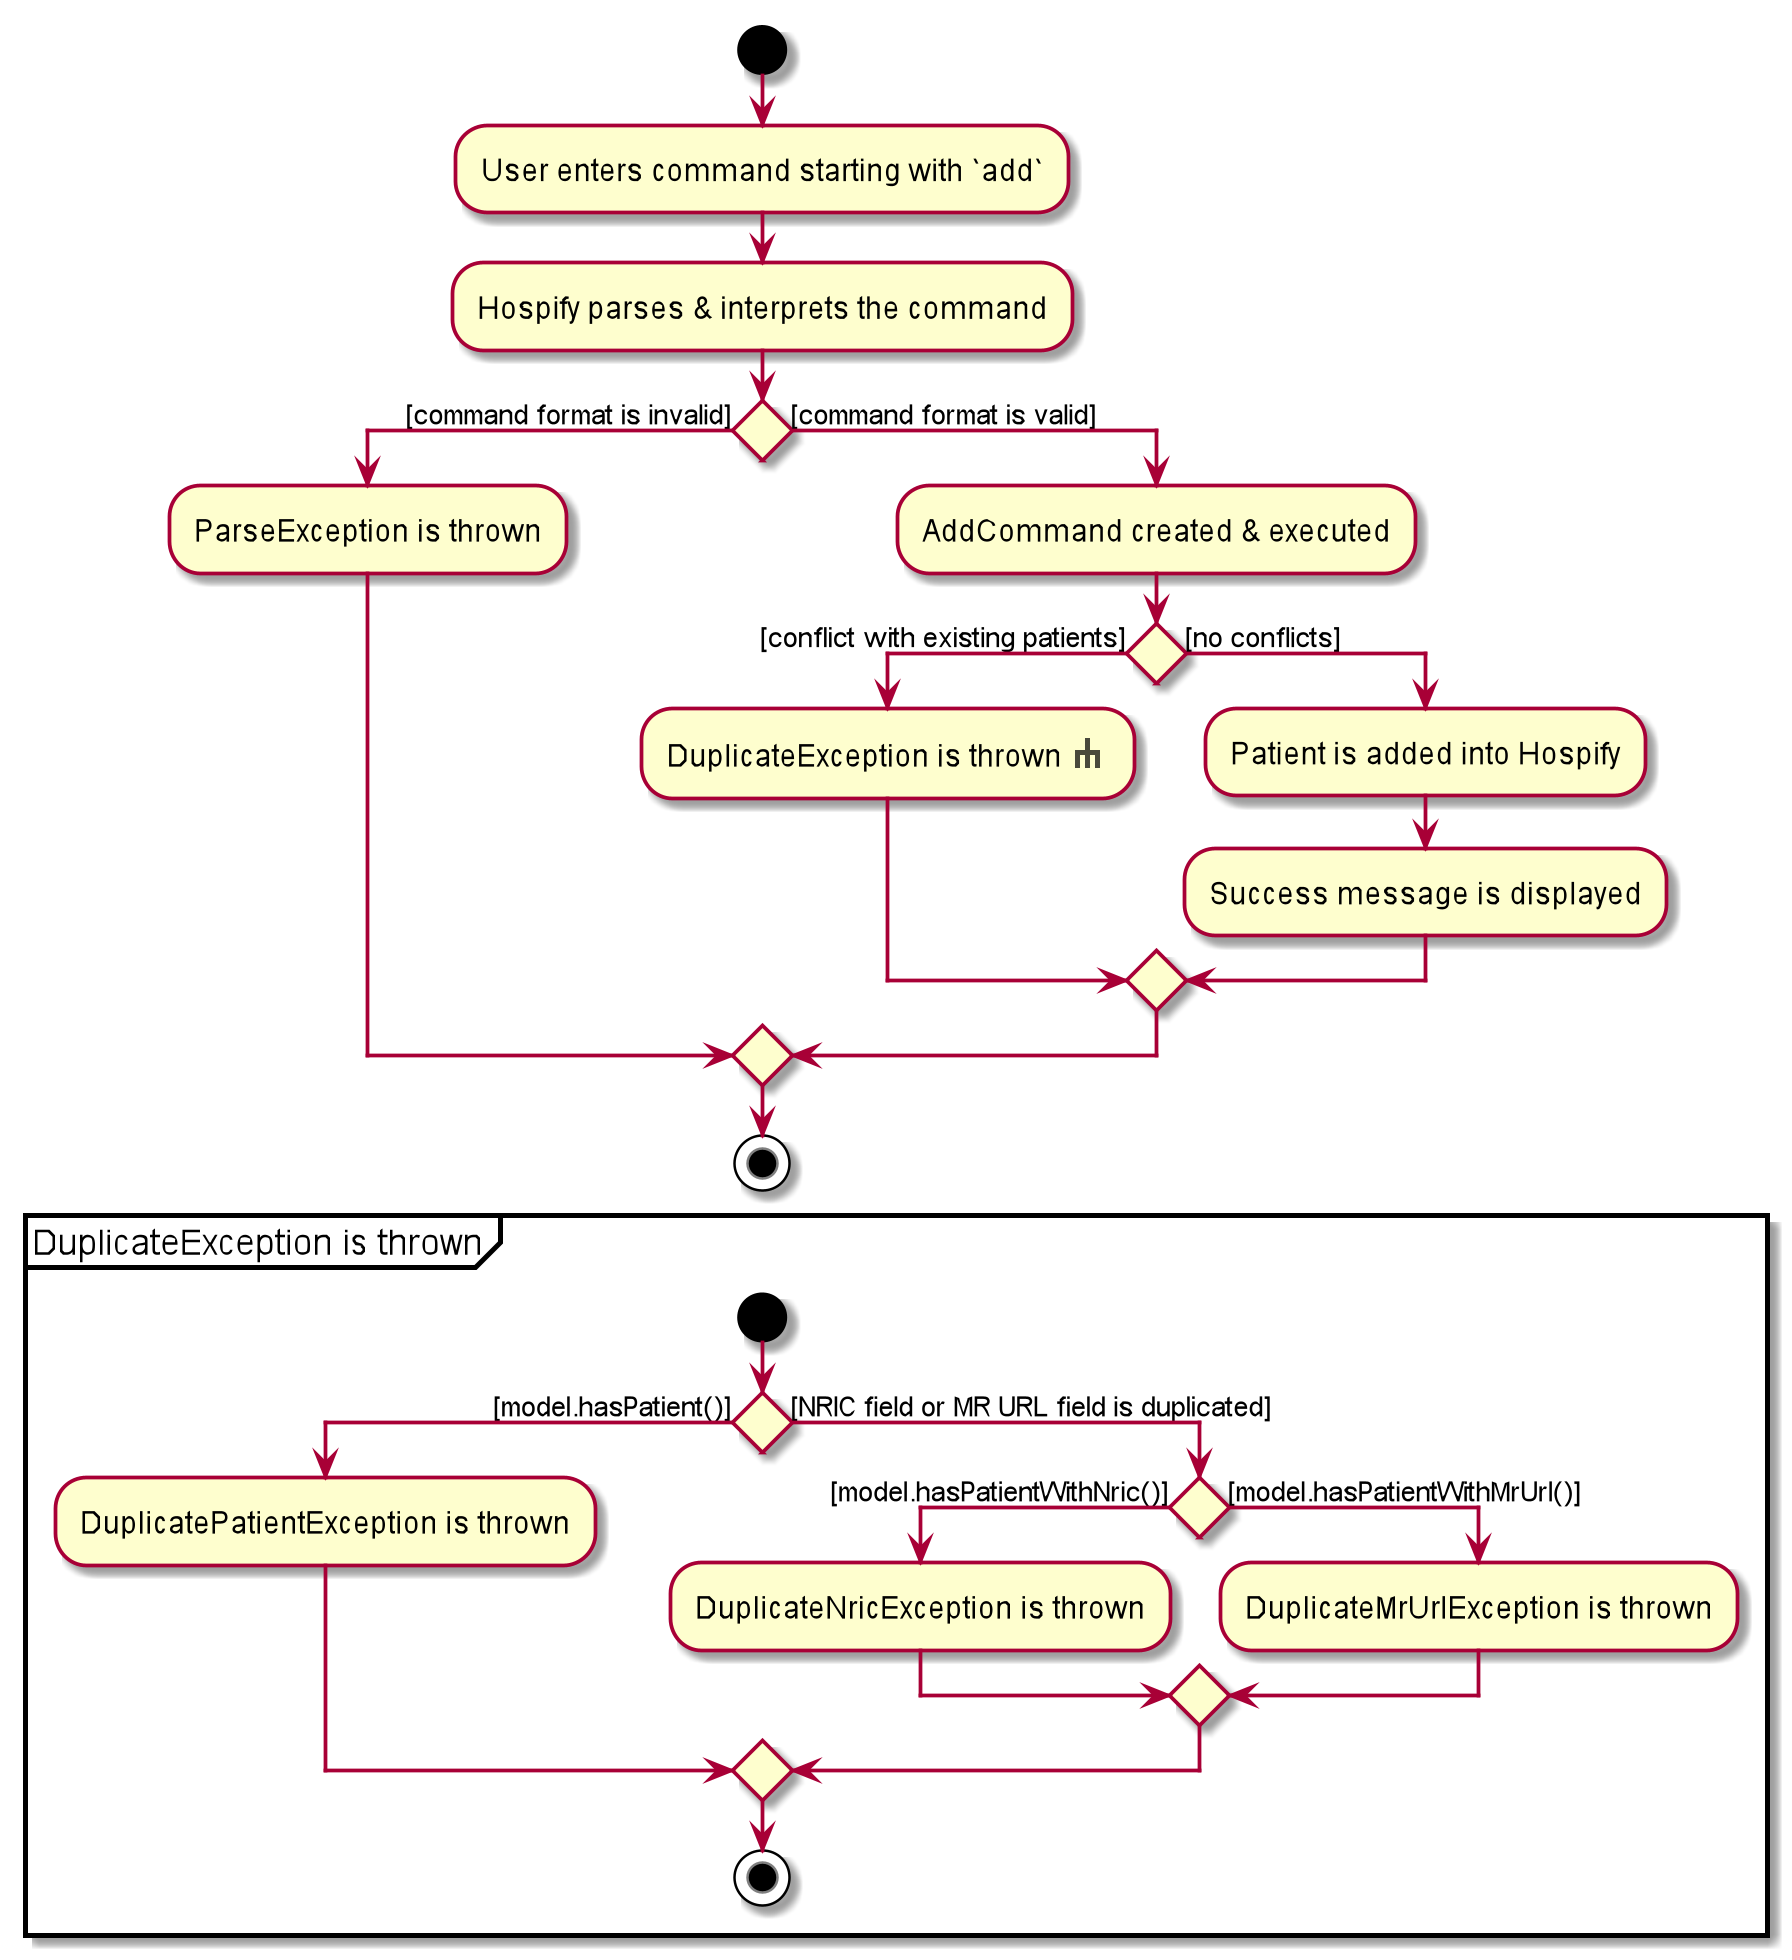
The following activity diagram summarizes what happens when a user adds a new patient:
4.2.2 Design consideration:
Aspect: How medical records are added and accessed
-
Alternative 1 (current choice): Requires users to enter a unique url that links to the patient’s online medical record each time a new patient is first added
- Pros: Easy to implement and to edit medical records.
- Cons: May be cumbersome for users to keep generating a new url for new patients.
-
Alternative 2: Automatically generates an empty medical record when a new patient is added (which can be accessed/edited within Hospify).
- Pros: Independent from external and online platforms (fully integrated within the application).
- Cons: Harder to implement and less freedom to edit medical records.
4.3 Sort feature (by Chong Jia Le)
4.3.1 Implementation
This feature enables the user to sort medical records of patients in ascending order based on : name or NRIC. The following are the additions required for this feature:
- A
SortByclass, which is a custom comparator, is added under thecommandspackage. - A
SortCommandclass is added under thecommandspackage. - A
SortCommmandParserclass is added under theparserpackage to parse the sort command and recognize how patients are to be sorted.
Given below is an example usage scenario.
The sequence diagram below illustrates Logic and Model Components when the user executes sort name command to sort patients in Hospify alphabetically.
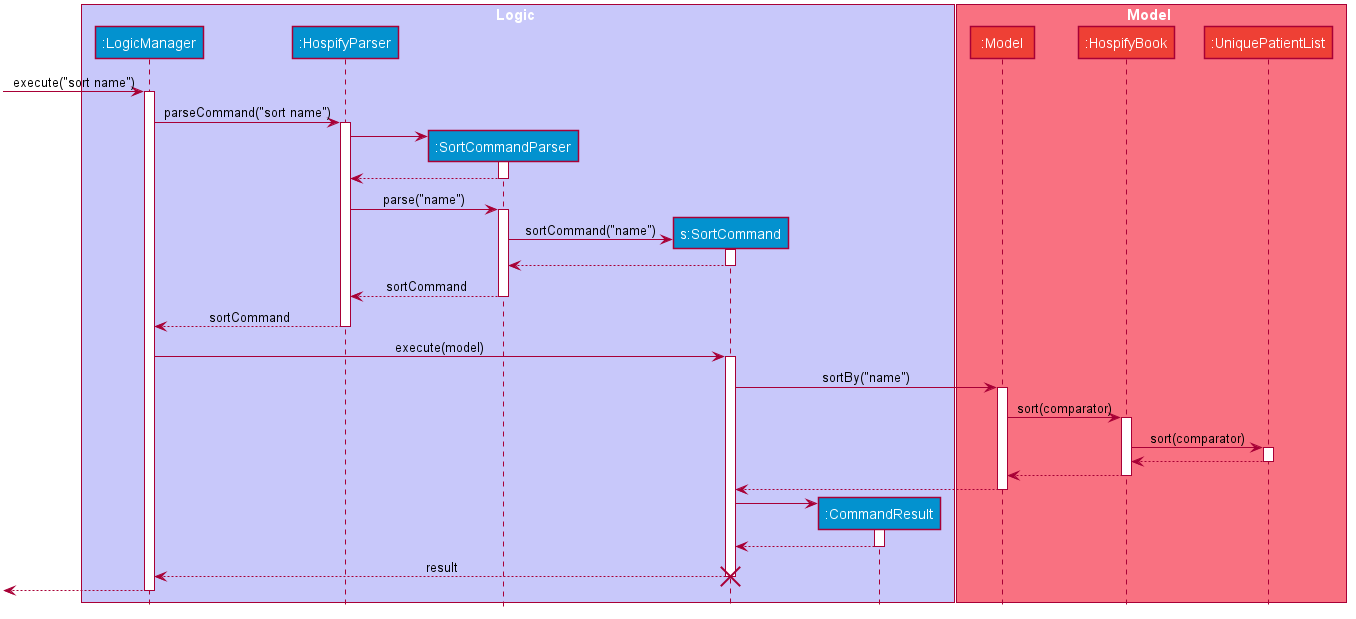
![]() Note on sequence diagram:
Note on sequence diagram:
- The lifeline for
SortCommandshould end at the destroy marker (X) but due to a limitation of PlantUML, the lifeline reaches the end of diagram.
In the Logic Component, after user inputs “sort name”, these key methods:
-
LogicManager#execute("sort name"): TheLogicManagertakes in a command text string (“sort name/nric”). -
HospifyParser#parseCommand("sort name"): TheHospifyParserparses the users input as a command word, “sort”, and predicate, “name”. Using the command word, aSortCommandParseris created. -
SortCommandParser#parse("name"): TheSortCommandParsertakes in the predicate, “name”, and parses it to create aSortCommand, with a specific predicate. A custom comparator,SortBy, is created based on the predicate. -
SortCommand#execute(model): TheSortCommanduses theSortByto sort the patients and returns aCommandResultobject which represents the result of a command execution.
In the Model Component, the following key methods are used:
-
Model#sort(sortBy): sorts the patients inHospifyusing the givensortBycomparator. -
HospifyBook#sort(sortBy): sorts patients stored in aUniquePatientListusing the givensortBycomparator. -
UniquePatientList#sort(sortBy): sorts the patients stores in a stream using sort function.
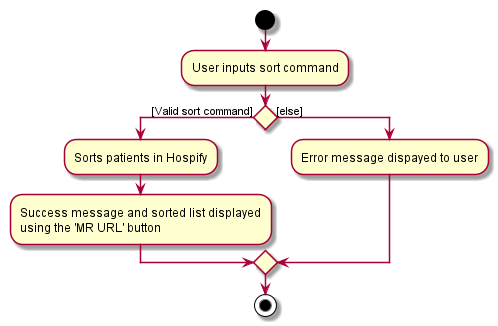
After the command is executed, a success message is displayed and the sorted list is shown in the application.
The following activity diagram summarizes what happens when the user inputs a sort command.
4.3.2 Design consideration:
Aspect: How sort is implemented
-
Alternative 1 (current choice): The list is only sorted at the moment when user inputs sort command
- Pros : Easy to implement and quick to add new patients.
- Cons : Cumbersome for users to repeatedly input sort command after each addition of new patients.
-
Alternative 2: The list remains sorted once user inputs sort command
- Pros : More convenient for user as list will sort itself after every addition of patient.
- Cons : Harder to implement and might make the app slower.
4.4 Count feature (by Chong Jia Le)
4.4.1 Implementation
This feature enables the user to count the number of patients in Hospify. The following are the additions required for this feature:
- A
CountCommandclass is added under thecommandspackage.
Given below is an example usage scenario.
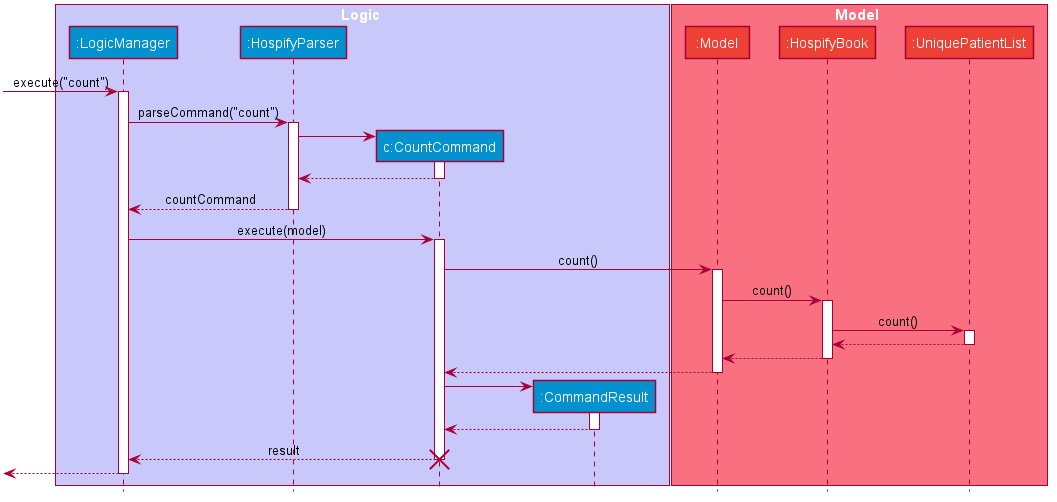
The sequence diagram below illustrates Logic and Model Components when the user executes count command to sort patients in Hospify alphabetically.
![]() Note on sequence diagram:
Note on sequence diagram:
- The lifeline for
SortCommandshould end at the destroy marker (X) but due to a limitation of PlantUML, the lifeline reaches the end of diagram.
In the Logic Component, after user inputs “count”, these key methods:
-
LogicManager#execute("count"): TheLogicManagertakes in the command text string (“count”). -
HospifyParser#parseCommand("count"): TheHospifyParserparses the users input and recognizes the command word, “count”, and aCountCommandis created. -
CountCommand#execute(model): TheCountCommanduses the count method ofModelto count the number of patients and returns aCommandResultobject which represents the result of a command execution.
In the Model Component, the following key methods are used:
-
Model#count(): counts the patients inHospifyusing the count method inHospifyBook. -
HospifyBook#scount(): counts patients using the count method inUniquePatientList. -
UniquePatientList#count(): counts the patients using the count function of Streams.
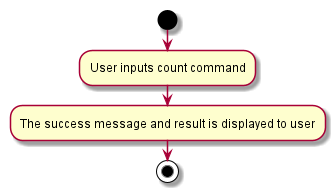
After the command is executed, a success message is displayed in the application. (i.e. There are 10 patients.)
The following activity diagram summarizes what happens when the user inputs a count command.
4.4.2 Design consideration:
Aspect: How count is implemented
-
Alternative 1 (current choice): Count command only counts the total patients in record
- Pros : Easy to implement and quick to count.
- Cons : User is unable to count number of search results.
-
Alternative 2: Count command can count number of results after find is executed.
- Pros : User is able to count number of search results.
- Cons : Harder to implement.
4.5 Appointment feature (by Gabriel Teo Yu Xiang)
4.5.1 Implementation
The appointment feature will enable clinics to manage patient’s appointments within Hospify, thus avoiding the need for spreadsheets. Users have the ability to show, add, edit and delete appointments within Hospify. The following are the additions required for this feature:
- An
Appointmentclass is created in thepatientpackage. - A new prefix
appt/to be used with the newAppointmentfield. - 4 new commands specifically for managing patients’ appointments,
showAppt,addAppt,editApptanddeleteAppt. - 3 new additional prefixes
oldappt/,newappt/andd/to represent old appointments, new appointments, and appointment description respectively, which are to be used in theeditApptcommand.
Overview:
To understand how the Appointment feature can be used, let us take a look at an overview of how the addAppt command is implemented first.
-
After the input is entered by the user, the
LogicManager#execute(String commandText)method calls theHospifyParser#parseCommand(String userInput)method for Hospify to parse and interpret the user input. -
Based on
addApptcommand word, anAddApptCommandParserobject is created and theAddApptCommandParser#parse(String args)method is called for theAddApptCommandParserto parse and interpret the arguments in the user input. -
Subsequently, an
AddApptCommandobject is created and returned as an output to theLogicManager#execute(String commandText)method. -
The
LogicManager#execute(String commandText)method then calls upon theAddApptCommand#execute(Model model)method, which in turn calls theModel#setPatient(Patient patient 1, Patient patient 2)andModel#updateFilteredPatientList(boolean true)methods to add the newAppointmentto the patient. -
Finally, a new
CommandResultobject is returned with a success message when theAppointmentis added to the patient.
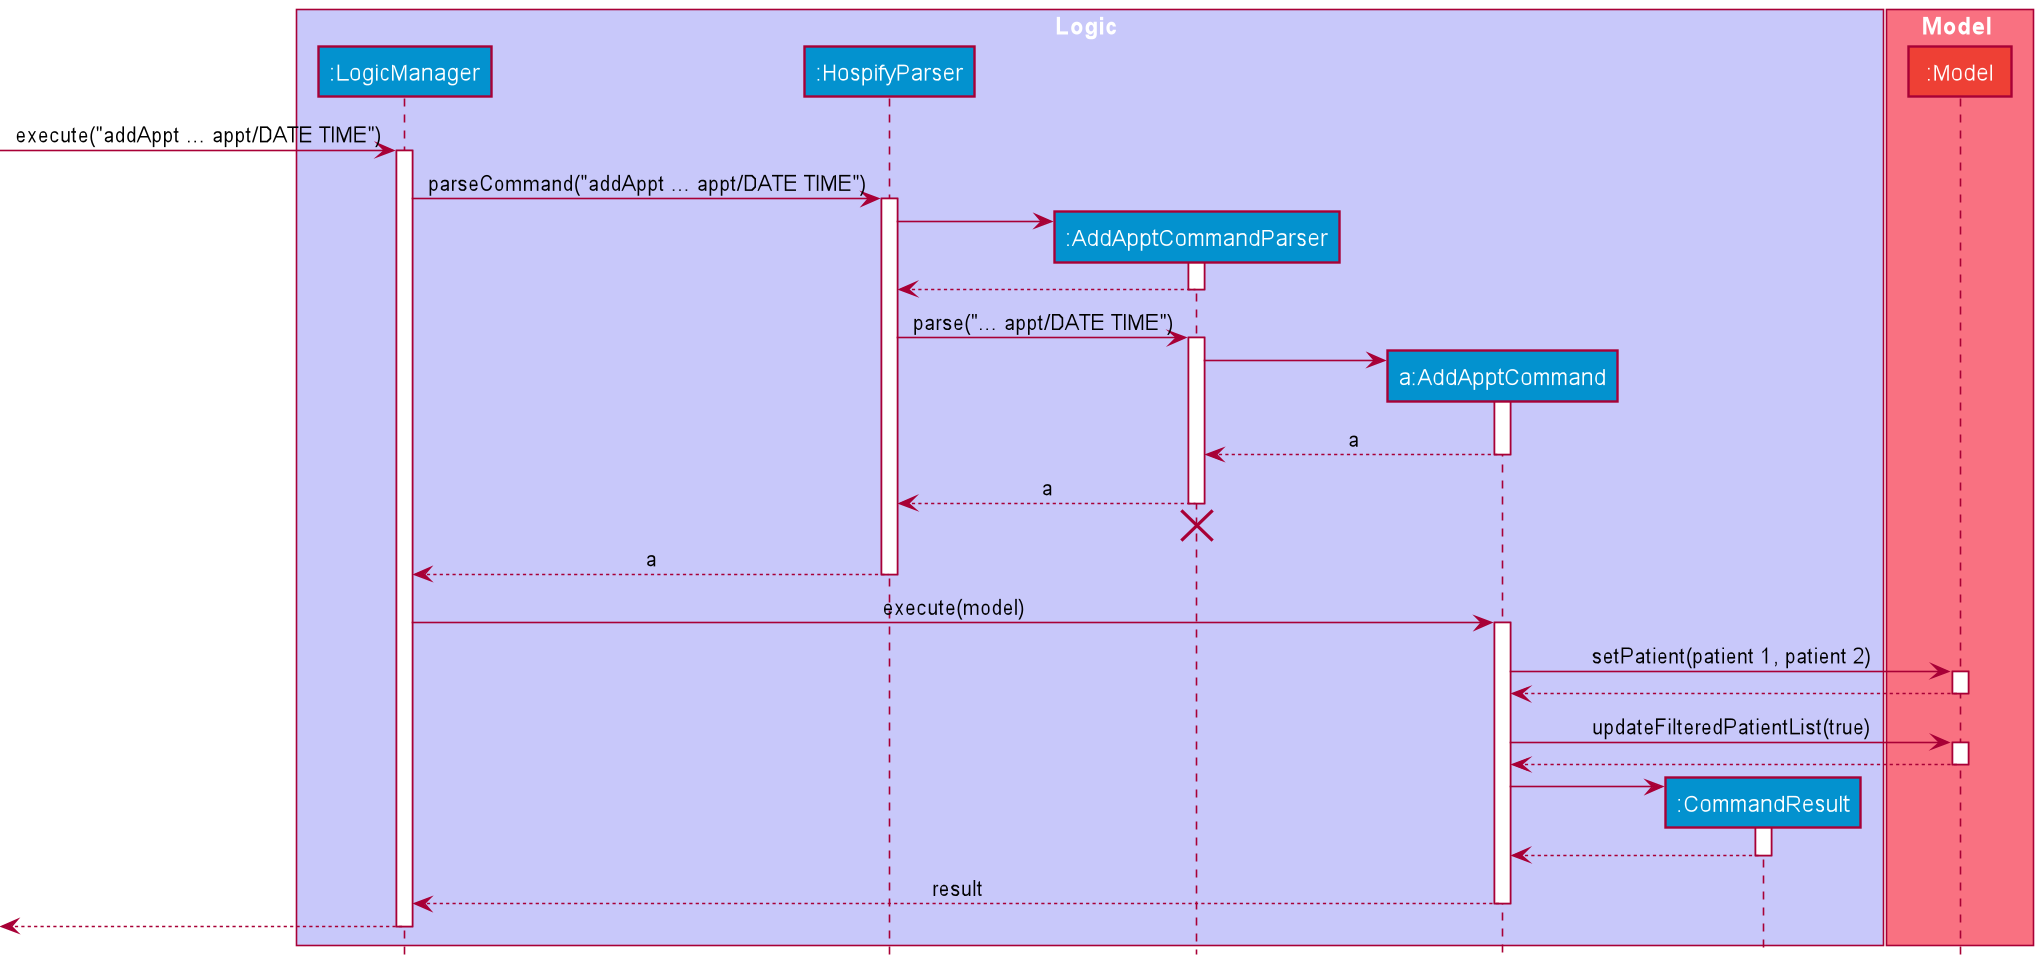
The sequence diagram below illustrates how the operation of adding an Appointment works.
![]() Note on sequence diagram:
Note on sequence diagram:
-
The lifeline for
AddApptCommandParsershould end at the destroy marker (X) but due to a limitation of PlantUML, the lifeline reaches the end of diagram. -
For simplicity, the complete line of user input for the
addApptcommand is omitted, originally referring toS1234567A appt/28/09/2022 20:00 d/Eye Check-up, which is further simplified to... appt/DATE TIMEin the sequence diagram. -
Similarly,
patient 1andpatient 2represent thePatientobject before and after adding theAppointmentrespectively, andPREDICATE_SHOW_ALL_PATIENTShas been simplified totruein the sequence diagram, since it is always evaluated totruein its implementation. -
The steps above illustrate a typical successful execution of the
addApptcommand. In the usage scenario below, we will summarise all other commands related to theAppointmentfeature.
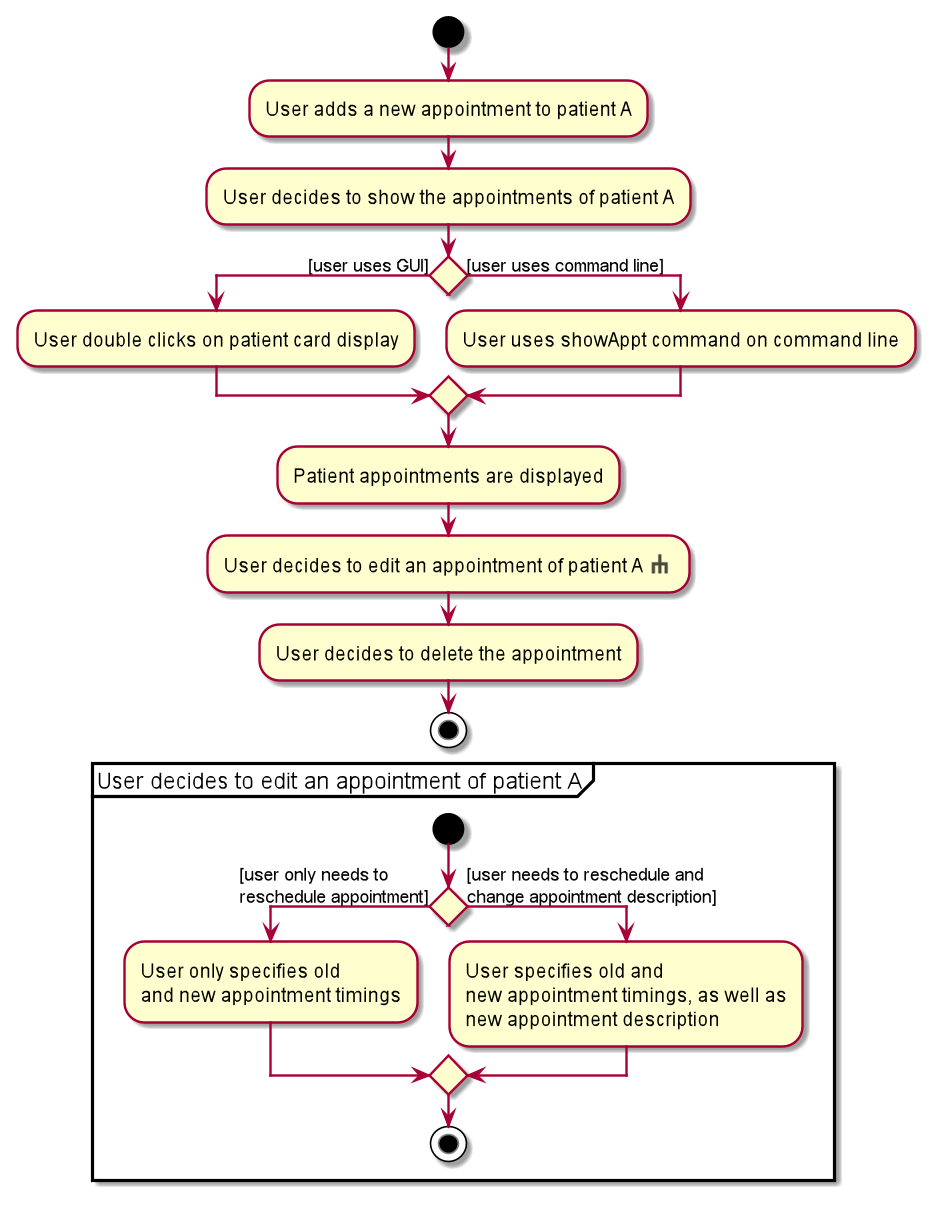
Given below is an example usage scenario using a Patient with NRIC S1234567A.
Step 1. The user executes addAppt S1234567A appt/28/09/2022 20:00 d/Eye Check-up command to add an appointment with the specified time and description to a patient of NRIC S1234567A.
Step 2. The user shows the appointment of the patient by either double clicking on the patient card display via the GUI or using the command showAppt S1234567A.
Step 3. The user now decides to edit the appointment of the patient of NRIC S1234567A and executes editAppt S1234567A oldappt/28/09/2022 20:00 newappt/14/10/2022 14:00 to change the appointment date and time accordingly.
Alternatively, the user can also choose to edit the appointment description along with the timing as well, by specifying the new description in the command as such:
editAppt S1234567A oldappt/28/09/2022 20:00 newappt/14/10/2022 14:00 d/Revisit.
Step 4. The user then decides to delete the appointment of the patient of NRIC S1234567A and executes deleteAppt S1234567A appt/14/10/2022 14:00 to delete the specified appointment.
The following activity diagram summarizes what happens when a user executes the above usage scenario:
4.5.2 Design consideration:
Aspect: How appointments are added and managed
-
Alternative 1 (current choice): Appointments are stored as a
HashSetattribute within each patient.- Pros: Easy to implement and each patient can have multiple appointments.
- Cons: May be messy as the number of appointments can get very large depending on the patient, making it difficult to keep track.
-
Alternative 2: An Appointment also keeps track of additional details. (appointment history, time started, time ended)
- Pros: Able to store more detailed information about a patient’s appointments.
- Cons: Harder to implement and more details for the user to manage and keep track of.
-
Alternative 3: Each patient only stores one Appointment.
- Pros: Easy to implement and manage.
- Cons: Very limited functionality as each patient can only have one appointment booked at a time.
4.6 Show Appointment feature (by Peh Jun Siang)
Shows the medical records of a patient either through the CLI or the GUI in a Tableview.
4.6.1 Implementation
Overview:
The Activity Diagram below shows an overview for users to show the Patient’s appointments through
the GUI or CLI.
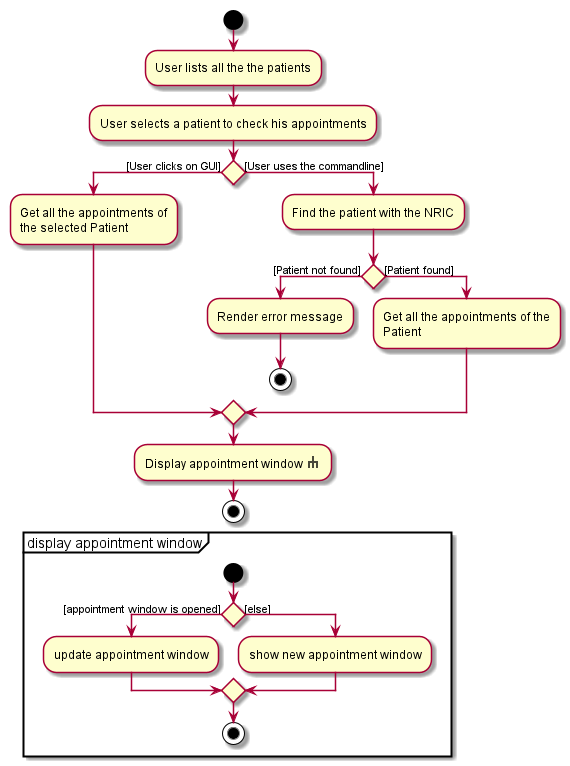
Detailed Implementation:
- Using the
GUI-
Sequence Diagram for
GUI
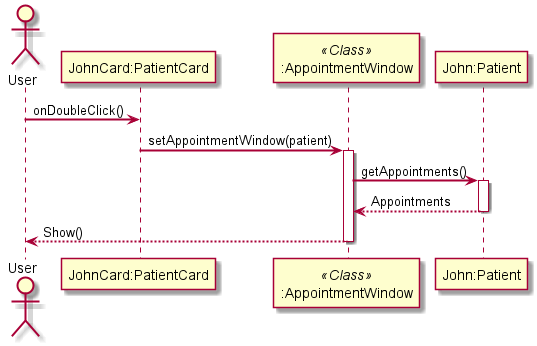
- Clicking on the Patient Card triggers the
PatientCard#onDoubleClickcontroller which updates the staticAppointmentWindowhoused in MainWindow. - The controller calls
MainWindow#setAppointmentWindow(patient)to update the information of the patient inAppointmentWindow. -
AppointmentWindowretrieves all the appointments of the patient and map the appointments intoAppointmentDescription(s). The purpose ofAppointmentDescriptionis to format long strings, and make sure it looks good in the column of the tableView before callingAppointmentWindow#show()to show the window.
- Clicking on the Patient Card triggers the
-
Sequence Diagram for
- Using the
CLI
ShowAppton theCLIis more complicated than using theGUIbecause we have to find the patient and check if the NRIC entered is valid. On theGUI, we only have to use a controller to check if the patient is clicked and show theAppointmentWindowon the click event.-
Sequence Diagram for
CLI
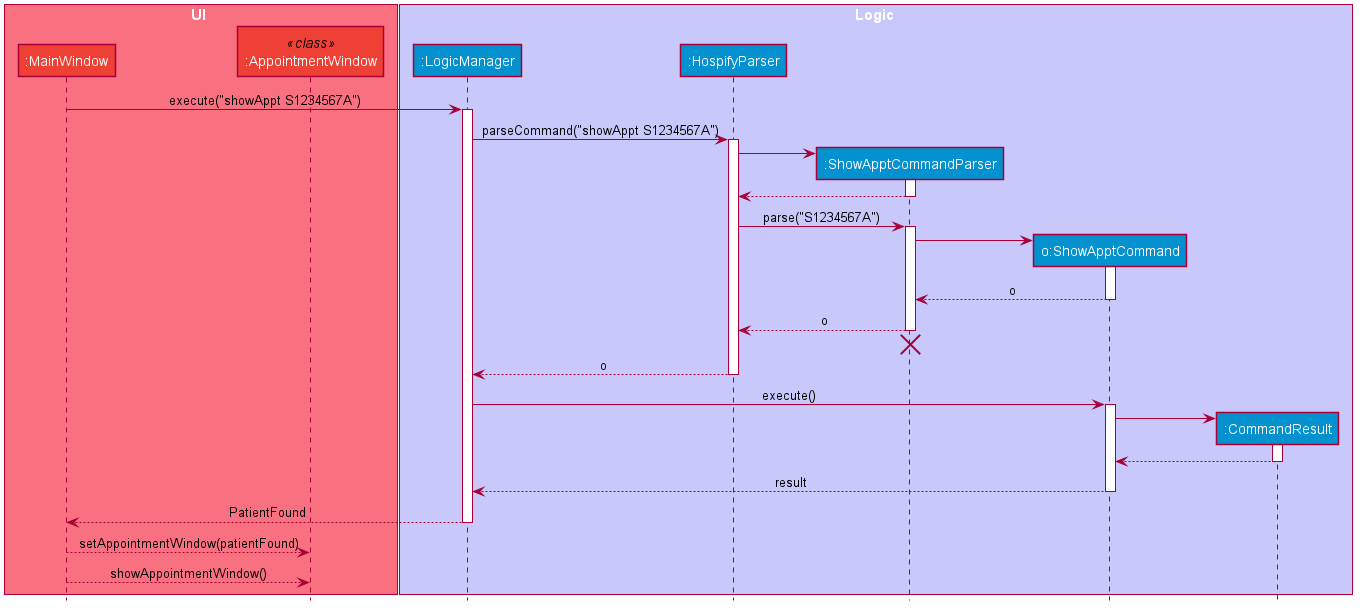 Description
- The
MainWindowtakes in the String command from the user in the UI. -
MainWindowpasses the String command toLogicManager#execute()under Logic showed in the Sequence Diagram above. -
ShowCommandparser#parse()verifies the command is in the stipulated format. -
LogicManager#execute()executes the showAppt command. -
ShowApptCommand#execute()then verifies if only ONE patient with the NRIC is found. Otherwise, it throws a commandException which notifies the user about the exact error. - If the patient is found successfully,
ShowApptCommand#execute()updates the patient found to theAppointmentWindowhoused in MainWindow by calling the static methodMainWindow#setAppointmentWindow(patient). - The
MainWindowreceives the command result fromLogicManager#execute()and checks if the command is requiresAppointmentWindowto be shown by calling theCommandResult#isShowAppointment(). - The process in which the appointments are retrieved and rendered are similar to the
GUIdescribed above. - Finally,
MainWindowshows the calls theAppointmentWindow#show().
- The
-
Sequence Diagram for
![]() Important: AppointmentWindow is STATIC (i.e. only ONE instance of AppointmentWindow is allowed).
This design is to prevent Users from opening multiple windows of the same patient and freezing the App.
Important: AppointmentWindow is STATIC (i.e. only ONE instance of AppointmentWindow is allowed).
This design is to prevent Users from opening multiple windows of the same patient and freezing the App.
4.7 Help feature (by Peh Jun Siang)
Overview:
The Help window shows all the commands that are available to Hospify.
Implementation:
The process in which the HelpWindow is shown is similar to the showApptCommand
using the CLI.
The only main differences are,
- The
HelpWindowdoes not have a parser. - Instead of retrieving appointments, it retrieves the
COMMAND_USAGEfrom each of the commands and render them into aCommandDescriptionsimilar toAppointmentDescriptionwhich is responsible from making the Strings look good in theHelpWindow. -
MainWindow#execute()checks forisHelpWindow()and callsHelpWindow#show()instead ofAppointmentWindow#show().
The process in which the CommandDescription are rendered into a tableView is identical
to showApptCommand.
5. Documentation, logging, testing, configuration, dev-ops
6. Appendix: Requirements (by Gabriel Teo Yu Xiang)
6.1 Product scope
Target user profile:
- Administrative staff in clinics
- has a need to manage a significant number of patients and their respective medical records
- prefers desktop apps over other types
- can type fast
- prefers typing to mouse interactions
- is reasonably comfortable using CLI apps
Value proposition:
- What problem does it solve?
- Many small clinics still use hard copies to store patients’ medical records. The database can get really large after many years. It is very expensive and time constraining to archive medical records and find medical records of patients when they revisit. There are also a lot of documents and folders which require a lot of physical space to store.
- How does it make their lives easier?
- We will build an easily accessible and secure system that helps clinics to store the patients’ information and medical records. It will enable the admin staff to easily reach out to the patients and doctors and help them to contact each other.
6.2 User stories
Priorities: High (must have) - * * *, Medium (nice to have) - * *, Low (unlikely to have) - *
| Priority | As an … | I want to … | So that I can… |
|---|---|---|---|
* * * |
admin staff who is a new user | see usage instructions | refer to instructions when I forget how to use the App |
* * * |
admin staff | add a new patient | store a new patient’s medical records |
* * * |
admin staff | delete a patient | remove entries that I no longer need |
* * * |
admin staff | find a patient by name | locate details of patients without having to go through the entire list |
* * |
admin staff with many patients in the App | view the number of patients | have an overview of the size of the database |
* * |
admin staff | make new appointments for patients | arrange an appointment timing easily |
* * |
admin staff | cancel appointments for patients | cancel an appointment timing easily |
* * * |
admin staff | access and retrieve medical records (like drug allergies) of patients | obtain them when requested by doctors |
* * * |
admin staff | access and retrieve prescription list of patients | obtain them when requested by nurses |
* * * |
admin staff | store NRIC of patients | uniquely identify patients and detect duplicates in the App |
* * * |
admin staff | use keywords to scan documents | verify if certain records have already been added |
* * |
admin staff who is a new user | verify the number of entries on the App | make sure that all the hardcopy records are added |
* * * |
admin staff | edit and update the patients’ personal information | make any changes when necessary |
* * |
admin staff with many patients in the App | sort the database according to the patients’ last visit | locate a patient easily |
* |
admin staff | archive appointments and medical records | store away less relevant information about deceased patients or patients who have not visited the clinic for 5 years or more |
6.3 Use cases
(For all use cases below, the System is Hospify and the Actor is the admin, unless specified otherwise)
Use case: UC1 - Add patient information
MSS
- Admin types
addfollowed by patient details. -
Hospify notifies that patient information is added.
Use case ends.
Extensions
-
1a. Hospify detects that the input is in the wrong format.
- 1a1. Hospify requests for the correct data.
-
1a2. Admin enters new data.
Steps 1a1-1a2 are repeated until the data entered are correct.
Use case resumes at step 2.
-
1b. Hospify detects that certain input that should not be duplicated is entered.
- 1b1. Hospify notifies user that the specific input already belong to an existing patient in Hospify.
- 1b2. Hospify requests for valid data.
-
1b3. Admin enters valid data.
Steps 1b1-1b3 are repeated until the data entered are valid and not duplicated.
Use case resumes at step 2.
Use case: UC2 - Delete patient information
MSS
- Admin types
deletefollowed by patient NRIC. - Hospify removes specified patient from the list.
-
Hospify notifies that patient information is deleted.
Use case ends.
Extensions
-
1a. Hospify detects that the input is in the wrong format.
- 1a1. Hospify requests for the correct data.
-
1a2. Admin enters new data.
Steps 1a1-1a2 are repeated until the data entered are correct.
Use case resumes at step 2.
Use case: UC3 - Find patient information
MSS
- Admin wants to find a patient using their name.
- Admin types
findfollowed by keyword (name). - Hospify returns all matches (if any) to the staff.
-
Admin selects the patient of interest.
Use case ends.
Extensions
-
2a. Hospify detects invalid characters (e.g. numbers and symbols).
- 2a1. Hospify requests for the correct data.
-
2a2. Admin enters new data.
Steps 2a1-2a2 are repeated until the data entered are correct.
Use case resumes at step 3.
Use case: UC4 - Compute number of entries
MSS
- Admin types
count. -
Hospify displays the number of patients that are currently not archived.
Use case ends.
Use case: UC5 - Display usage instructions
MSS
- Admin types
help. -
Hospify displays help interface.
Use case ends.
Use case: UC6 - Display patient’s appointment
MSS
- Admin types
ShowApptfollowed by patient NRIC. - Hospify shows a window which shows all of the patient’s appointments.
-
Admin sorts the appointments by earliest to latest or latest to earliest.
Use case ends.
Extensions
- 1a. User with NRIC not found.
- 1a1. Hospify notifies the User that the User is not found.
- 1a2. User enters another NRIC.
- 1b. User enters an invalid NRIC.
- 1b1. Hospify prompts User to enter in the stipulated format.
Steps 1b1 repeats until user enters a valid NRIC.
Use case: UC7 - Display full list of patients
MSS
- Admin types
list. -
Hospify displays a complete list of patients stored in the application.
Use case ends.
Use case: UC8 - Edit patient information
This use case is similar to UC1, except that the admin can choose to edit any field and any number of them.
Use case: UC9 - Sort list of patients by name
MSS
- Admin types
sort name. -
Hospify displays the list of patients sorted by their name in ascending order.
Use case ends.
Use case: UC10 - Sort list of patients by NRIC
This use case is similar to UC9, except that the command sort NRIC is used and the patients are sorted by their NRIC in ascending order.
Use case: UC11 - Add patient appointment
MSS
- Admin types
addAppt, followed by patient NRIC, appointment date and time, and description of appointment. -
Hospify notifies that patient appointment is added.
Use case ends.
Extensions
-
1a. Hospify detects that the input is in the wrong order, the NRIC is invalid, or the appointment date and time format is incorrect.
- 1a1. Hospify requests for the correct data.
-
1a2. Admin enters new data.
Steps 1a1-1a2 are repeated until the data entered are correct.
Use case resumes at step 2.
Use case: UC12 - Edit patient appointment
This use case is similar to UC11, except that the fields required are the patient NRIC, old appointment date and time, and new appointment date and time.
Use case: UC13 - Delete patient appointment
This use case is similar to UC11, except that the fields required are the patient NRIC and the date and time of the appointment to be deleted.
Use case: UC14 - Access patient medical record
MSS
- Admin wants to access the medical record of a patient.
- Admin finds the patient (UC3).
- Admin clicks on the
MR URLbutton. - Hospify copies the medical record url to the system clipboard.
- Admin opens the web browser and pastes the url onto the search bar.
-
Web browser displays the medical record of the patient.
Use case ends.
Extensions
-
1a. Admin types
showMr, followed by patient NRIC.-
1a1. Hospify redirects admin by opening the default web browser.
Use case resumes at step 6.
-
Use case: UC15 - Clear list of patients
MSS
- Admin types
clear. -
Hospify deletes all patient entries stored in the application.
Use case ends.
6.4 Non-Functional Requirements
- Should work on any mainstream OS as long as it has Java
11or above installed. - Should be able to hold up to 1000 patients without a noticeable sluggishness in performance for typical usage.
- A user with above average typing speed for regular English text (i.e. not code, not system admin commands) should be able to accomplish most of the tasks faster using commands than using the mouse.
- The system should work on both 32-bit and 64-bit environments.
- The system should respond within two seconds to user inputs.
- The system should be user-friendly to new users and easy to learn.
- The system should be backward compatible with older versions of the product.
- The system is expected to be able to save and load user input data from the hard drive.
- The system is expected to be able to
sortpatients according to theirname,NRICorappointment. - The system does not support printing of reports (patient details).
- The system does not support syncing data with other clinics’ patients’ details.
6.5 Glossary
- Mainstream OS: Windows, Linux, Unix, OS-X
- NRIC: National Registration Identity Card - A unique identification system with 1 alphabet followed by 7 digits, and another alphabet. E.g X1234567X, where X is an arbitrary Alphabet
- MR URL: Medical Record URL - A unique web address link to a specific patient’s online medical record
7. Appendix: Instructions for manual testing
Given below are instructions to test the app manually.
7.1 Launch and shutdown
-
Initial launch
-
Download the jar file and copy into an empty folder
-
Double-click the jar file.
Expected: Shows the GUI with a set of sample patients. The window size may not be optimum.
-
-
Saving window preferences
-
Resize the window to an optimum size. Move the window to a different location. Close the window.
-
Re-launch the app by double-clicking the jar file.
Expected: The most recent window size and location is retained.
-
7.2 Deleting a patient
-
Deleting a patient while all patients are being shown
-
Prerequisites: List all patients using the
listcommand. Multiple patients in the list. -
Test case:
delete 1
Expected: The first patient (index 1) on the list is deleted. Details of the deleted patient shown in the status message. Timestamp in the status bar is updated. -
Test case:
delete S0000001A
Expected: The patient with NRIC S0000001A is deleted. Details of the deleted patient shown in the status message. Timestamp in the status bar is updated. -
Test case:
delete 0
Expected: No patient is deleted. Error details shown in the status message. Status bar remains the same. -
Other incorrect delete commands to try:
delete,delete x,...(where x is larger than the list size)
Expected: Similar to previous.
-
7.3 Saving data
-
Dealing with missing/corrupted data files
-
Delete the file
data/hospify.json(this is to simulate a missing/corrupted data file). -
Re-launch the app by double-clicking the jar file.
Expected: A newdata/hospify.jsonfile containing a set of sample patients is created.
-
-
Auto-saving
-
Launch Hospify and delete the first patient on the list using
delete 1. Exit the app. -
Re-launch the app by double-clicking the jar file.
Expected: The change that you have made is retained (i.e. the first patient is no longer in the list).
-