User Guide

- 1. Introduction
- 2. Quick start
-
3. Features
- 3.1 Displaying usage instructions:
help(by Peh Jun Siang) - 3.2 Adding a patient:
add(by Cedric Lim Jun Wei) - 3.3 Listing all patients:
list(by Cedric Lim Jun Wei) - 3.4 Editing a patient:
edit(by Cao Qin) - 3.5 Locating patients by name or Nric:
find(by Gabriel Teo Yu Xiang) - 3.6 Deleting a patient:
delete(by Cao Qin) - 3.7 Counting total number of patients:
count(by Chong Jia Le) - 3.8 Sorting the patients:
sort(by Chong Jia Le) -
3.9 Showing Appointments of a Patient:
showAppt(by Peh Jun Siang) - 3.10 Adding an Appointment:
addAppt(by Gabriel Teo Yu Xiang) - 3.11 Editing an Appointment:
editAppt(by Gabriel Teo Yu Xiang) - 3.12 Deleting an Appointment:
deleteAppt(by Gabriel Teo Yu Xiang) - 3.13 Using the Medical Record feature:
mr/(by Cedric Lim Jun Wei) - 3.14 Show medical record directly:
showMr(by Peh Jun Siang) - 3.15 Clearing all entries:
clear(by Cao Qin) - 3.16 Exiting the program:
exit - 3.17 Saving the data
- 3.1 Displaying usage instructions:
- 4. FAQ (by Peh Jun Siang)
- 5. Command summary
1. Introduction
Hello, fellow clinic administrative staff.
Welcome to Hospify, a desktop application for a digital medical record management solution. With Hospify, you will be able to add, edit, find, delete and sort (and more!) patients’ medical record and even appointment details. In this user guide, you will learn more about how to get started with Hospify and how you can use the key features of the application.
Hospify is primarily optimized for use via a Command Line Interface (CLI), which means most features can be used by just typing a single line of command! If you can type fast, you will be able to manage medical records much more efficiently. However, if you are new to Hospify, fret not! Read on to find out what Hospify can offer.
Before we move on to how to install Hospify, let us understand how the user guide works!
To navigate around this user guide, you may use the hyperlinks provided at the top of the page to jump to a particular section that you are interested in. This user guide is divided into 4 major sections: Quick Start, Features (contains sub section, each representing a feature of Hospify), Frequently Asked Questions (FAQ) and Command Summary. The following explains the key notations used in this user guide:
-
text in box- represents a command, action, input, output or file -
 Notes: - represents noteworthy information
 -
 Tip: - represents a useful tip
 -
 Important: - represents important warnings
2. Quick start
In this section, we will be going through the process of installing Hospify on your computer and some of the necessary pre-requisites. Before we start the installation, please ensure that you have Java 11 or above installed in your Computer. If not, you may download Java 11 from here.
![]() Note on installing Java
Note on installing Java 11:
There are many versions of Java 11 listed. Select the correct version based on your computer’s operating system.
-
Download the latest
hospify.jarfrom here. Click onhospify.jarto start the download as shown in figure 1.1 below.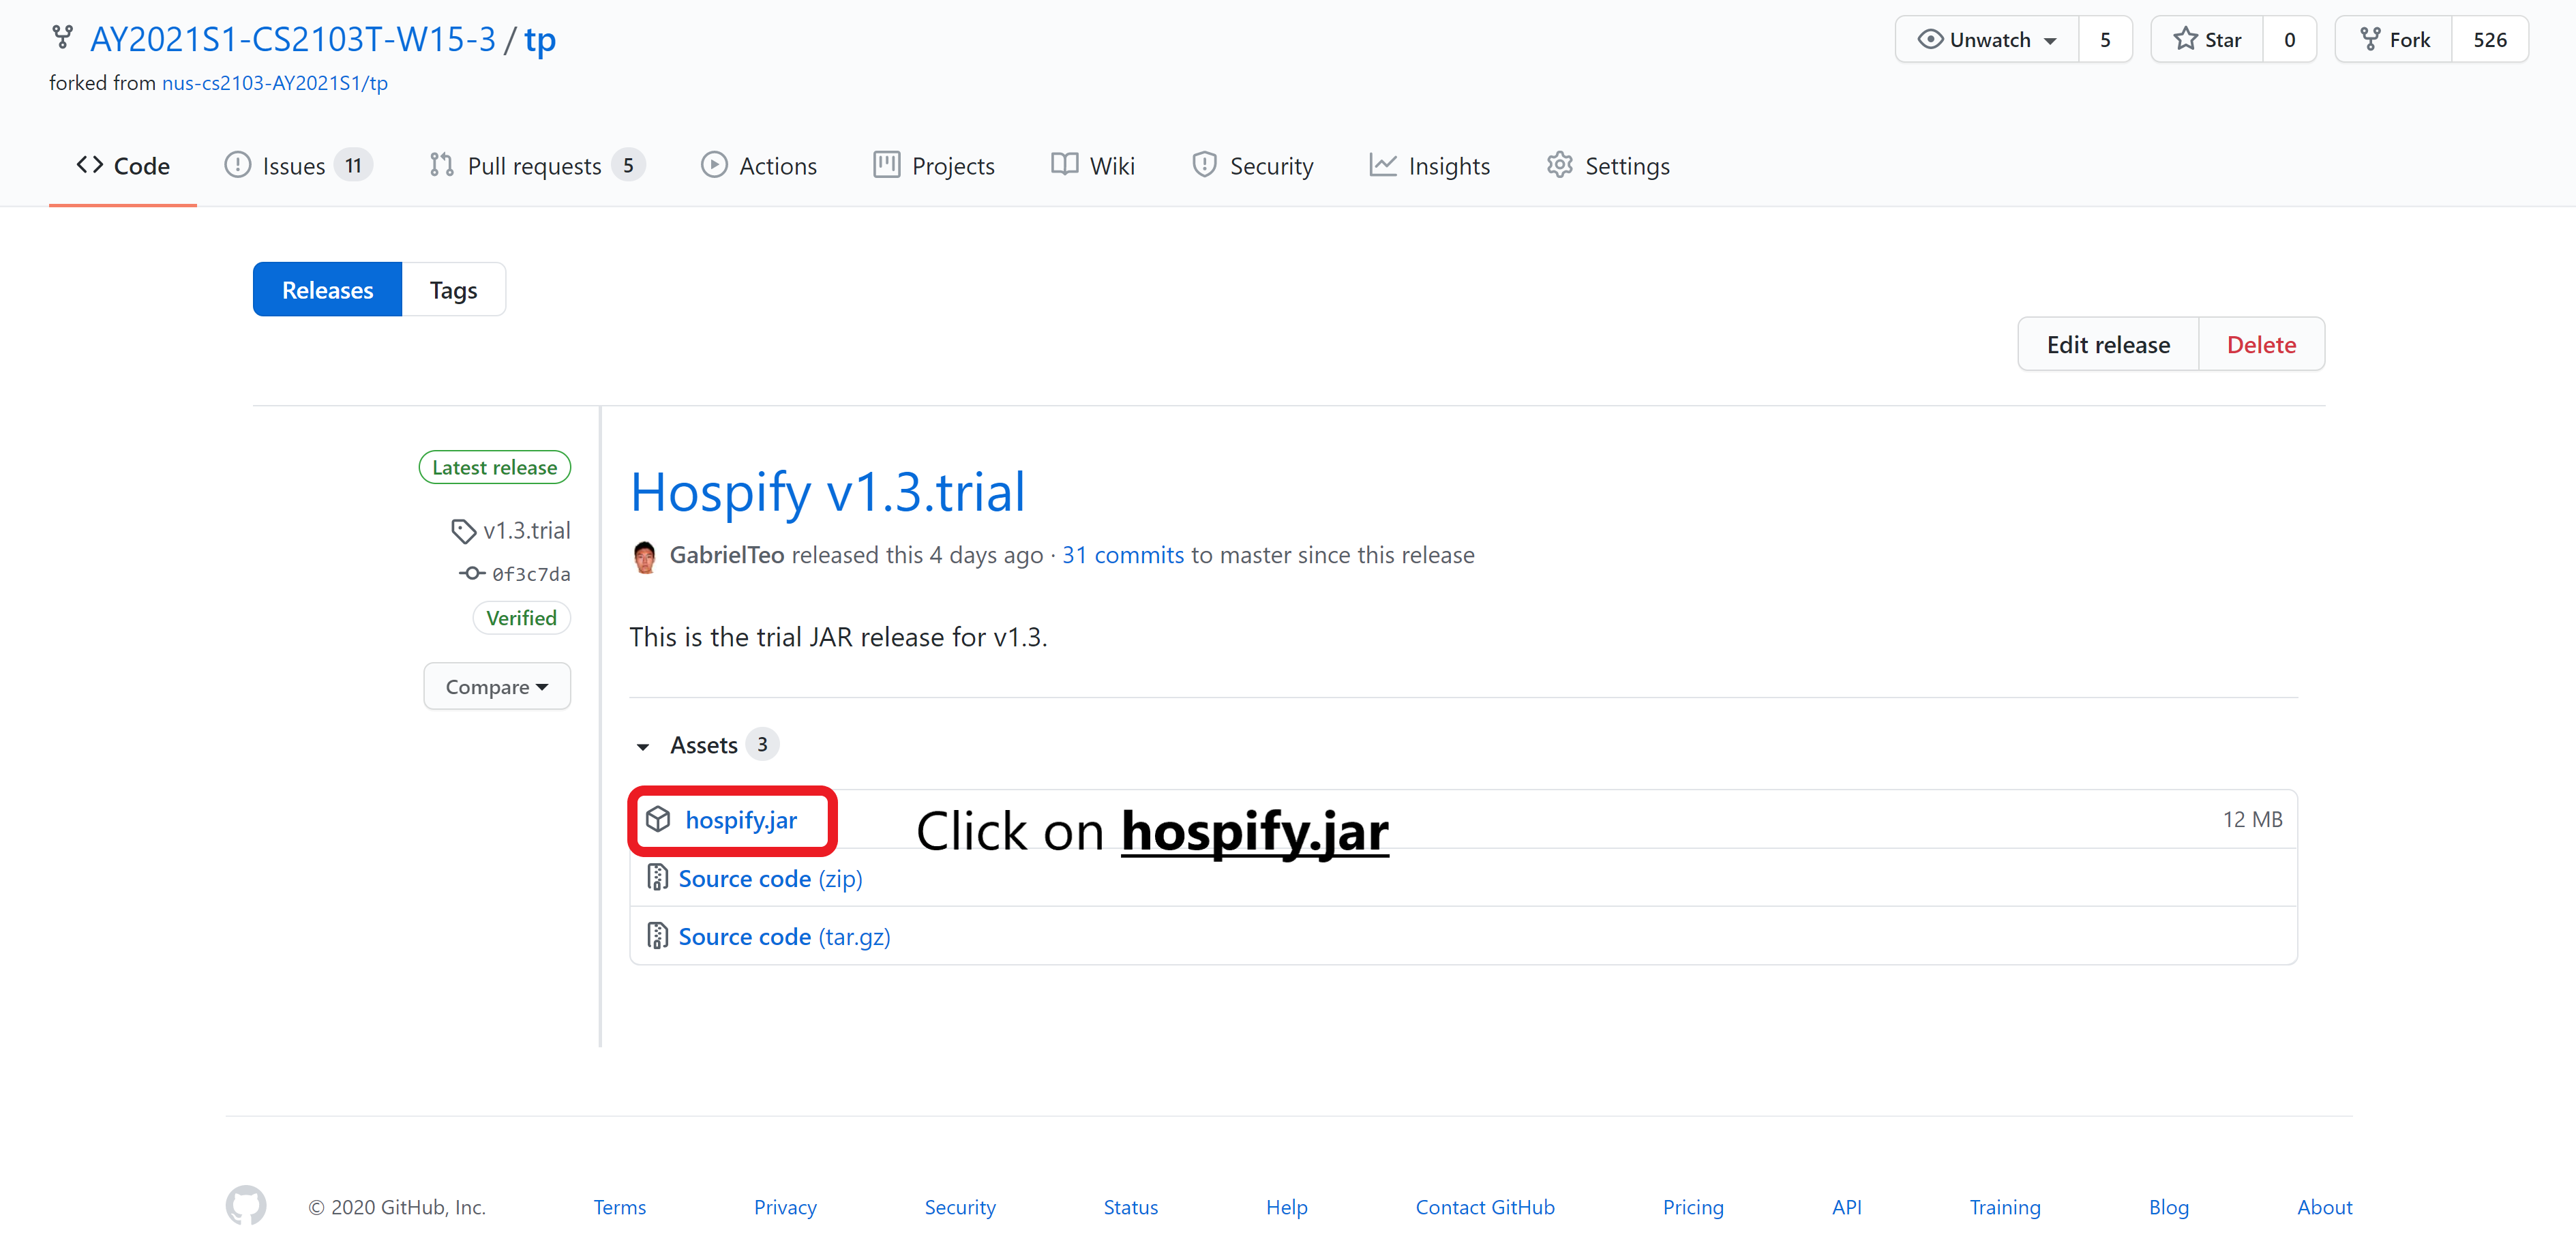 Figure 1.1 Hospify download page
![]() Note:
Note:
The actual download page may differ slightly from the one shown in Figure 1.1 as we are constantly updating Hospify to better serve your needs! Do not worry, just click on the same hospify.jar as shown above, to download the latest version of Hospify.
-
Copy the file to the folder you want to use as the home folder for the Hospify app.
-
Double-click the file to start the app. A Graphical User Interface (GUI) similar to the one as shown in figure 1.2 below should appear in a few seconds. Notice that Hospify came listed with some sample patients.
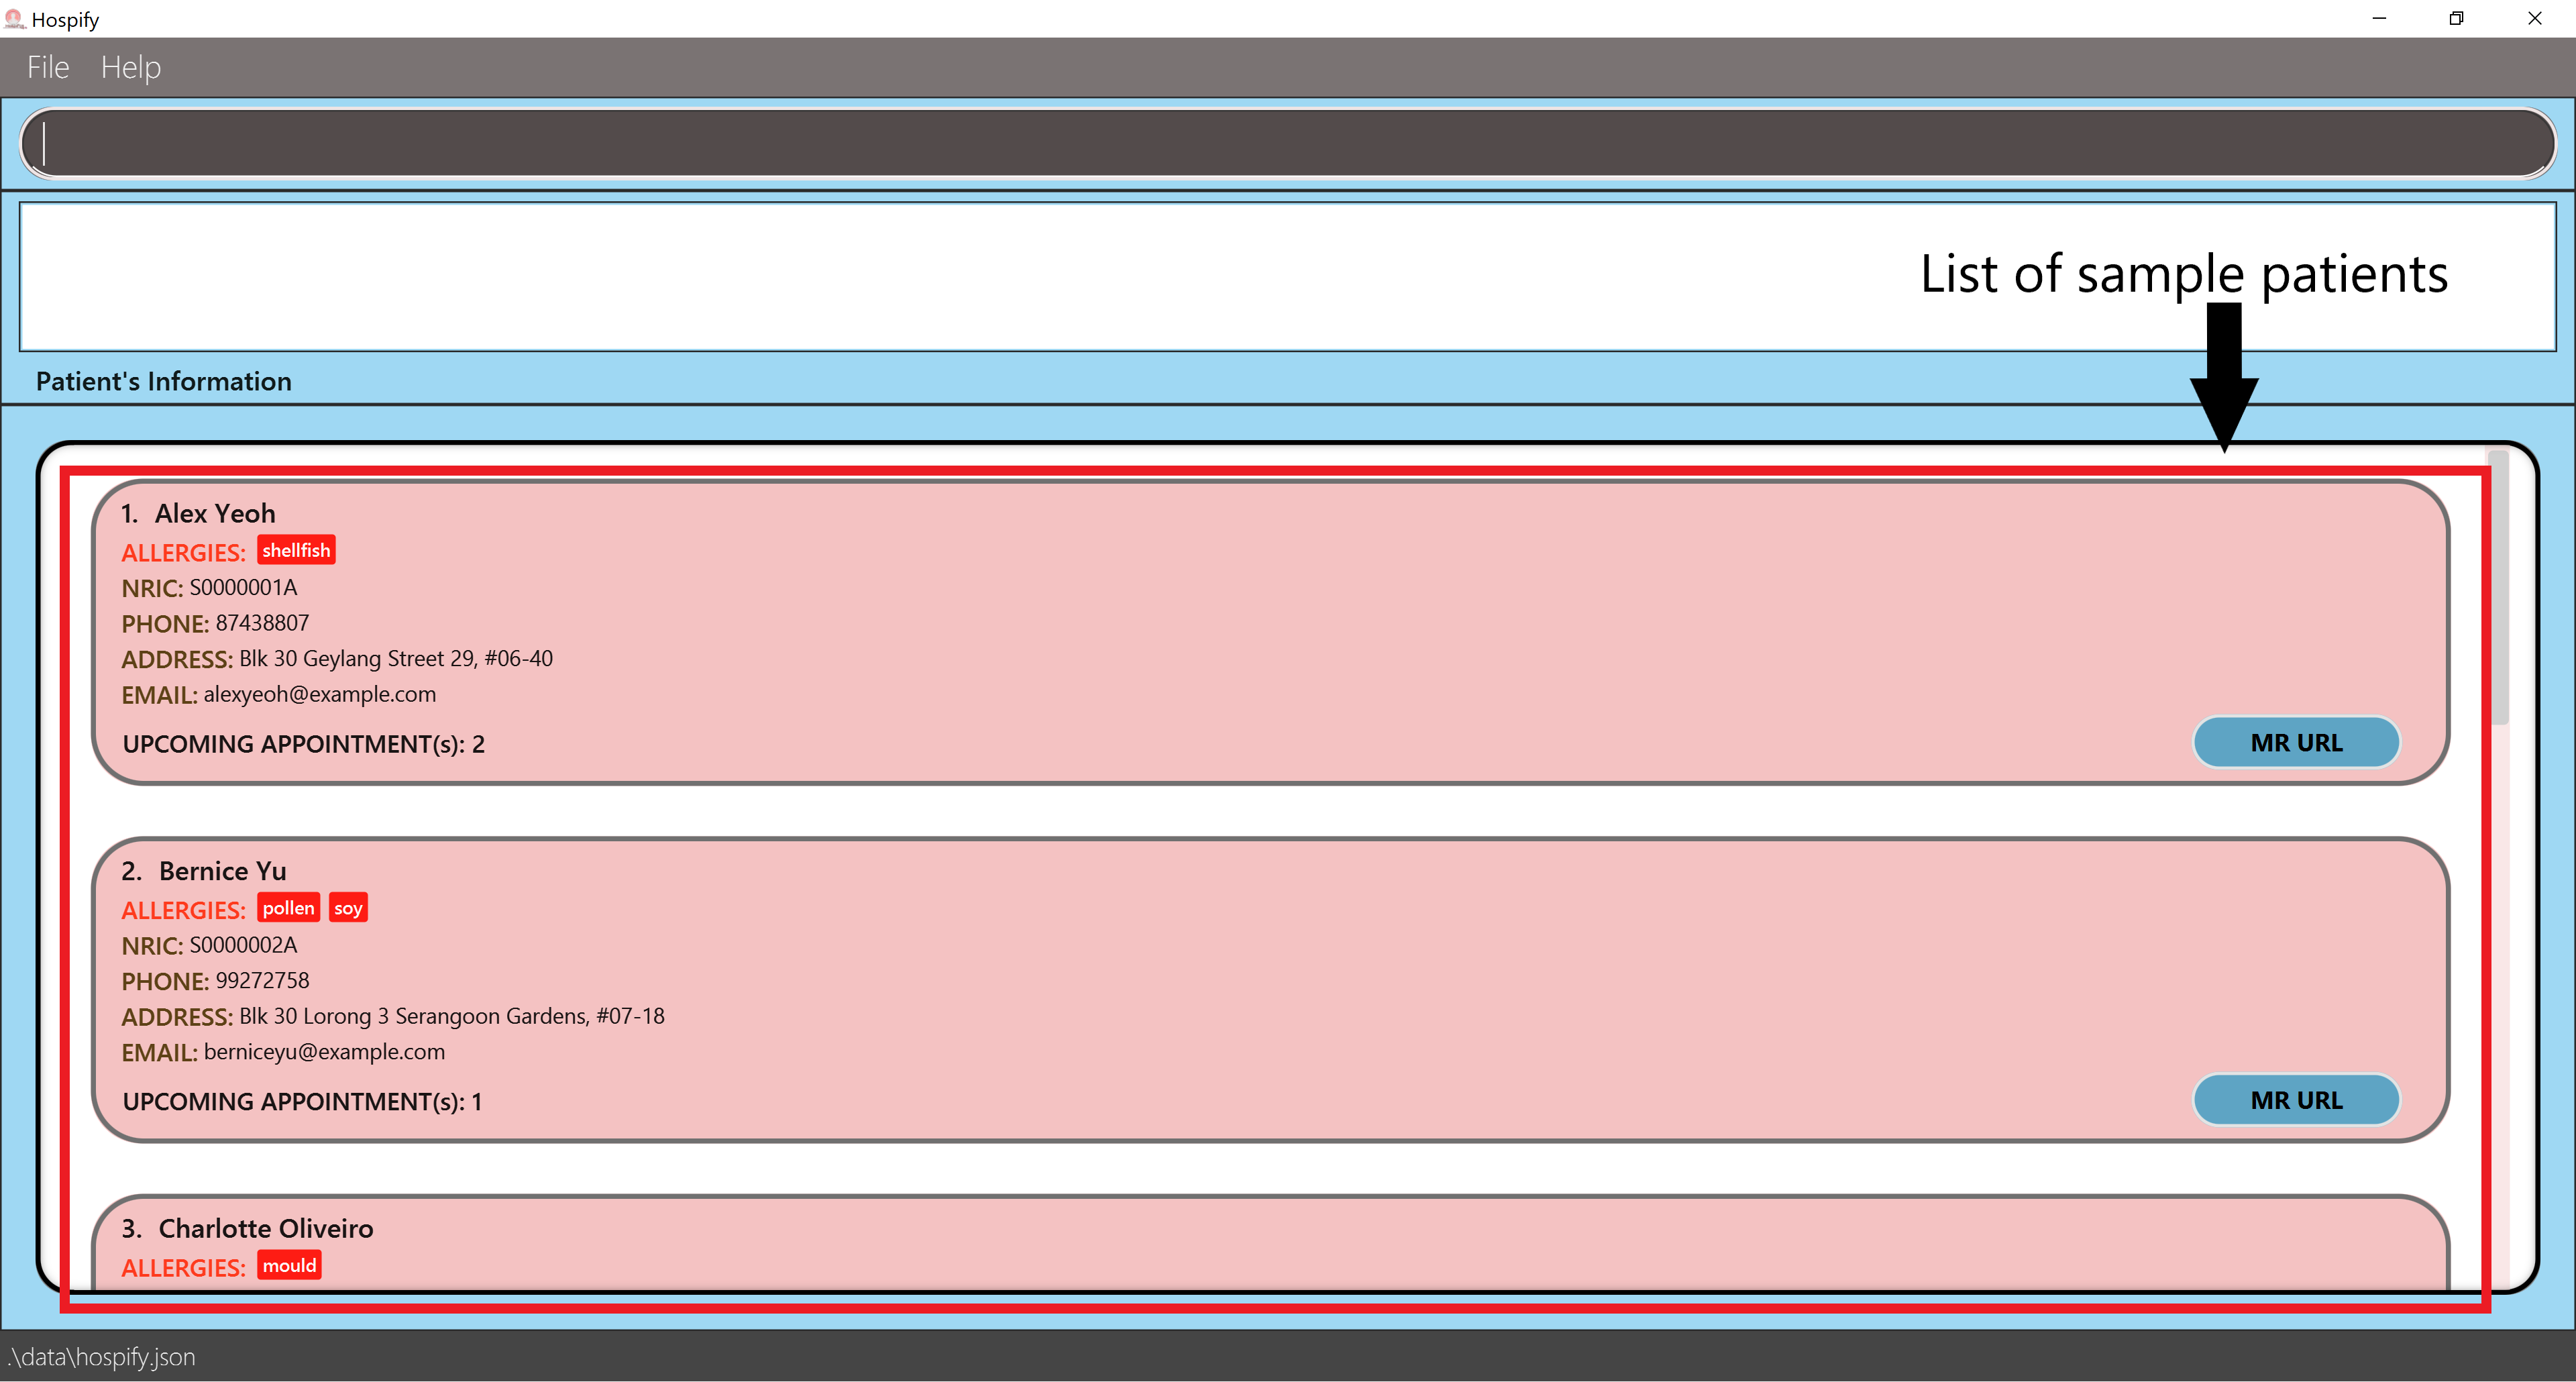 Figure 1.2 Start up UI showing list of sample patients
 -
You can now try typing your very first command in the command box and press
Enterto execute it! Not sure what to type? Try typinghelpand pressingEnter. A help window as shown in figure 1.3 below should appear.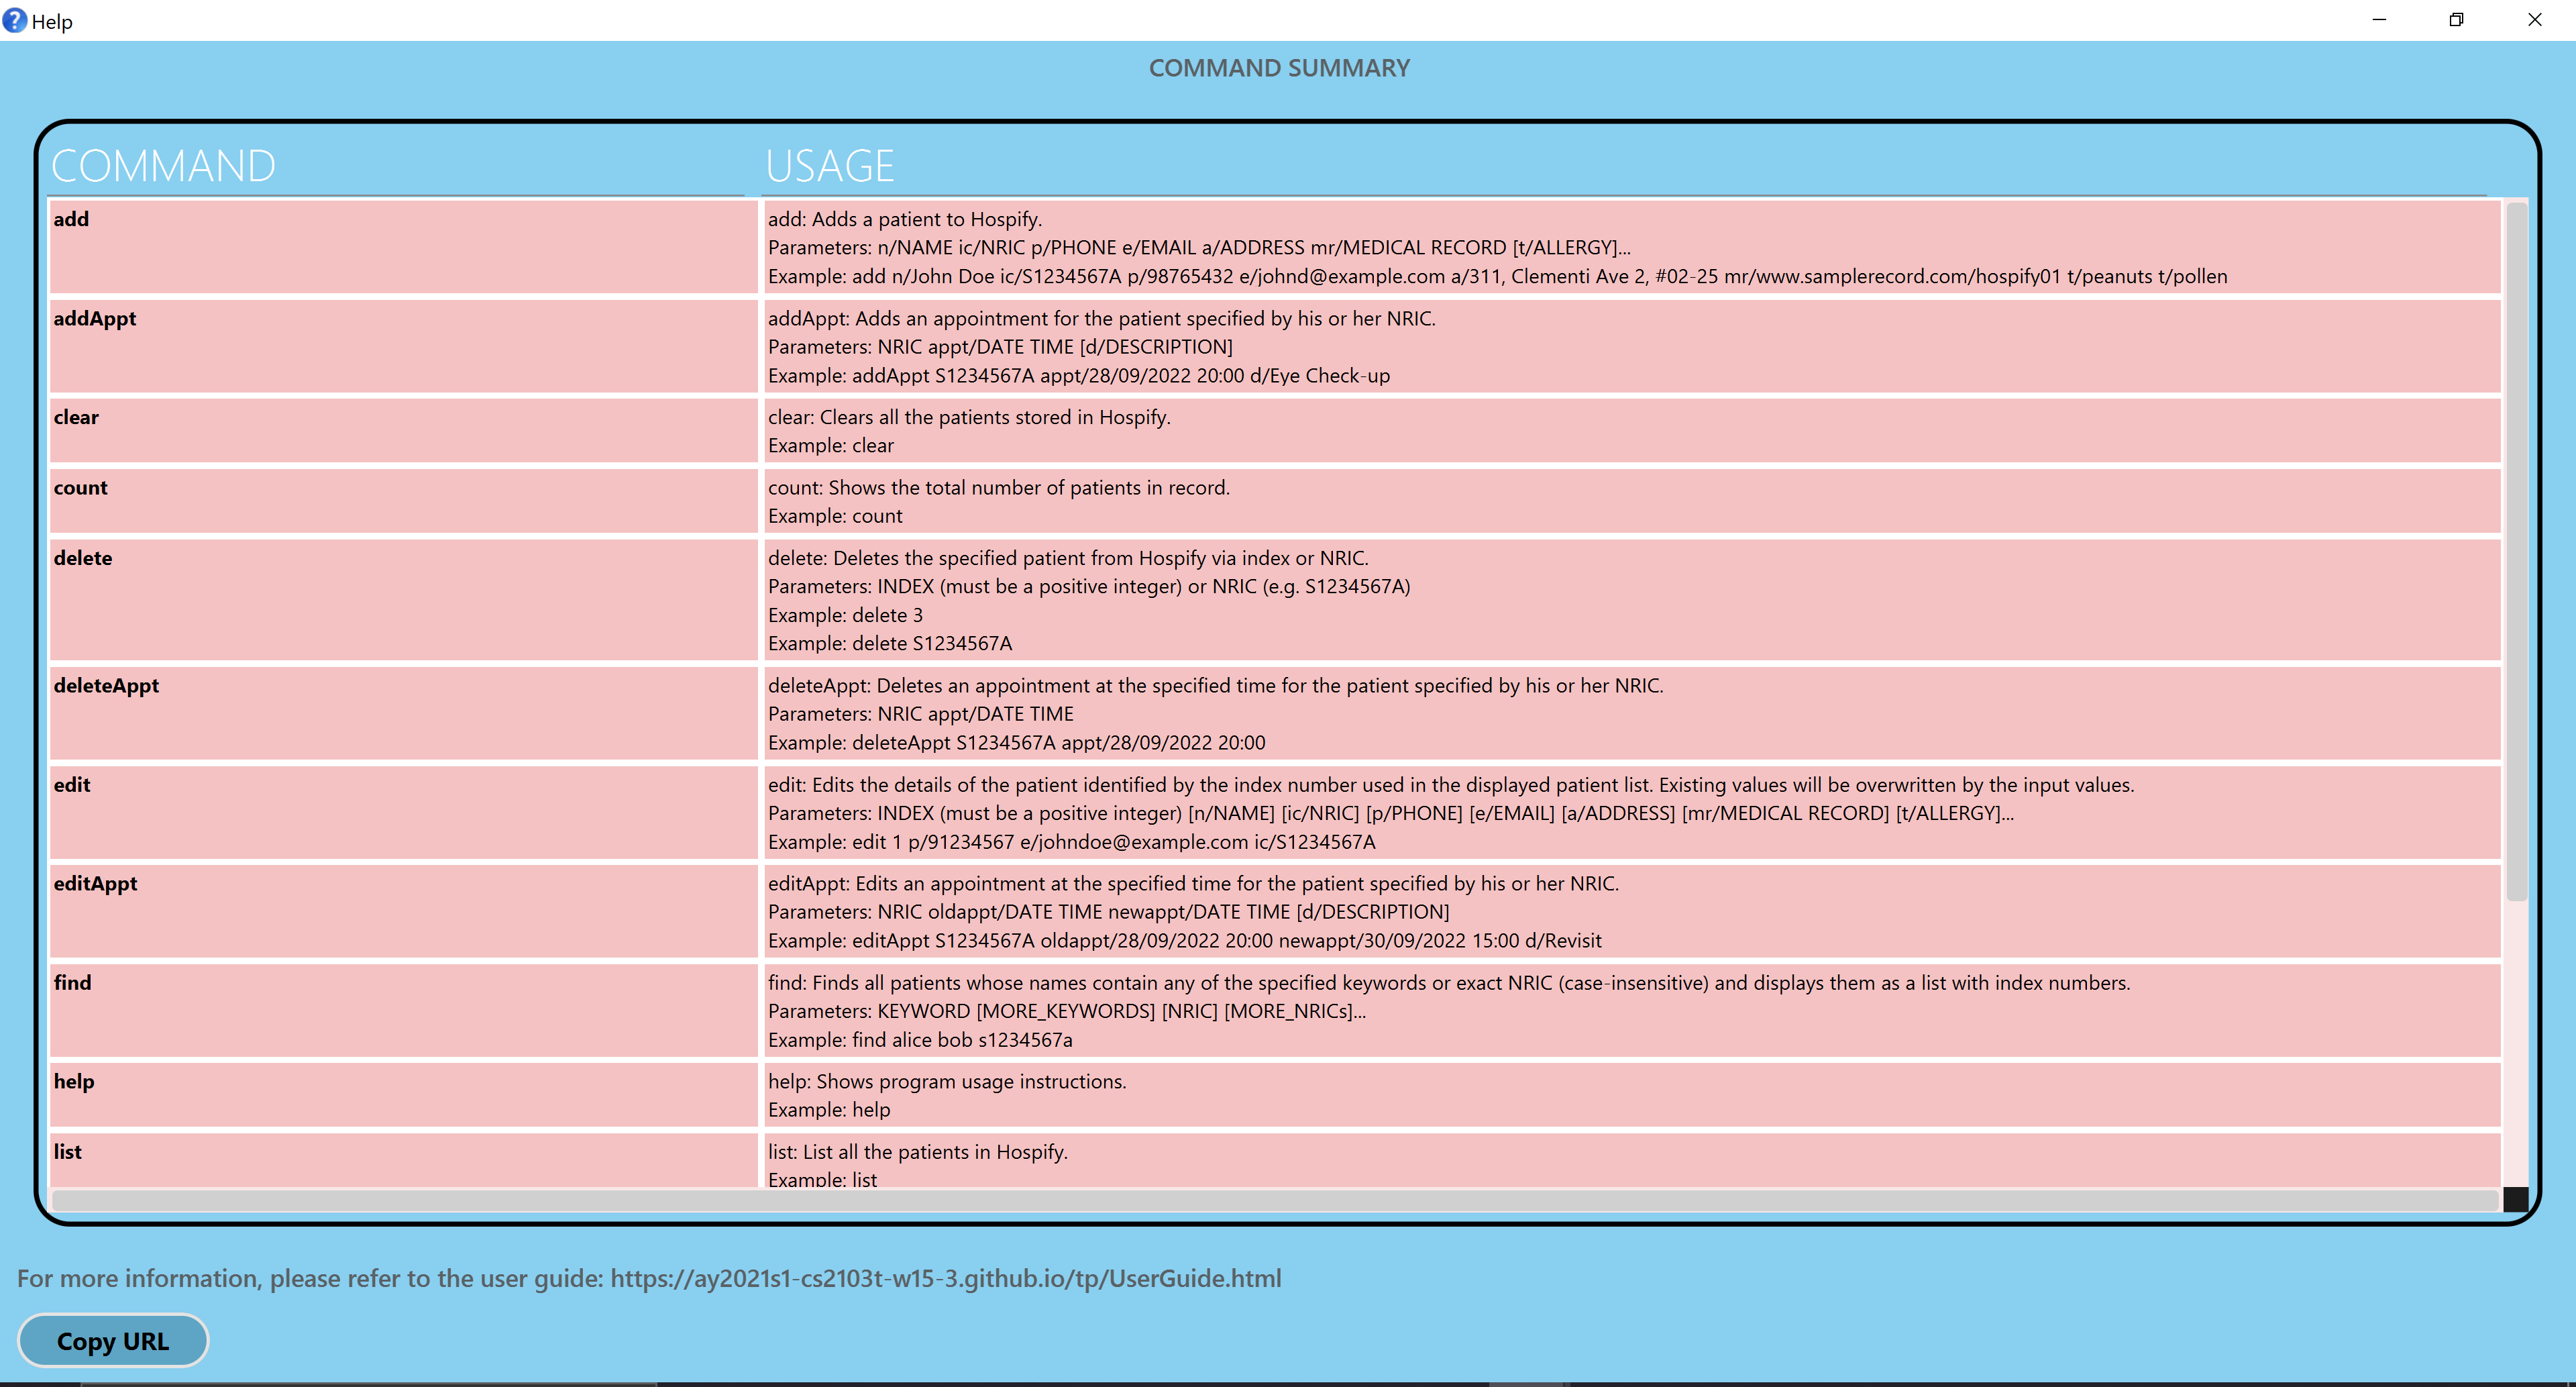 Figure 1.3 Help window
Now, you can try out some other commands:
-
list: Lists all patients. -
addn/John Doe ic/S1234567A p/98765432 e/johnd@example.com a/John street, block 123, #01-01 mr/www.samplerecord.com/01: Adds a patient namedJohn Doeto Hospify. -
delete3: Deletes the 3rd patient shown in the current list. -
clear: Deletes all patients. -
exit: Exits the app.
-
-
You can refer to the Features below for a list of all the commands available and the details of each command.
3. Features
In this section, we will be looking at a series of commands that Hospify supports, how you can use these commands, why these commands may be helpful to you and the expected outcomes of executing these commands. You may refer to the table of contents at the top of this page to skip to the specific command that you are interested in.
![]() Notes about the command format:
Notes about the command format:
-
Words in
UPPER_CASEare the parameters that you have to provide when typing a command.
e.g. inadd n/NAME,NAMEis a parameter which can be used asadd n/John Doe. -
Items in square brackets are optional parameters.
e.gn/NAME [t/ALLERGIES]can be used asn/John Doe t/shellfishor asn/John Doe. -
Items with
… after them can be used multiple times (including zero times).
e.g.[t/ALLERGIES]…can be used ast/shellfish,t/shellfish t/grassetc. -
Parameters can be in any order.
e.g. if the command specifiesn/NAME ic/ NRIC p/PHONE_NUMBER,p/PHONE_NUMBER n/NAME ic/S1234567Ais also acceptable.
3.1 Displaying usage instructions: help (by Peh Jun Siang)
The help command shows you the list of all the commands and their usages with examples supported by Hospify.
Format: help
After executing help, the sizable Help Window pops up as shown below in Figure 2.1. The commands are sorted alphabetically.
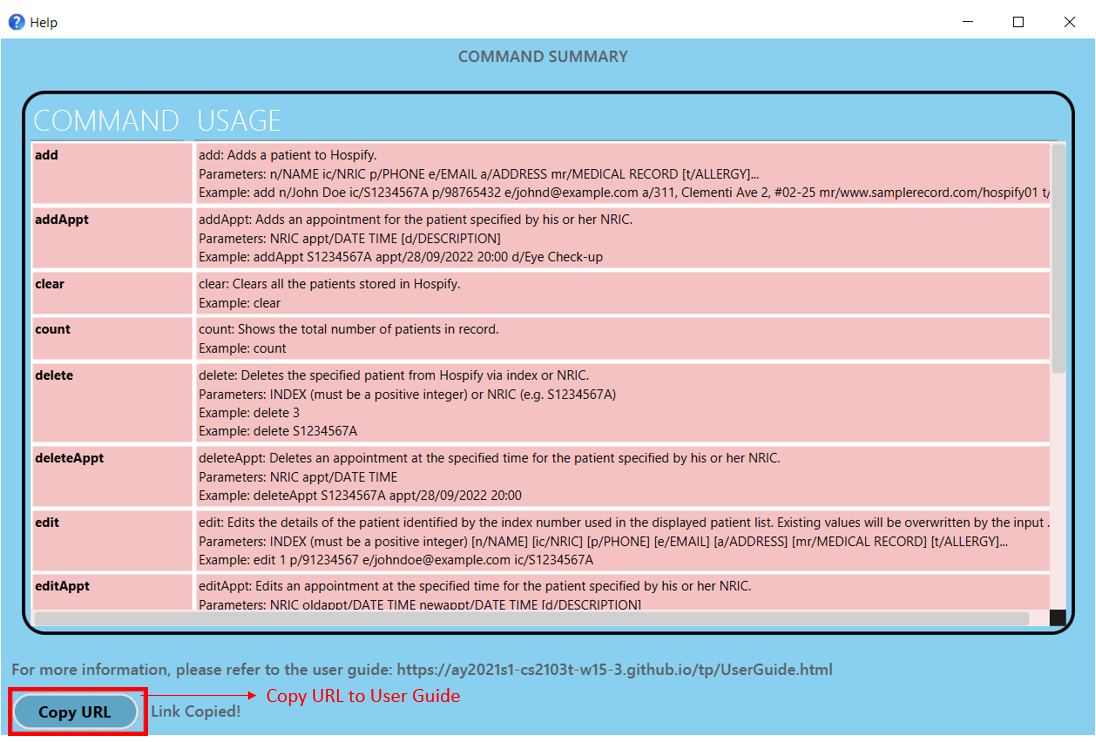
Figure 2.1 Sizable Help Window
![]() Tip: Whenever you feel lost when using Hospify, the
Tip: Whenever you feel lost when using Hospify, the help command can be very helpful.
![]() Tip: You can copy the URL of the Hospify User Guide to your clipboard to view a more detailed description
for the commands.
Tip: You can copy the URL of the Hospify User Guide to your clipboard to view a more detailed description
for the commands.
3.2 Adding a patient: add (by Cedric Lim Jun Wei)
This is a core and basic feature of Hospify. This command allows you to add a new patient to Hospify. Start by typing the command word add, followed by the following items:
-
n/NAME: Name of patient -
ic/NRIC: Nric of patient -
p/PHONE_NUMBER: Phone number of patient -
e/EMAIL: Email of patient -
a/ADDRESS: Home address of patient -
mr/MEDICAL_RECORD_URL: Url to the patient’s online medical record -
t/ALLERGIES: Known allergies of the patient
![]() Important note on the fields:
Important note on the fields:
-
All items except items 4 and 7 are compulsory fields that you have to provide. Missing any one of those fields will trigger an error.
-
Items 4 and 7 are optional items that you may choose to exclude. In addition, for item 7, you may choose to include more than one of such item by using
t/ALLERGIESagain. -
You are not allowed to add patients with the same
NRICorMEDICAL_RECORD_URLfield as an existing patient in Hospify. However, it is possible to do so for the other fields.
Let us summarise the information above to a single line of command in the following format.
Format: add n/NAME ic/NRIC p/PHONE_NUMBER [e/EMAIL] a/ADDRESS mr/MEDICAL_RECORD_URL [t/ALLERGIES]…
- The
NAME(upper limit of 100 characters) andALLERGIES(upper limit of 100 characters) field should contain alphanumeric characters. - The
NRICfield should start with an alphabet, followed by 7 digits, before ending with another alphabet. - The
PHONE_NUMBERfield should contain a number that is between 3 and 15 digits (inclusive) long. - The
EMAILfield should contain a valid email address (for more information on email validity, please refer to the Command Summary). - The
ADDRESS(upper limit of 200 characters) field can contain any word or number. - The
MEDICAL_RECORDfield should contain a valid url (for more information on url validity, please refer to the Command Summary).
![]() Note: A patient can have any number of allergies (including 0)
Note: A patient can have any number of allergies (including 0)
Let us use some examples (as shown below) to see how this command can actually be used.
Examples:
add n/John Doe ic/S1234567A p/98765432 e/johnd@example.com a/John street, block 123, #01-01 mr/www.samplerecord.com/11add n/Betsy Crowe ic/S9425431A t/shellfish e/betsycrowe@example.com a/Newgate Prison p/1234567 t/grass mr/www.samplerecord.com/02
When a patient is successfully added to Hospify, a success message will appear in the message box, and the patient is shown at the bottom of the list as shown in figure 3.1 below.
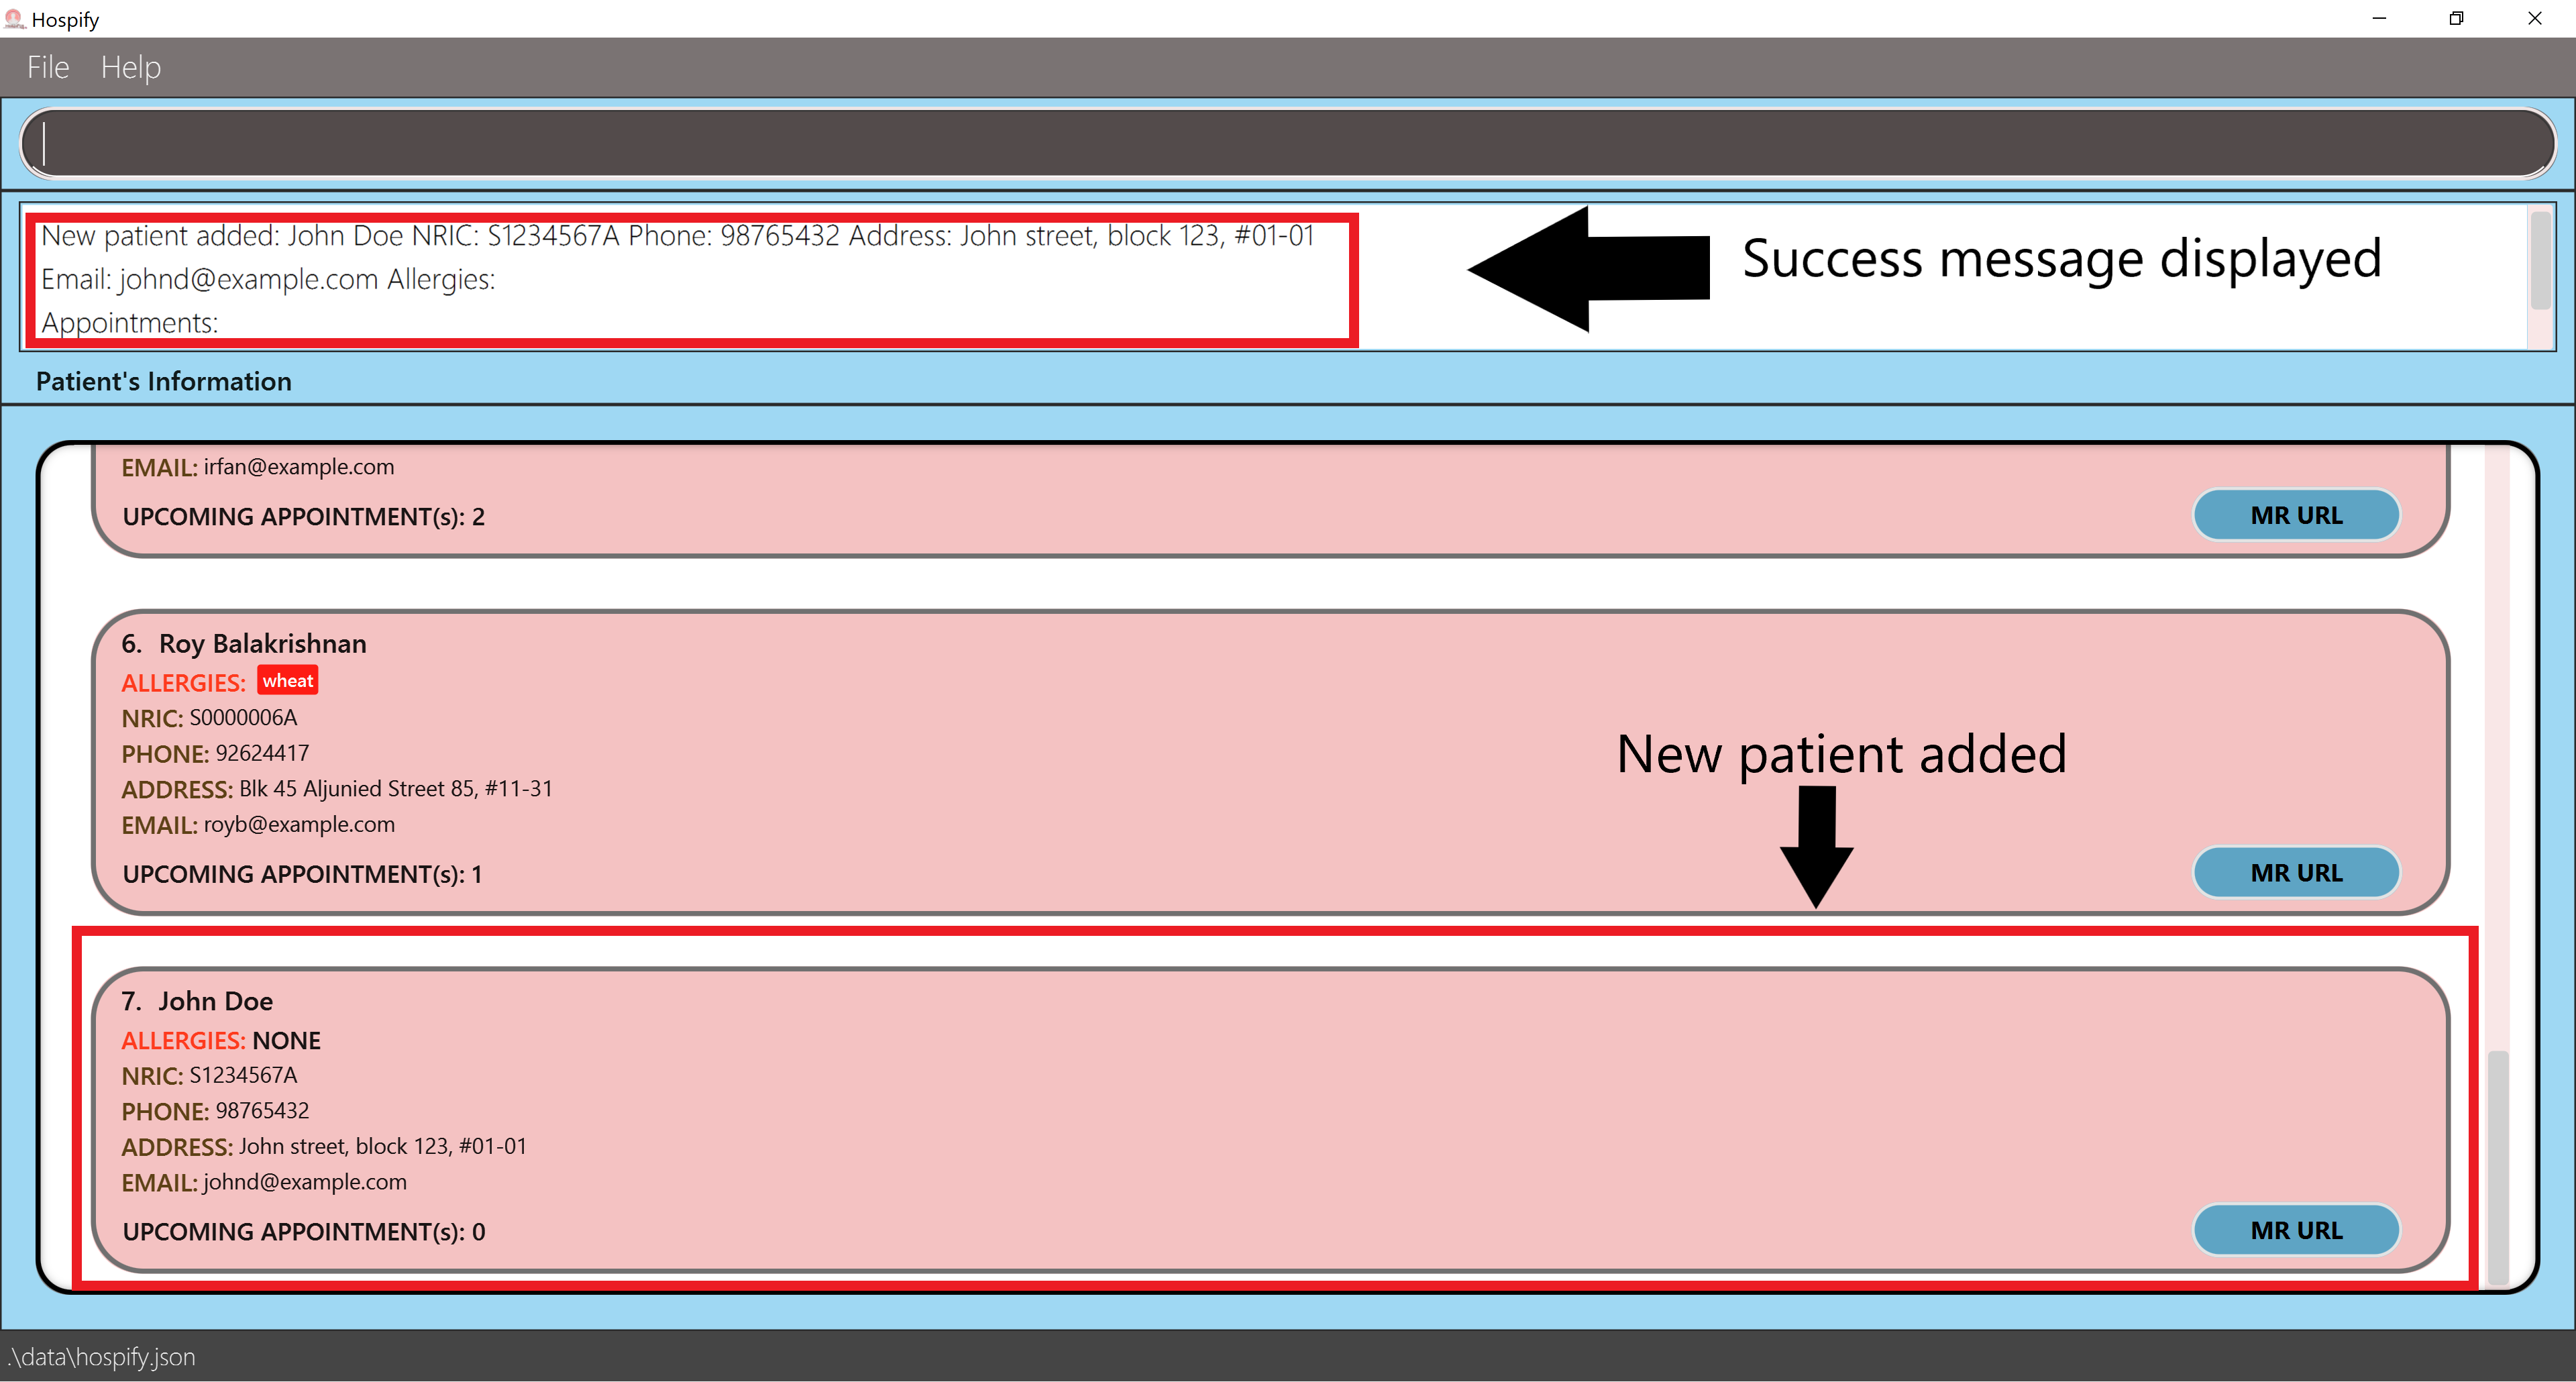 Figure 3.1 Adding a patient (success scenario)
3.3 Listing all patients: list (by Cedric Lim Jun Wei)
This command allows you to display the complete list of patients recorded in Hospify. This may be useful after you have used the find command (which displays a partial list of patients) and you wish to revert back to the complete list of patients again.
To use the command, simply type in list on the command line with no additional parameters.
Format: list
In the example below, we first use the find command to search for patient Bernice Yu. To do so, we type find Bernice Yu on the command line. This results in a partial list containing only one patient as shown in figure 4.1 below.
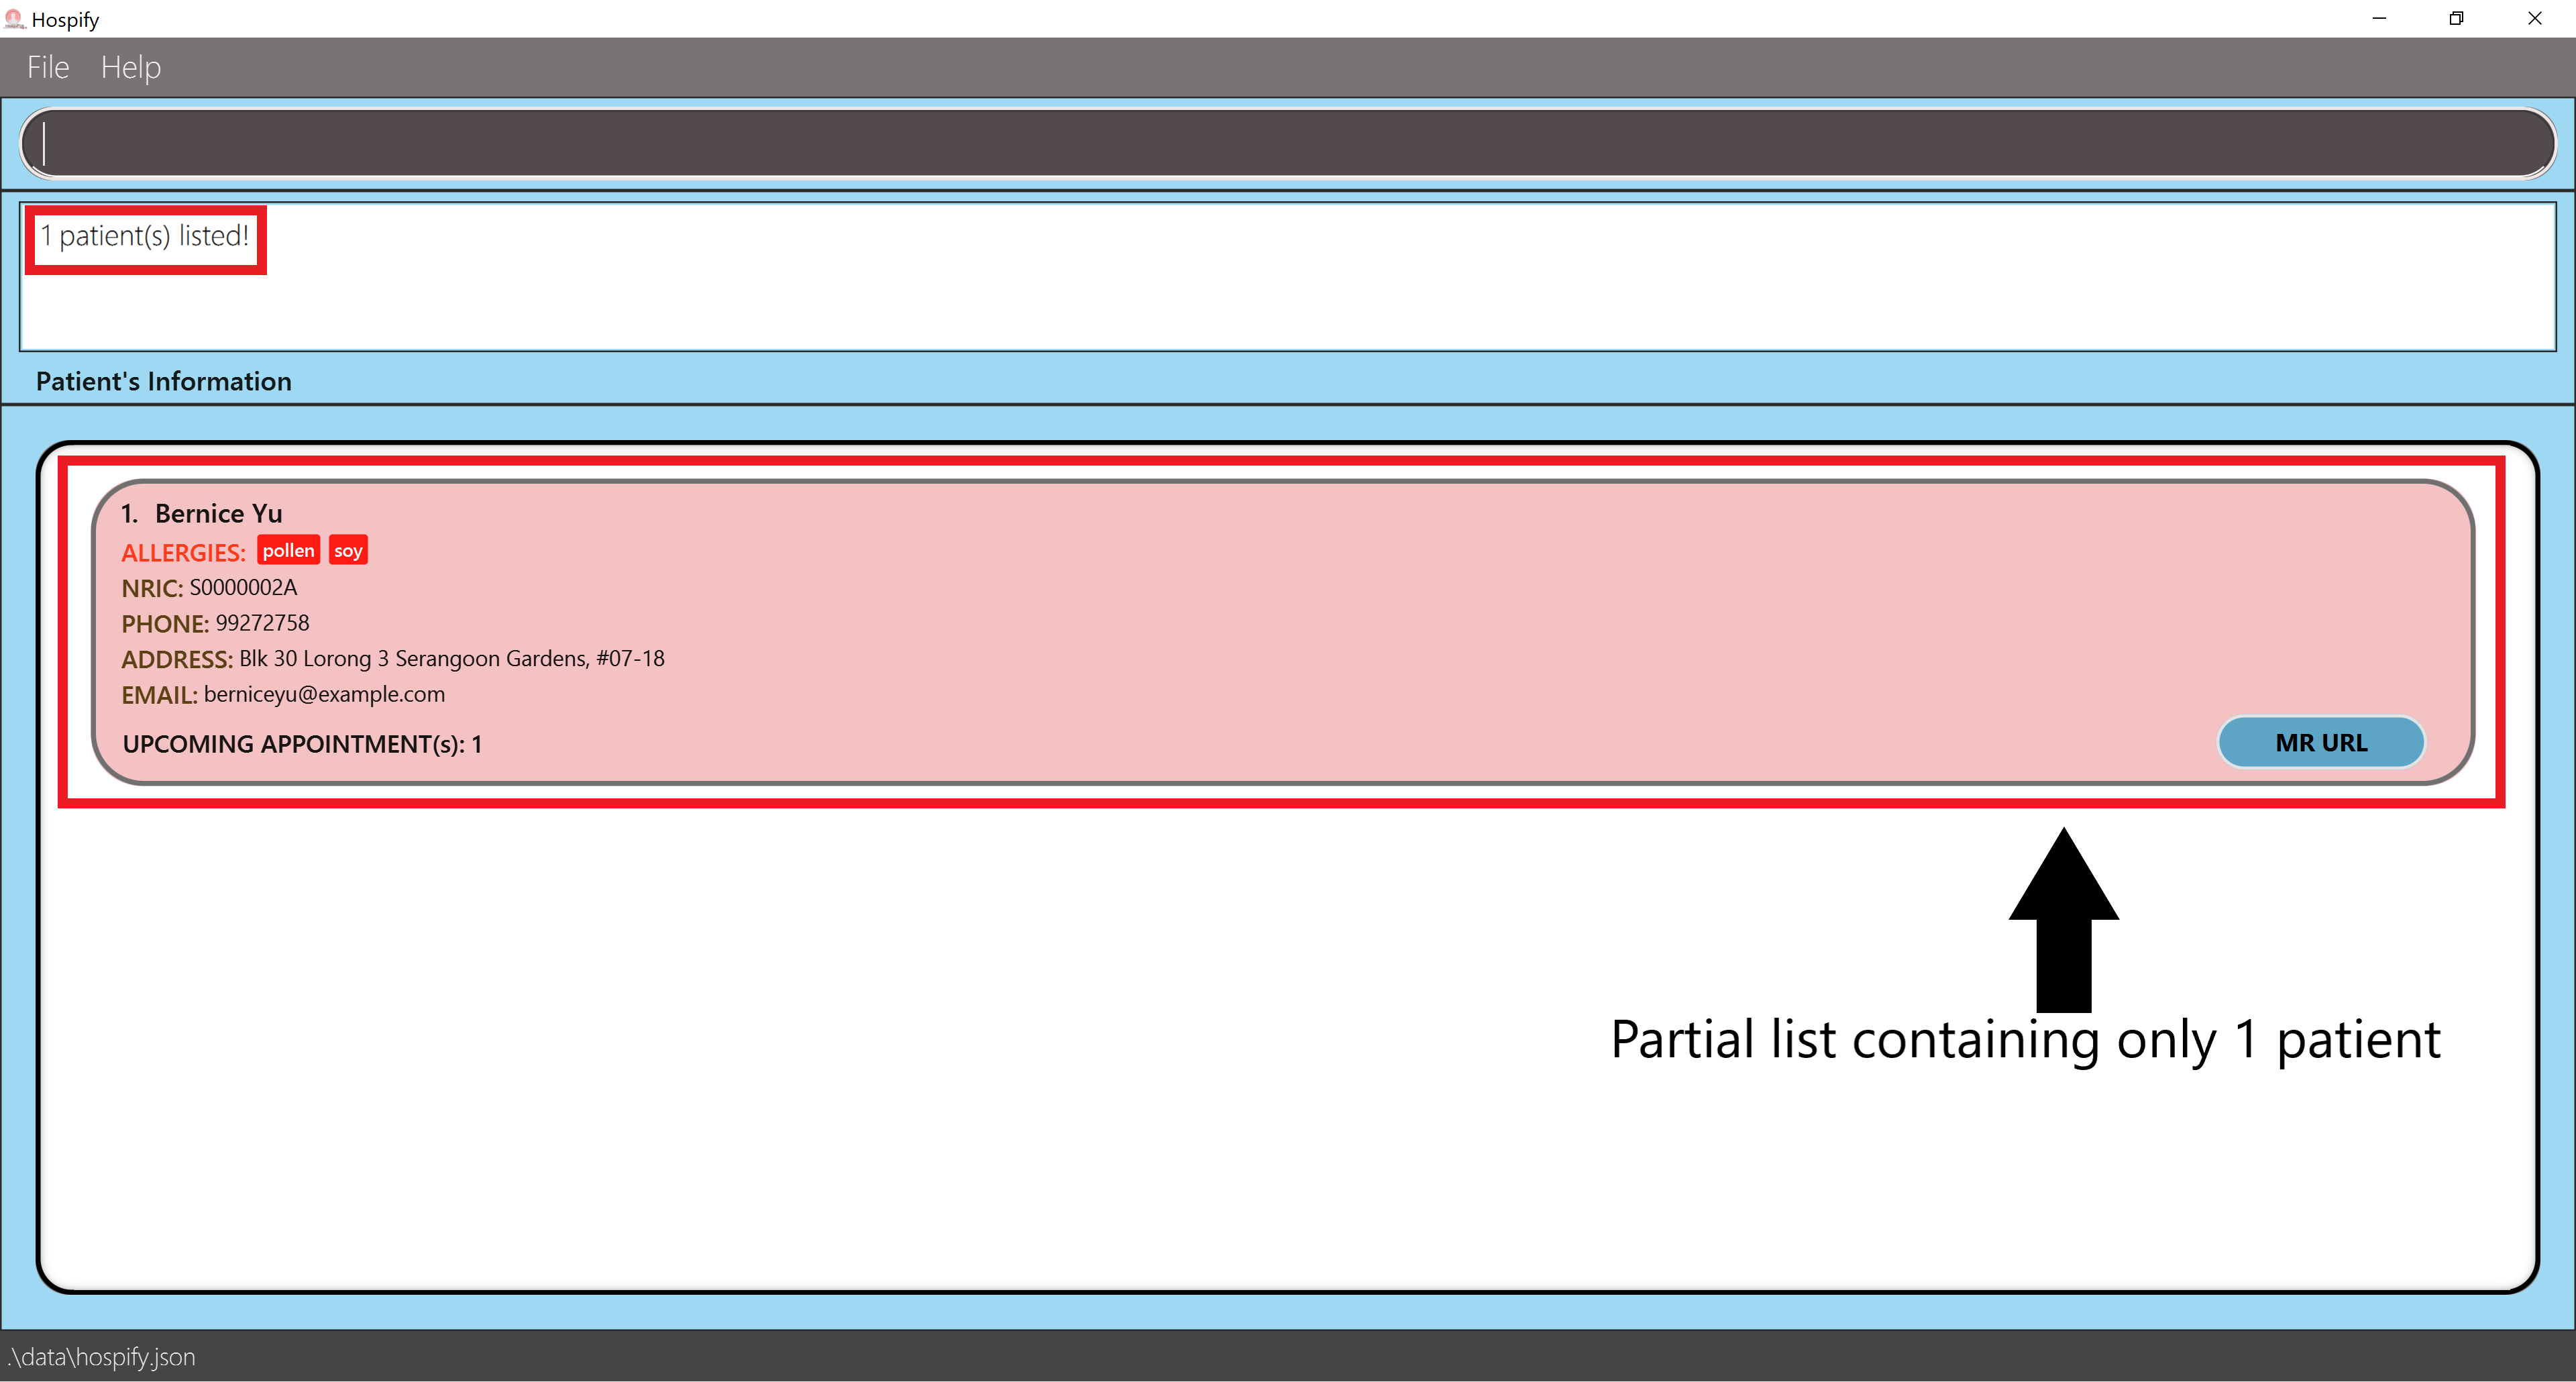 Figure 4.1 Finding patient
 Bernice Yu
With the help of the list command, we can revert back to the complete list of patients as shown in figure 4.2 below.
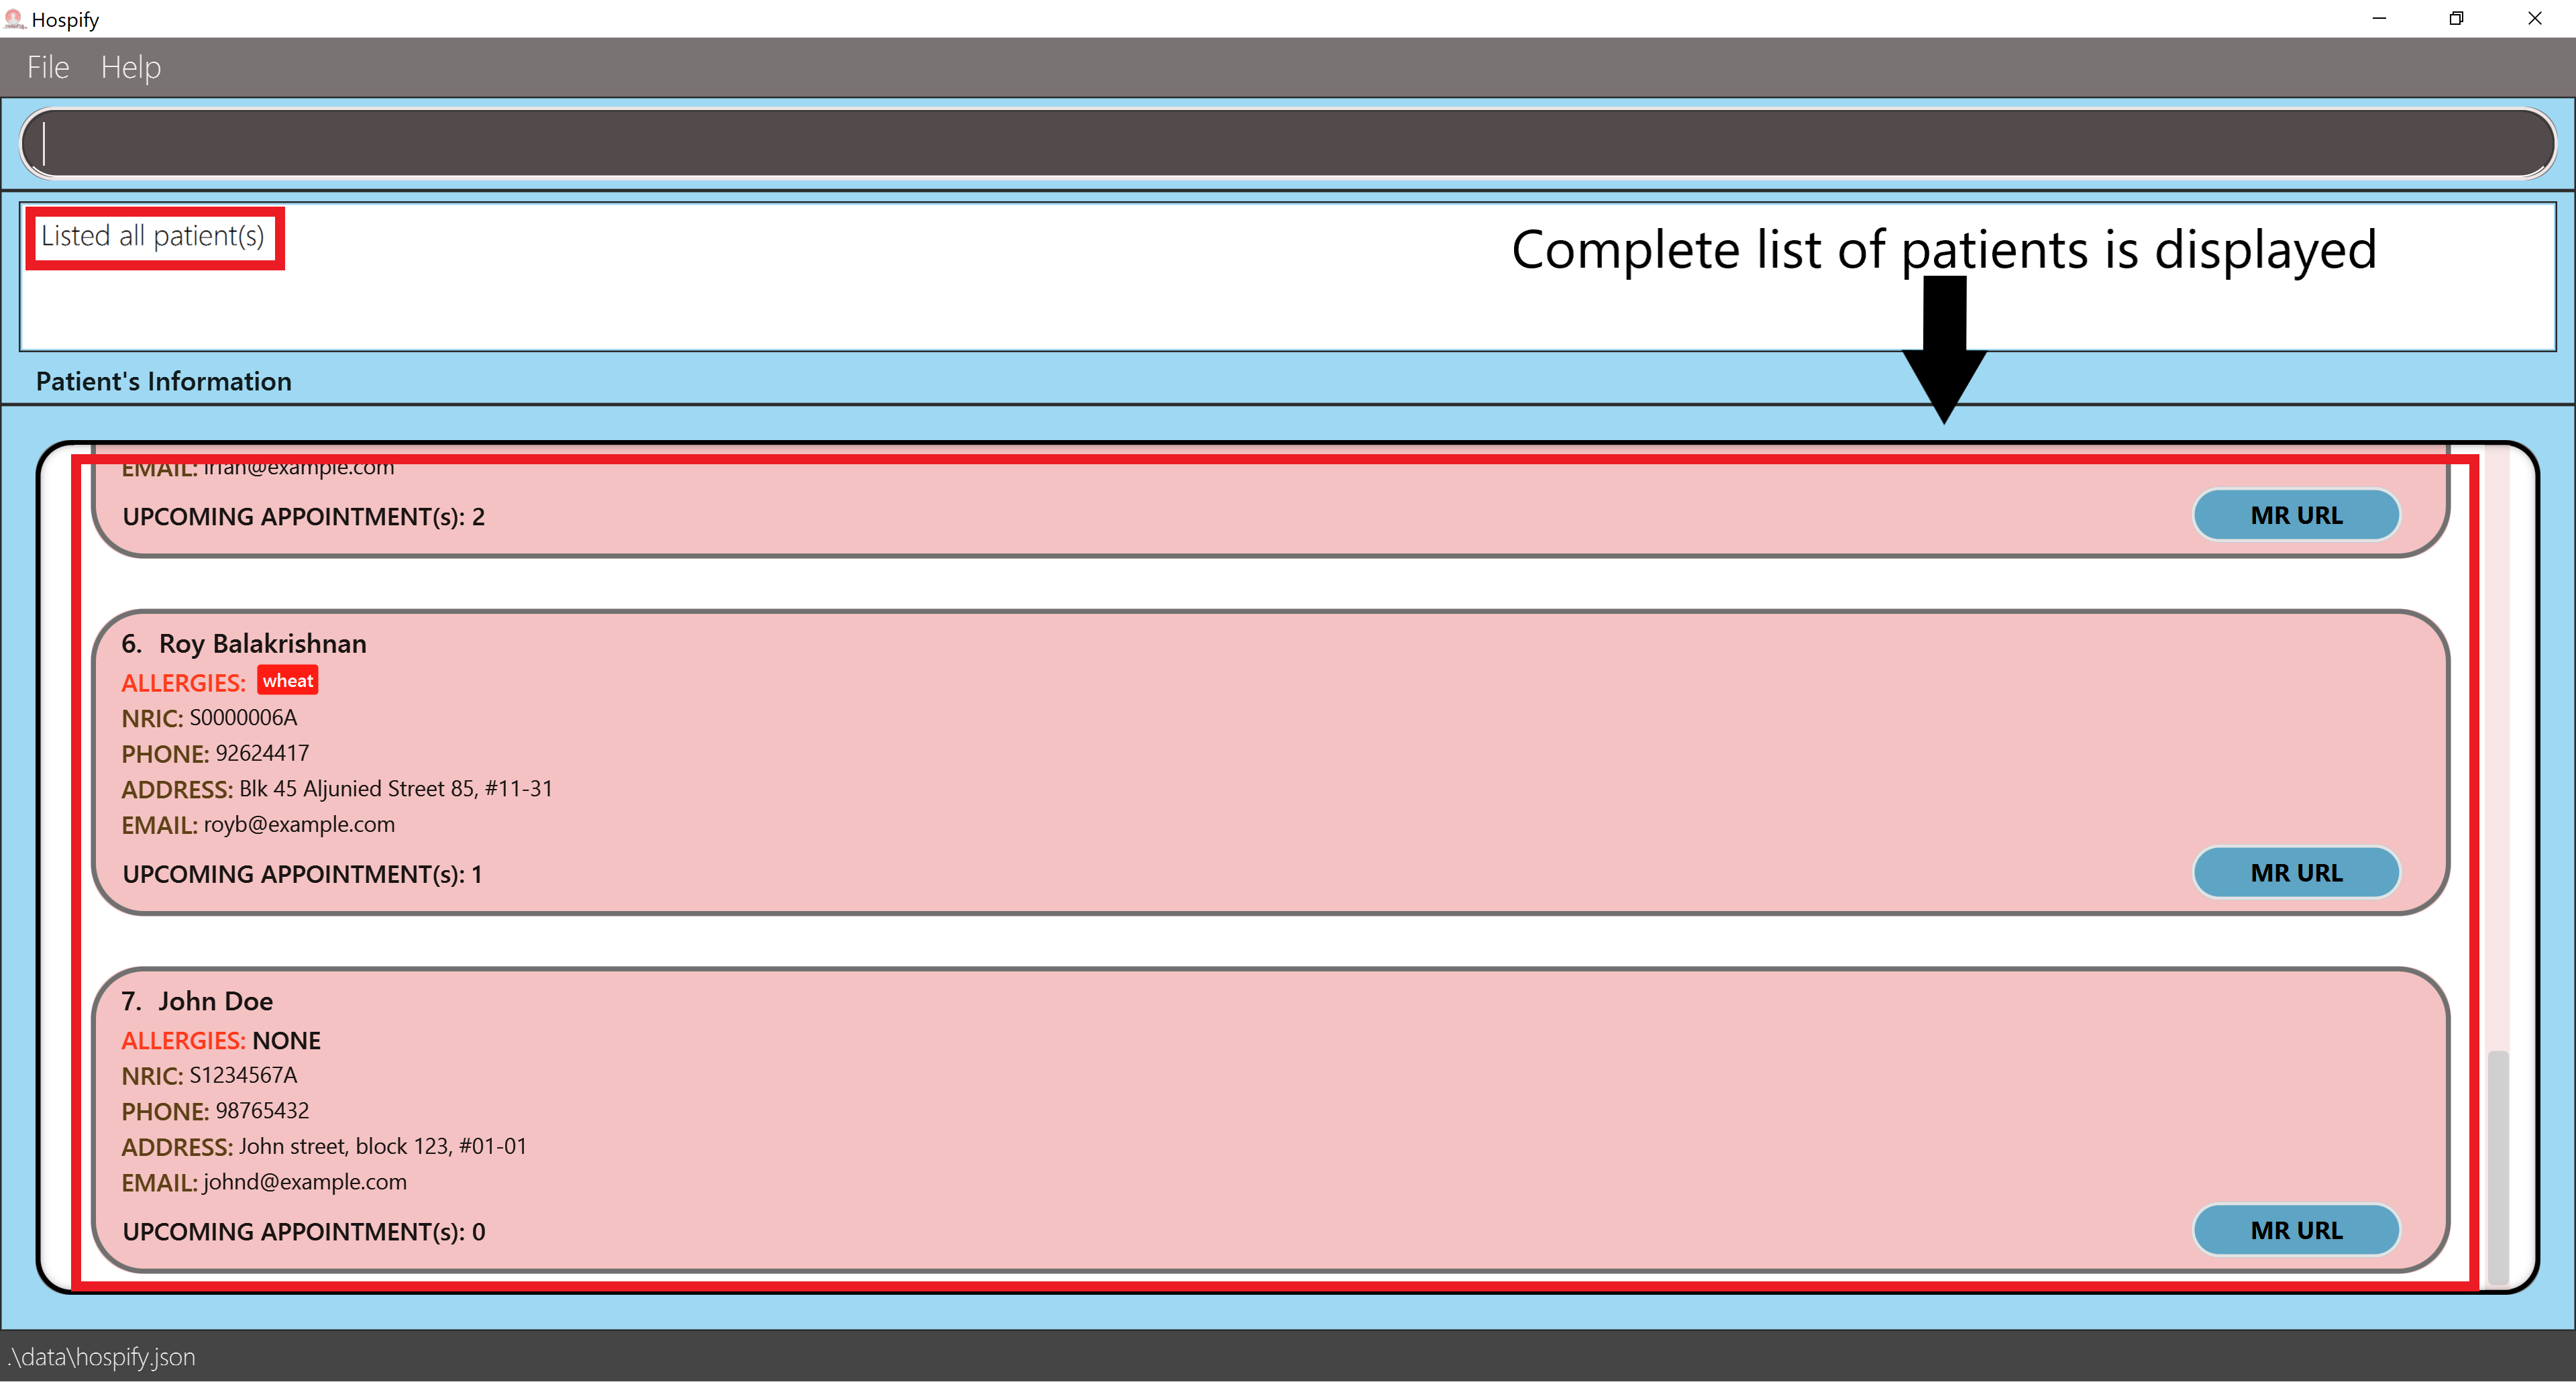 Figure 4.2 Listing all patients
3.4 Editing a patient: edit (by Cao Qin)
This command allows you to edit an existing patient in Hospify, it is especially useful when the patients’ information changes and you want to update it in the system.
To use this command, simply type in edit and the fields of the patient you want to edit, as specified by the format below.
Format: edit INDEX [n/NAME] [ic/NRIC] [p/PHONE] [e/EMAIL] [a/ADDRESS] [mr/MEDICAL_RECORD_URL] [t/ALLERGIES]…
![]() Note:
Note:
- The meaning of each field in the above format is the same as in the
addcommand, you can refer to theaddcommand. For your convenience, specifications for each field are also provided below.
- The
INDEXrefers to the index number of the patient as shown in the displayed patient list, and it must be a positive integer, such as 1, 2, 3, … - The
NRICfield should start with an alphabet, followed by 7 digits, before ending with another alphabet. - The
NAMEandALLERGIESfields should only contain alphanumeric characters, and they have an upper limit of 100 characters. - The
PHONE_NUMBERfield should contain a number that is between 3 and 15 digits (inclusive) long. - The
EMAILfield should contain a valid email address (to find more information on email validation, please check the Command Summary). - The
ADDRESSfield should only contain alphanumeric characters, and its total length should not exceed 200 characters. - The
MEDICAL_RECORD_URLfield should contain a valid URL (to find more information on URL validation, please check the Command Summary).
![]() Important notes:
Important notes:
- Except for the
INDEXfield, all other fields are optional. - At least one of the optional fields must be provided.
- After editing a field, the old value of that field will be deleted from the system and replaced by the new input value.
- When editing allergies, the existing allergies of the patient will be removed i.e adding of allergies is not cumulative.
- You are not allowed to edit the
NRICorMEDICAL_RECORD_URLfield of a patient to the same as another existing patient’s in Hospify. However, it is possible to do so for other fields.
To help you better understand how to use the edit command, here are some examples below.
Examples:
-
edit 1 p/91234567 e/johndoe@example.comedits the phone number and email address of the 1st patient to be91234567andjohndoe@example.comrespectively. -
edit 2 n/Betsy Crower t/edits the name of the 2nd patient to beBetsy Crowerand clears all existing allergies.
![]() Tip:
Tip:
- You can remove all the patient’s allergies by typing
t/without specifying any allergies after it.
When a patient is successfully edited in Hospify, a success message will appear in the message box, and the edited patient will be updated in the list as shown in figure 5.1 below.
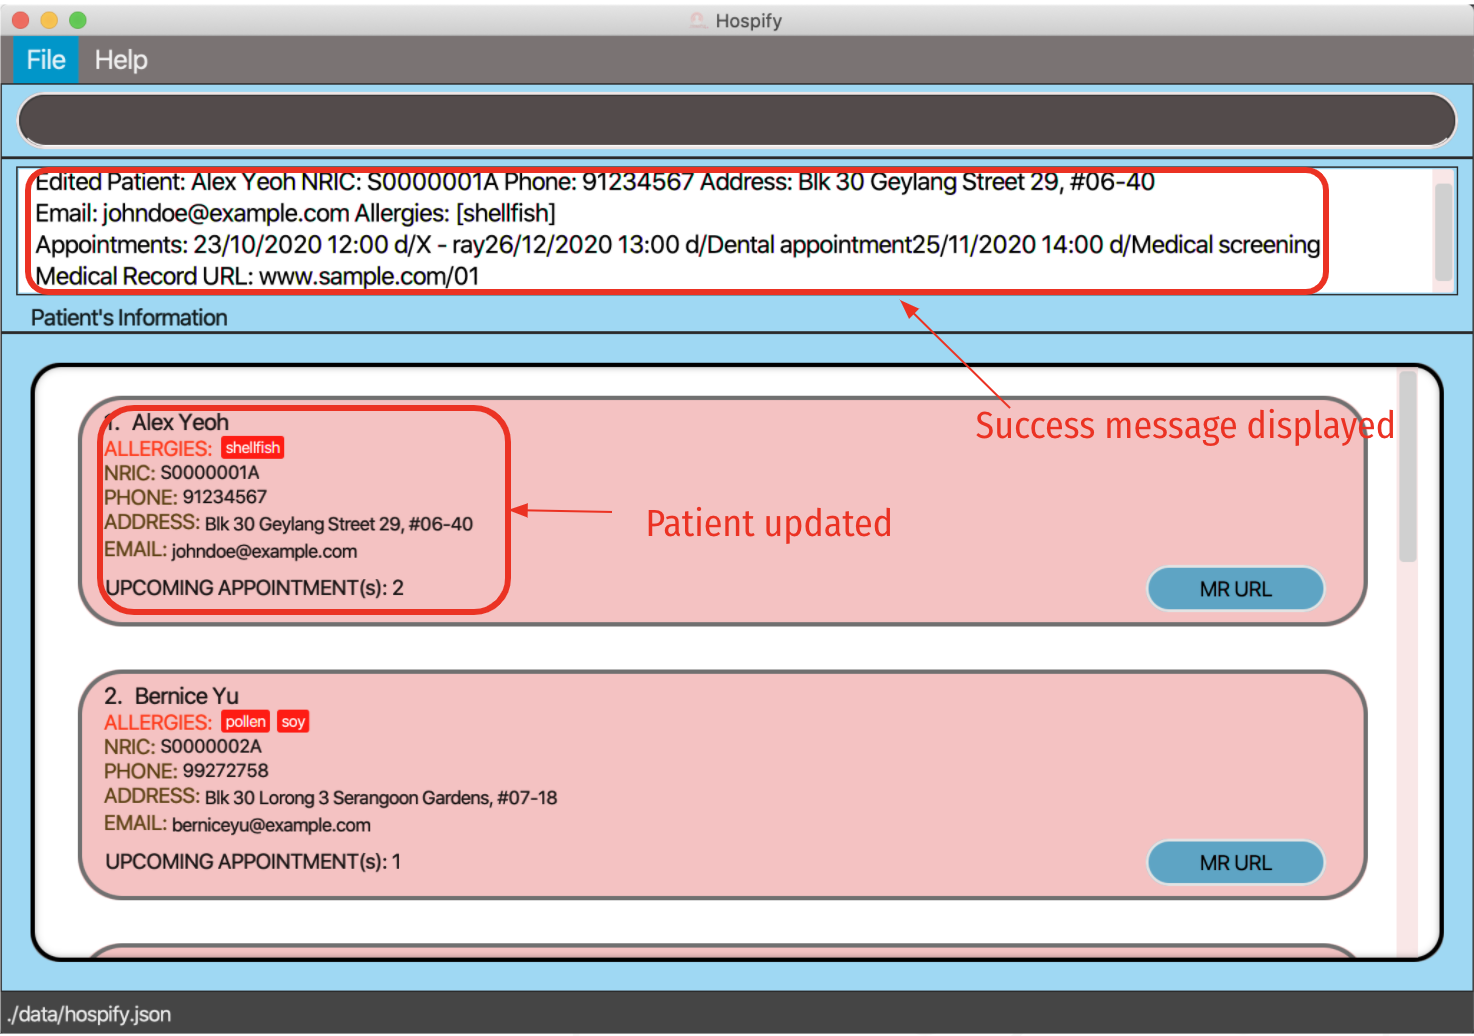 Figure 5.1 Editing a patient(success scenario)
3.5 Locating patients by name or Nric: find (by Gabriel Teo Yu Xiang)
This command allows you to find patients whose names contain any of the given keywords or NRICs.
Format: find KEYWORD [MORE_KEYWORDS] [NRIC] [MORE_NRICs]
- The search is case-insensitive. e.g.
hanswill matchHans, ands1234567awill matchS1234567A - The order of the keywords or NRICs does not matter. e.g.
Hans Bowill matchBo Hans - Both the name and NRIC are searched.
- Patients matching at least one keyword or NRIC will be returned (i.e.
ORsearch). e.g.Hans Bo S7654321Awill returnHans Gruber,Bo Yang,Tom Lee(whose NRIC is S7654321A)
![]() Note:
Note:
-
Only full words will be matched e.g.
Hanwill not matchHans -
Only full NRICs will be matched e.g.
S12345will not matchS1234567A
After executing the command, a message will appear showing the number of patients found, as well as the patients in the list displayed as shown in figures 6.1 and 6.2 below.
Examples:
-
find alex davidreturnsAlex Yeoh,David Li
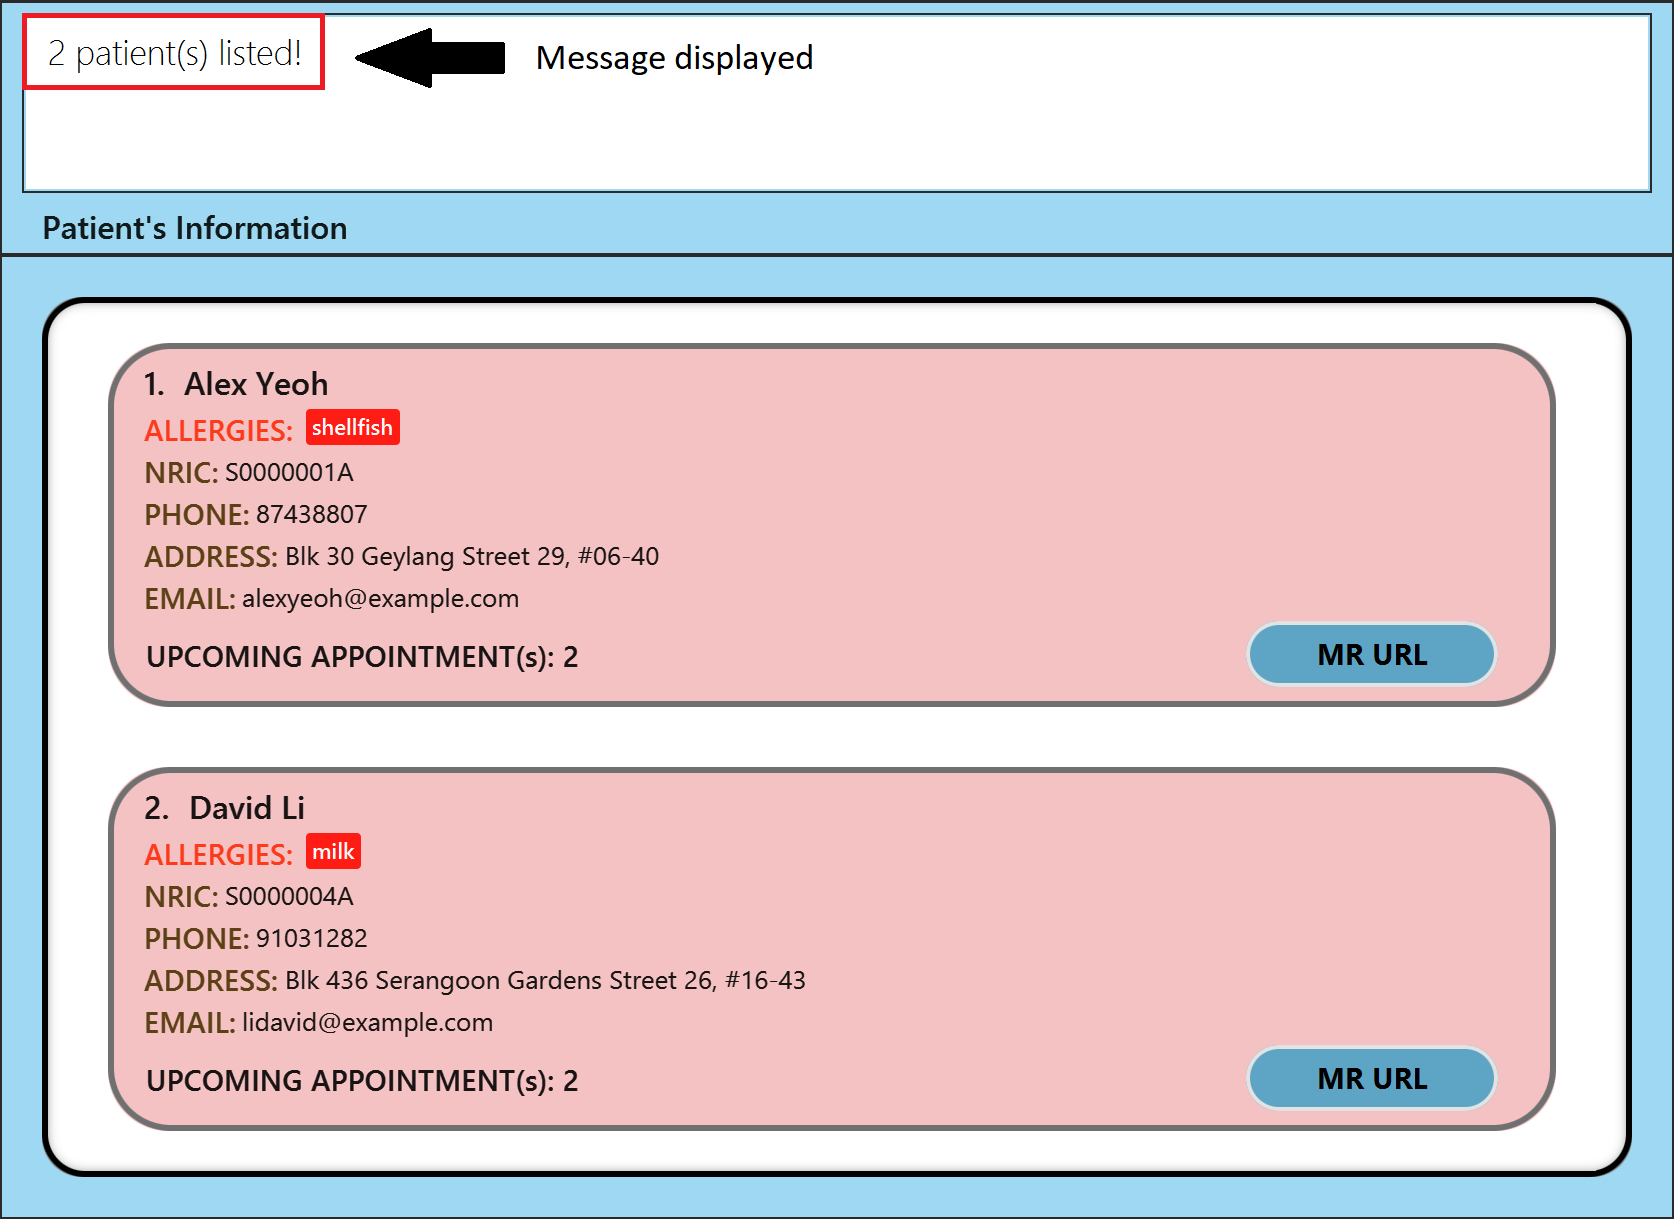 Figure 6.1 Finding patients
 Alex YeohandDavid Li -
find bernice s0000003areturnsBernice Yu,Charlotte Oliveiro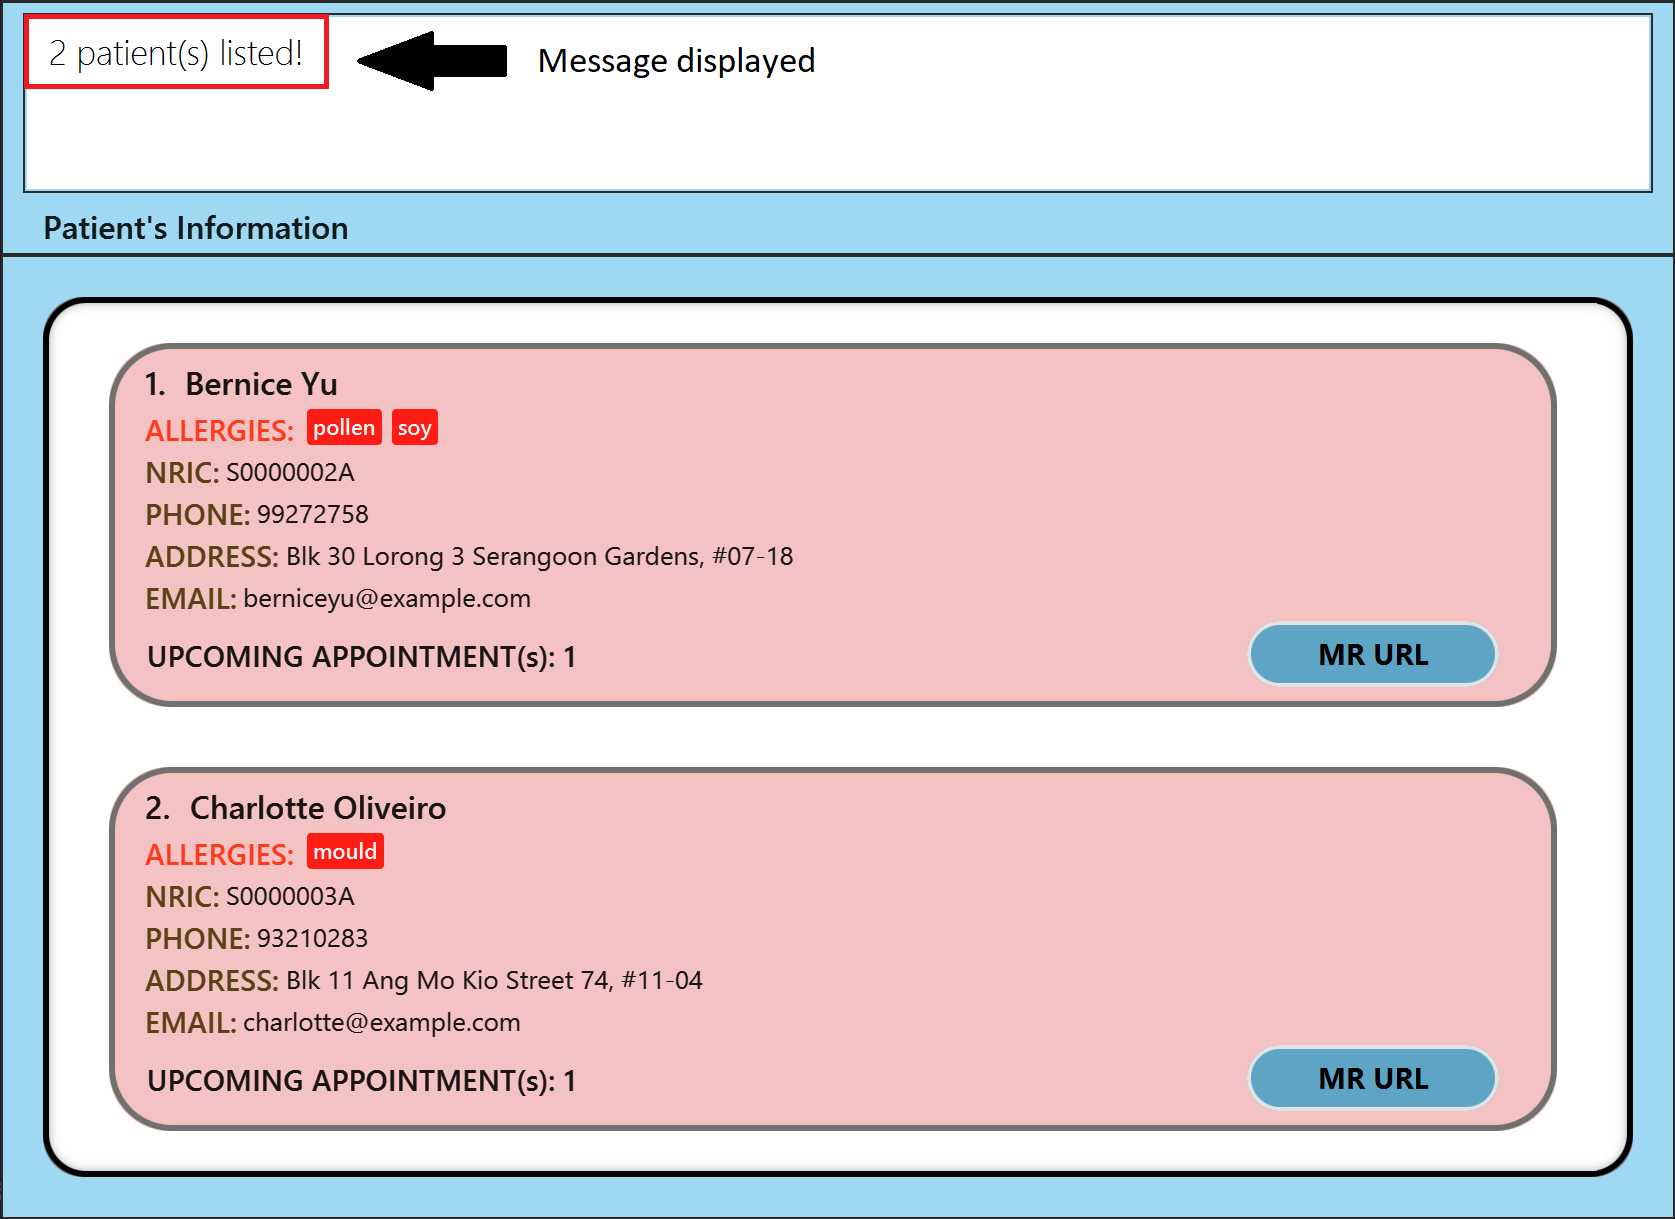 Figure 6.2 Finding patients
 Bernice YuandCharlotte Oliveiro
3.6 Deleting a patient: delete (by Cao Qin)
This command allows you to delete a specific patient from Hospify. As a converse of add command, delete command might
be useful when you find a patient’s information will no longer be used in the system and want to remove it.
To use this command, simply type in delete and the INDEX or NRIC of the patient you want to delete, as specified in the format below.
Format: delete INDEX or delete NRIC
![]() Notes about
Notes about delete command:
-
deletecommand deletes the patient at the specifiedINDEXorNRIC. - The
INDEXrefers to the index number of the patient as shown in the displayed patient list, and it must be a positive integer, such as 1, 2, 3, … - The
NRICrefers to theNRICfield of the patient to be deleted. It should start with an alphabet, followed by 7 digits, before ending with another alphabet. - The
NRICentered is case-insensitive. e.g.s1234567awill matchS1234567A - Only full
NRICs will be matched e.g.S12345will not matchS1234567A - When a patient is successfully deleted from Hospify, a success message will appear in the message box, and the deleted patient will disappear from the displayed patient list.
To help you get more familiar with the delete command, here are some examples of using this command, as shown below.
Examples:
scenario 1 (delete by index):
-
list(shown in Figure 7.1 below) followed bydelete 2(shown in Figure 7.2 below) deletes the 2nd patient in Hospify’s patient list.listcommand shows all the patients and their corresponding index.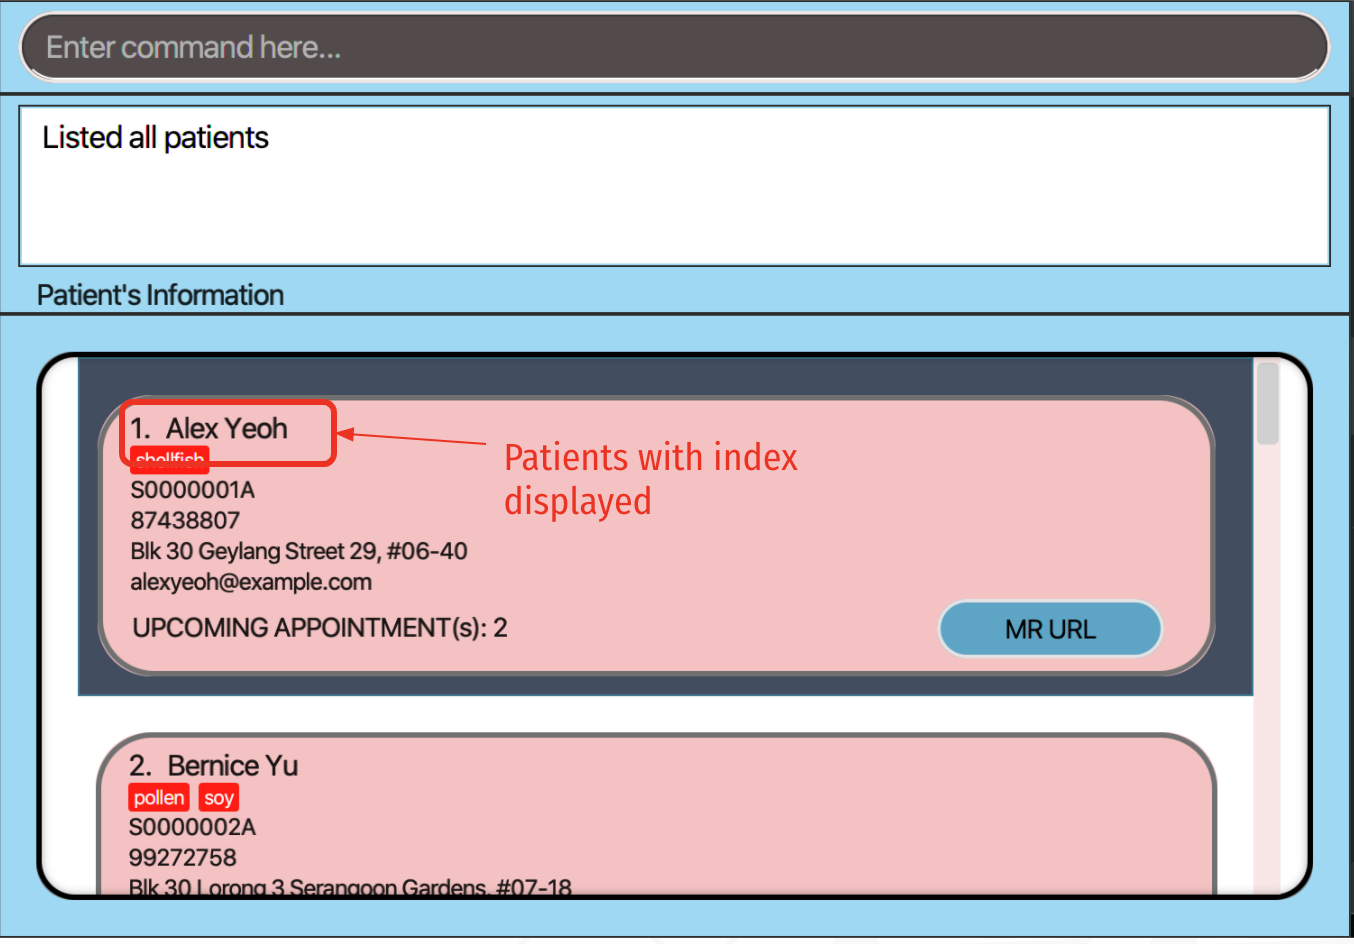 Figure 7.1 result of
 listcommanddelete 2command deletes the patient with index 2.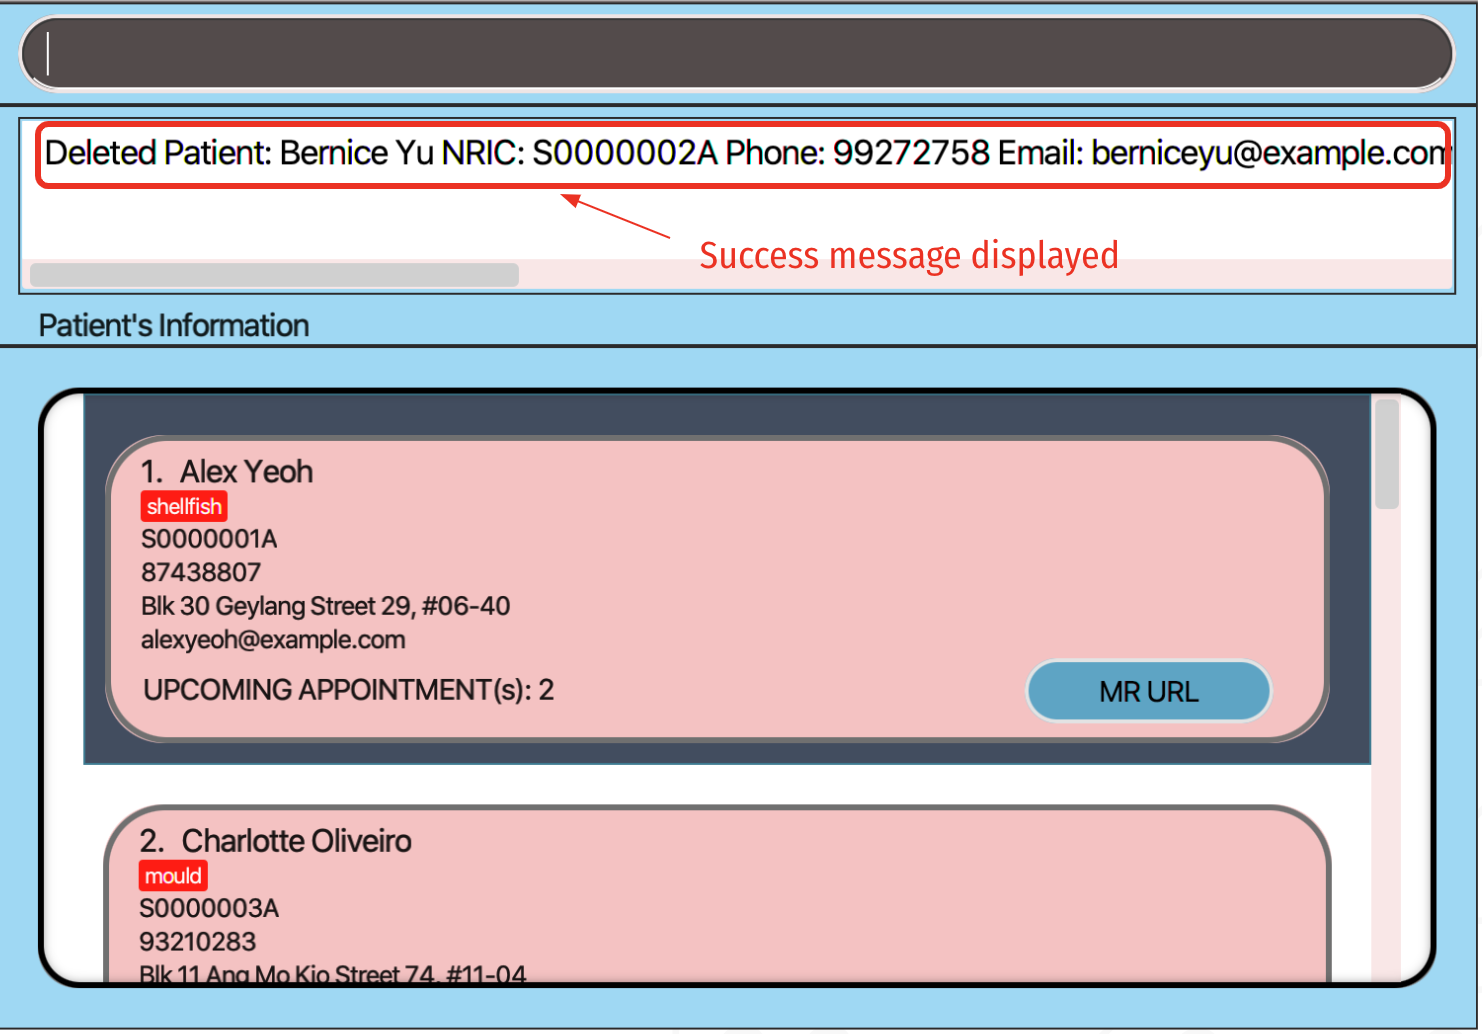 Figure 7.2 result of
 delete 2command
scenario 2 (delete by nric):
-
delete S0000004A(shown in Figure 7.3 below) deletesDavid Li(whose NRIC is S0000004A).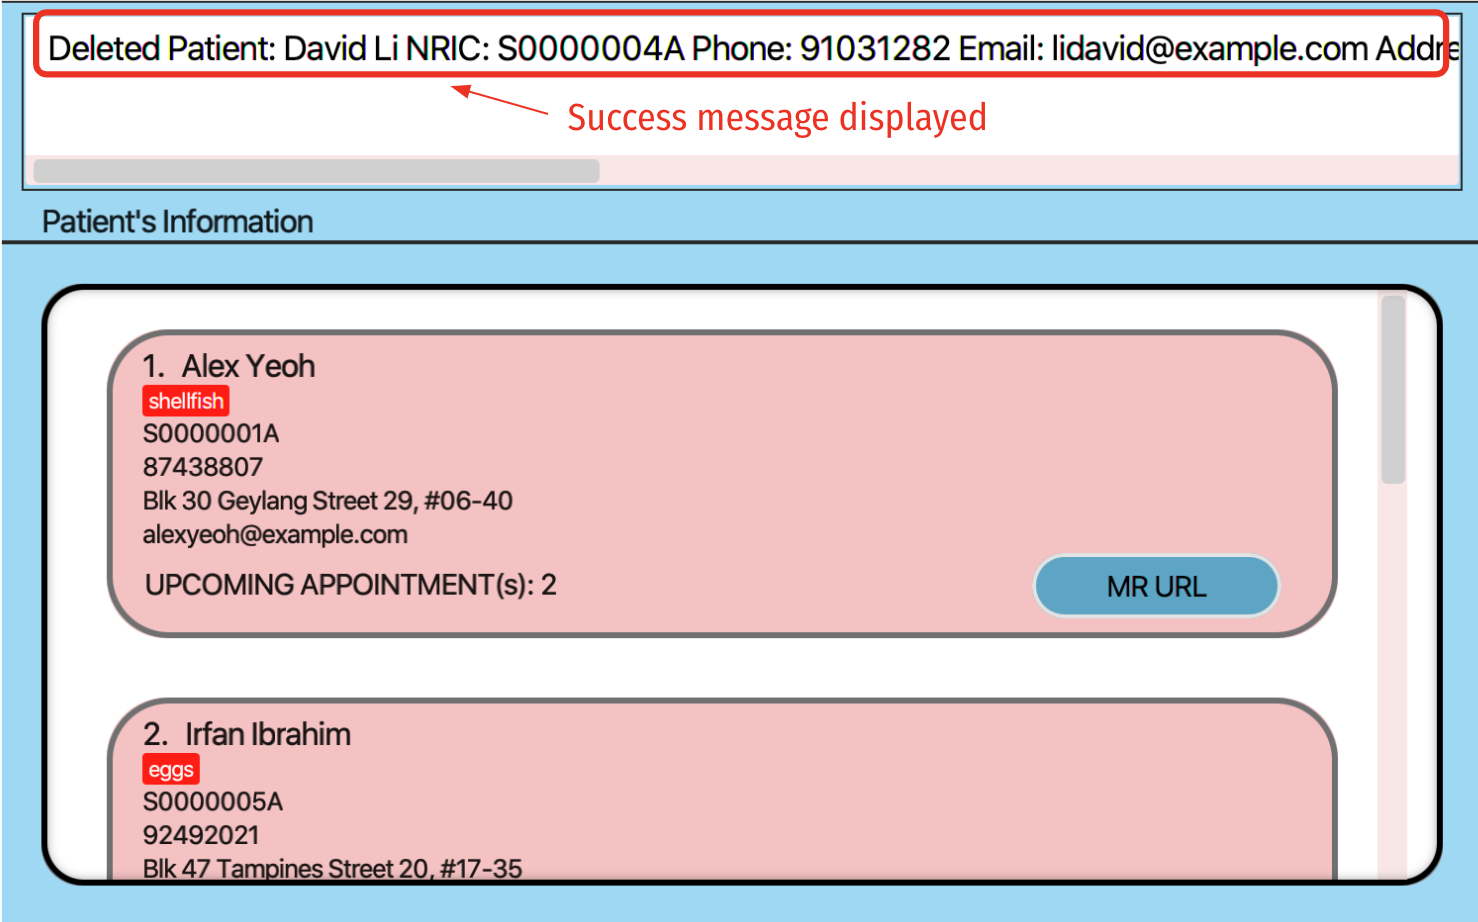 Figure 7.3 result of
 delete S0000004Acommand
3.7 Counting total number of patients: count (by Chong Jia Le)
This command allows you to see the total number of patients recorded in Hospify.
To use this command, simply type in count on the command line with no additional parameters.
Format: count
![]() Note:
Note:
- The total number of patients will always be provided, and not the number of patients currently displayed in the list.
Example:
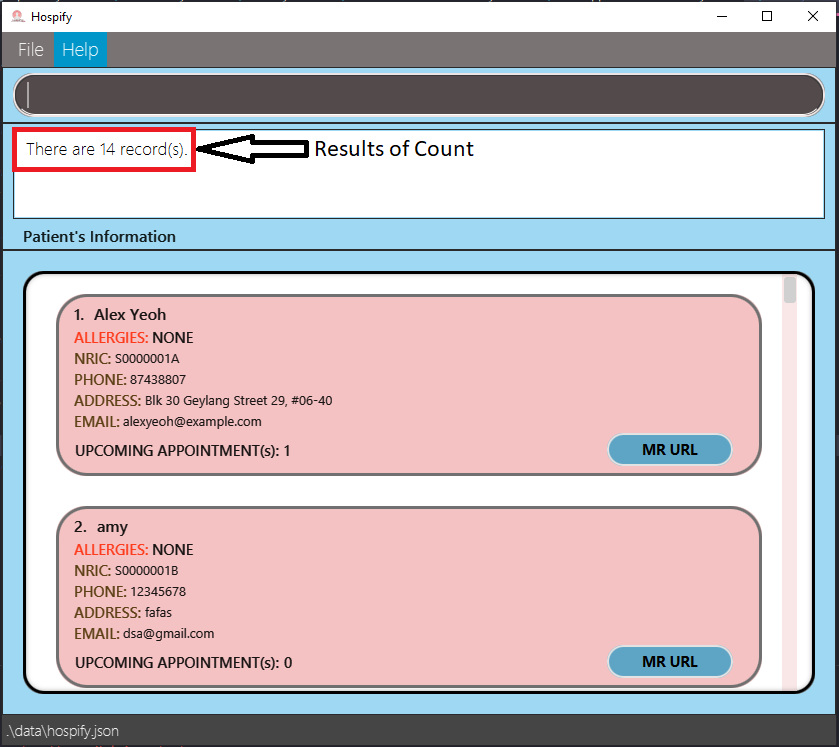 Figure 8.1 Result of
 count command
3.8 Sorting the patients: sort (by Chong Jia Le)
This function allows you to sort the patients in Hospify. The sort can be performed by either name or NRIC and it will be sorted in ascending order.
Using this command after you have used the find command, which displays a partial list of patient, would allow you to sort the partial list.
To use this command, simply type in sort on the command line followed by either name or NRIC depending on how you want the patients to be sorted.
Format: sort name or sort NRIC
Examples:
-
Performing
sort namewould result in the patients to be sorted by their name in ascending order, as shown in the steps below.-
Initially, list of patients is not sorted by name as seen below:
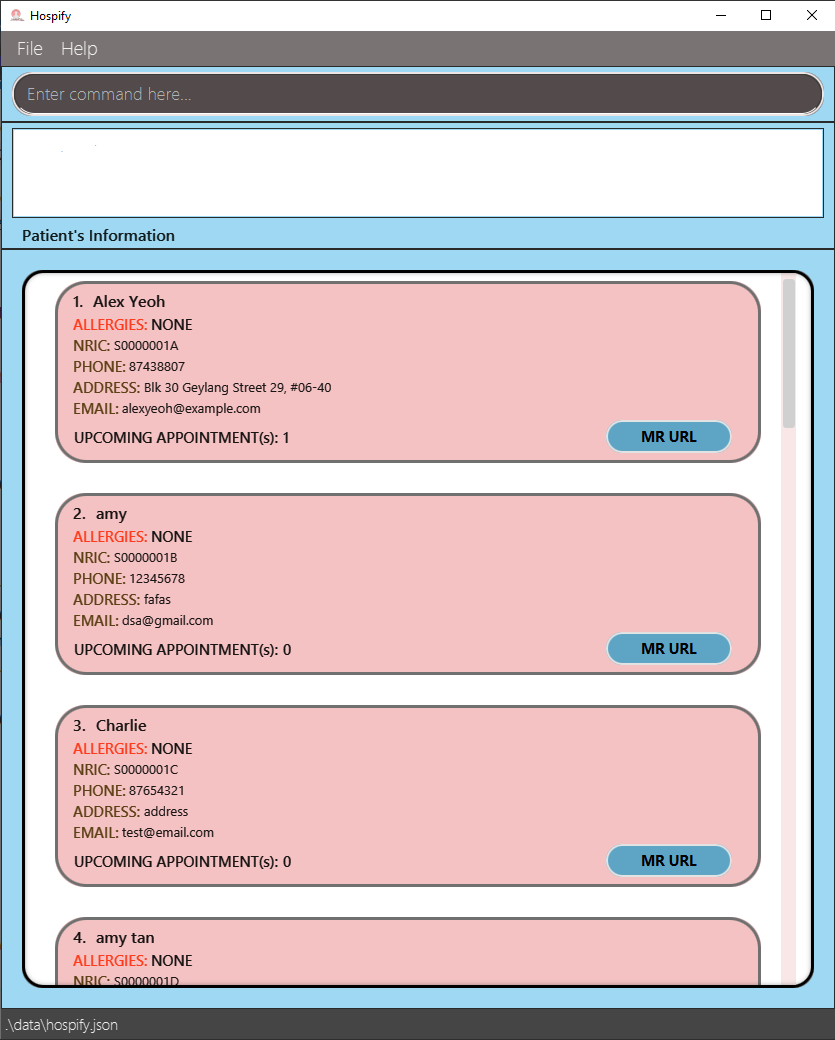 Figure 9.1 List of patients not sorted by name
 -
After user inputs
sort namelist is sorted as seen below: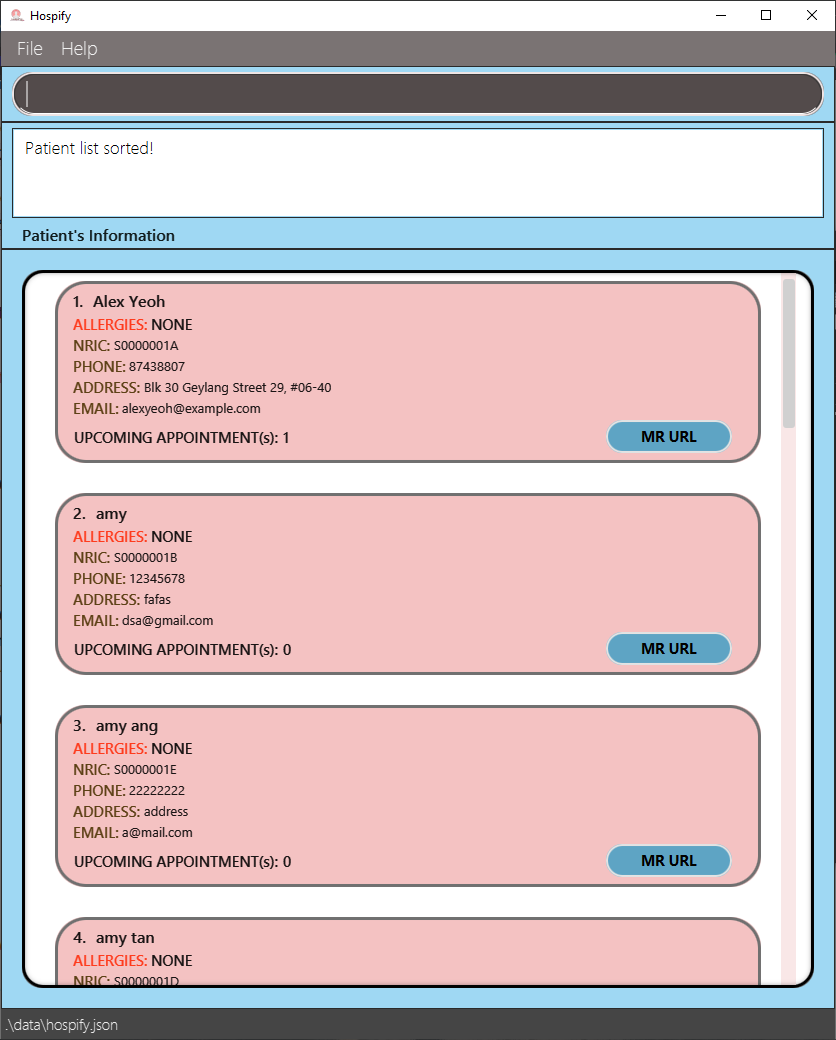 Figure 9.2 List of patients after
 sort name
-
-
Performing
sort NRICwould result in the patients to be sorted by their NRIC in ascending order, as shown in the steps below.-
Initially, list of patients is not sorted by NRIC as seen below:
 Figure 9.3 List of patients not sorted by NRIC
 -
After user inputs
sort NRIClist is sorted as seen below: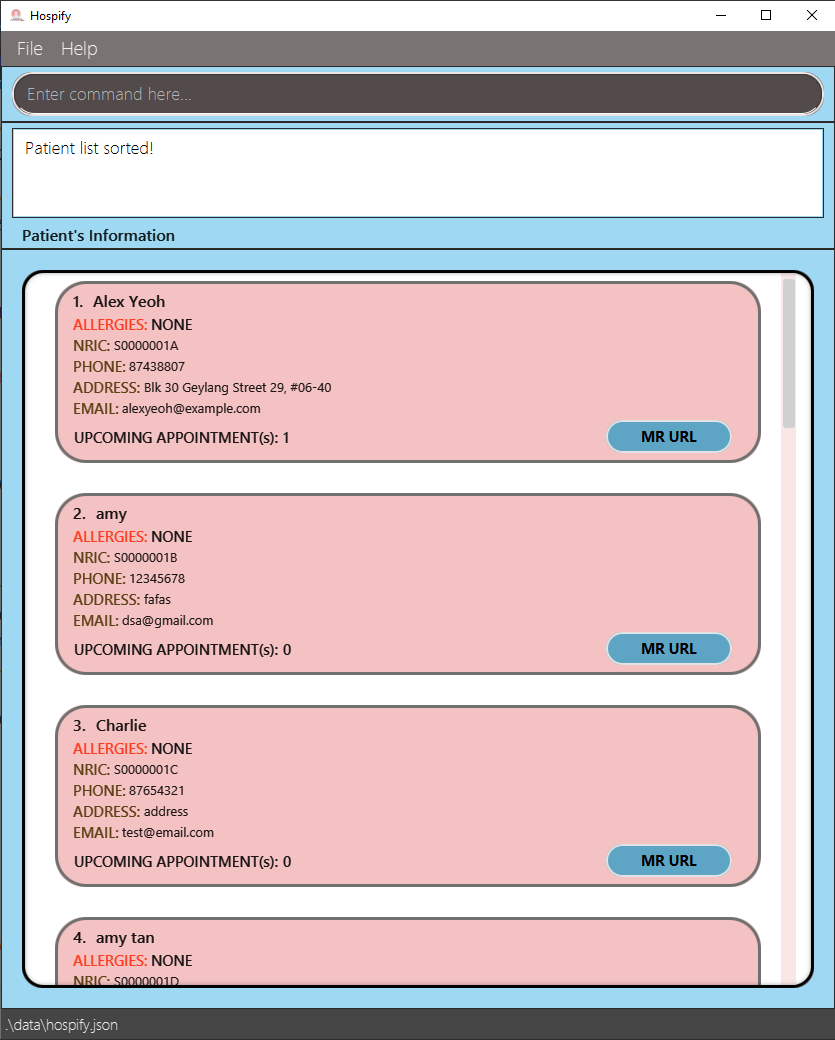 Figure 9.4 List of patients after
 sort NRIC
-
-
Performing
find amyfollowed bysort namewould result in the app displaying all patients whose names containamysorted in alphabetical order by their name.-
find amyis performed resulting in the application showing only patients whose names containamyas shown below: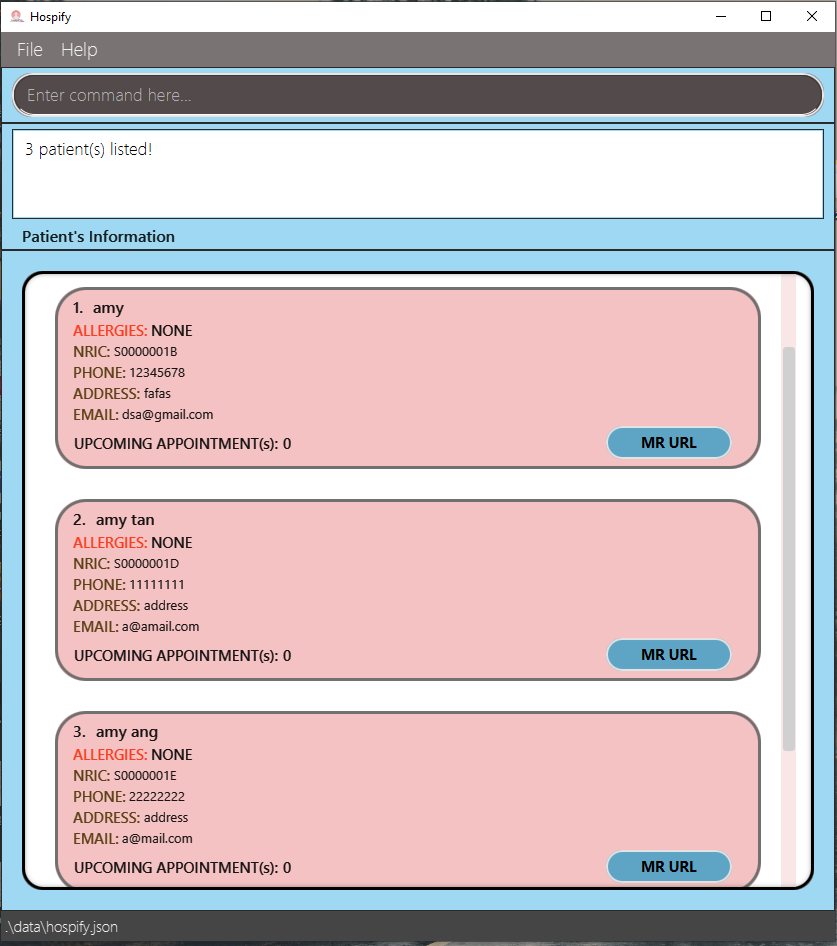 Figure 9.5 Partial list of patients after
 find amy -
After the user inputs
sort name, the partial list is sorted as seen below: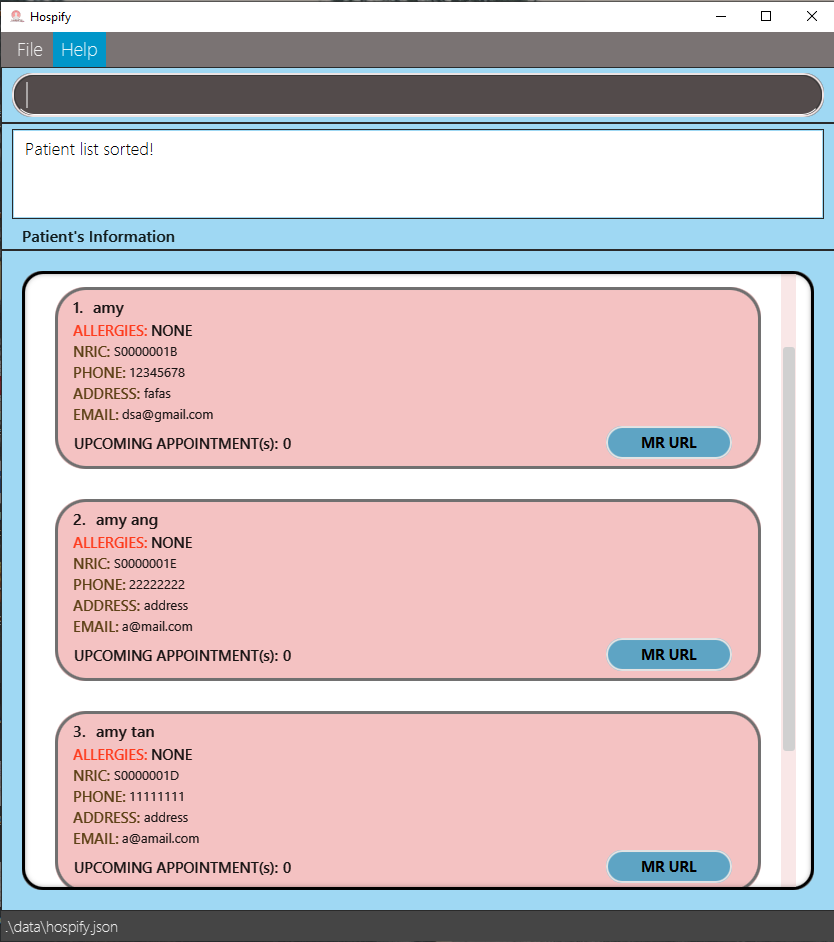 Figure 9.6 Partial list of patients after
 sort name
-
3.9 Showing Appointments of a Patient: showAppt (by Peh Jun Siang)
The showAppt command shows you all the appointments of a patient in a table for ease of viewing.
Unlike other commands, you can click on the patient’s information to show the appointments without needing to enter any commands.
3.9.1 Using the GUI
You can simply double click on the patient to display all the appointments of that patient.
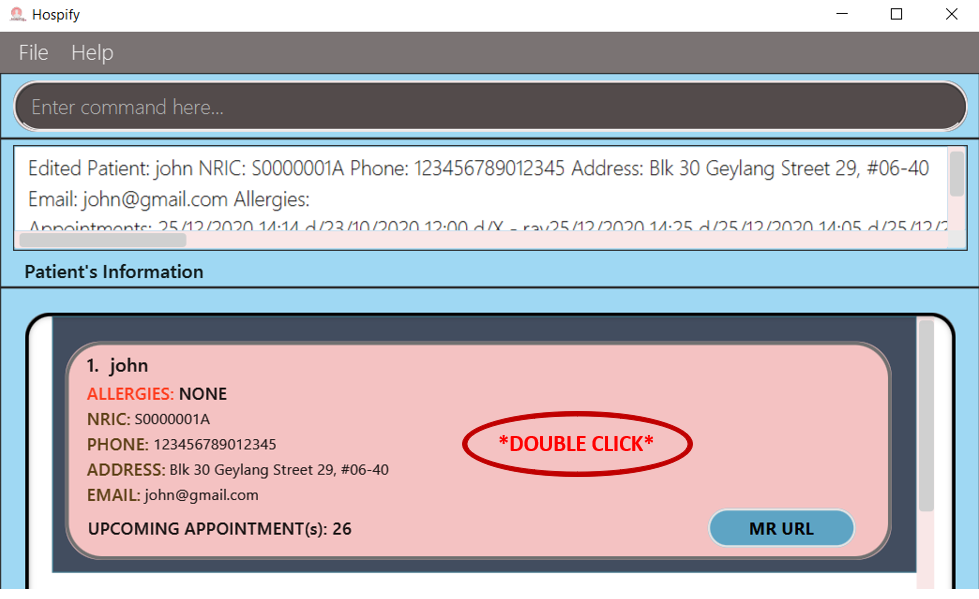 Figure 10.1 Show appointments via GUI
3.9.2 Using the Command Line
If the number of patients is too large, it might be difficult to find the patient’s information to click. In that case, you can use the command line to show the patient’s appointments.
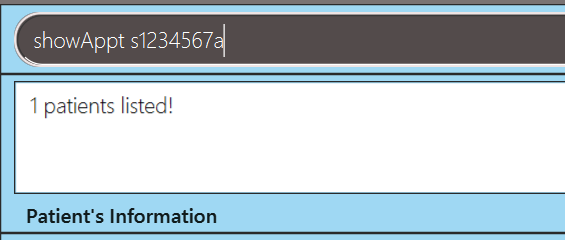
Figure 10.2 Show appointments via Command Line
Format: showAppt NRIC
Example: showAppt S1234567A
The Appointment window should pop up after successfully running the command either through the GUI or the Command Line shown below.
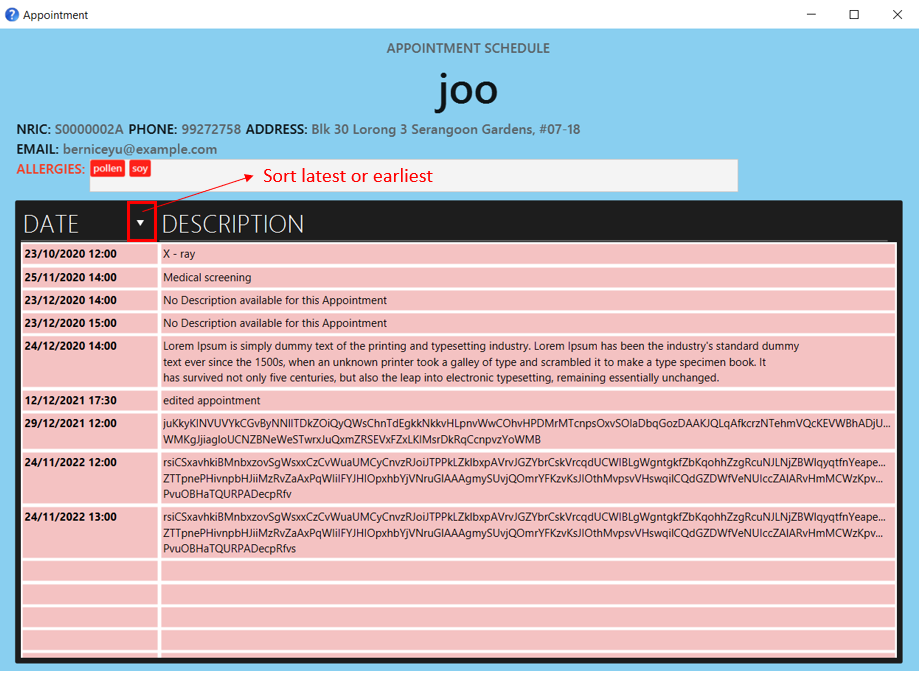 Figure 10.3 Appointments window with appointments of patient
showAppt takes in only ONE NRIC of the patient to show.
3.10 Adding an Appointment: addAppt (by Gabriel Teo Yu Xiang)
This command allows you to schedule an Appointment for a patient in Hospify.
Format: addAppt NRIC appt/DATE TIME [d/DESCRIPTION]
-
NRICrepresents theNRICof the patient you are adding anAppointmentto. -
DATEandTIMErepresent the date and time of theAppointmentrespectively. -
DESCRIPTIONrepresents the name or brief description of theAppointment. e.g.Eye Check-uporPhysiotherapy Session
DATE and TIME parameters must be specified in the following formats:
![]() Note: The appointment description is optional and may be left out
Note: The appointment description is optional and may be left out
- Date format:
| Format | Example |
|---|---|
| dd/MM/yyyy | 28/09/2022 |
- Time format:
| Format | Example |
|---|---|
| HH:mm | 20:00 |
Examples:
addAppt S1234567A appt/25/12/2020 15:00addAppt S0000001A appt/28/09/2022 20:00 d/Eye Check-up
When an Appointment is successfully added to a patient, a success message will appear in the message box, and the number of upcoming appointments will be updated and reflected as shown in figure 11.1 below.
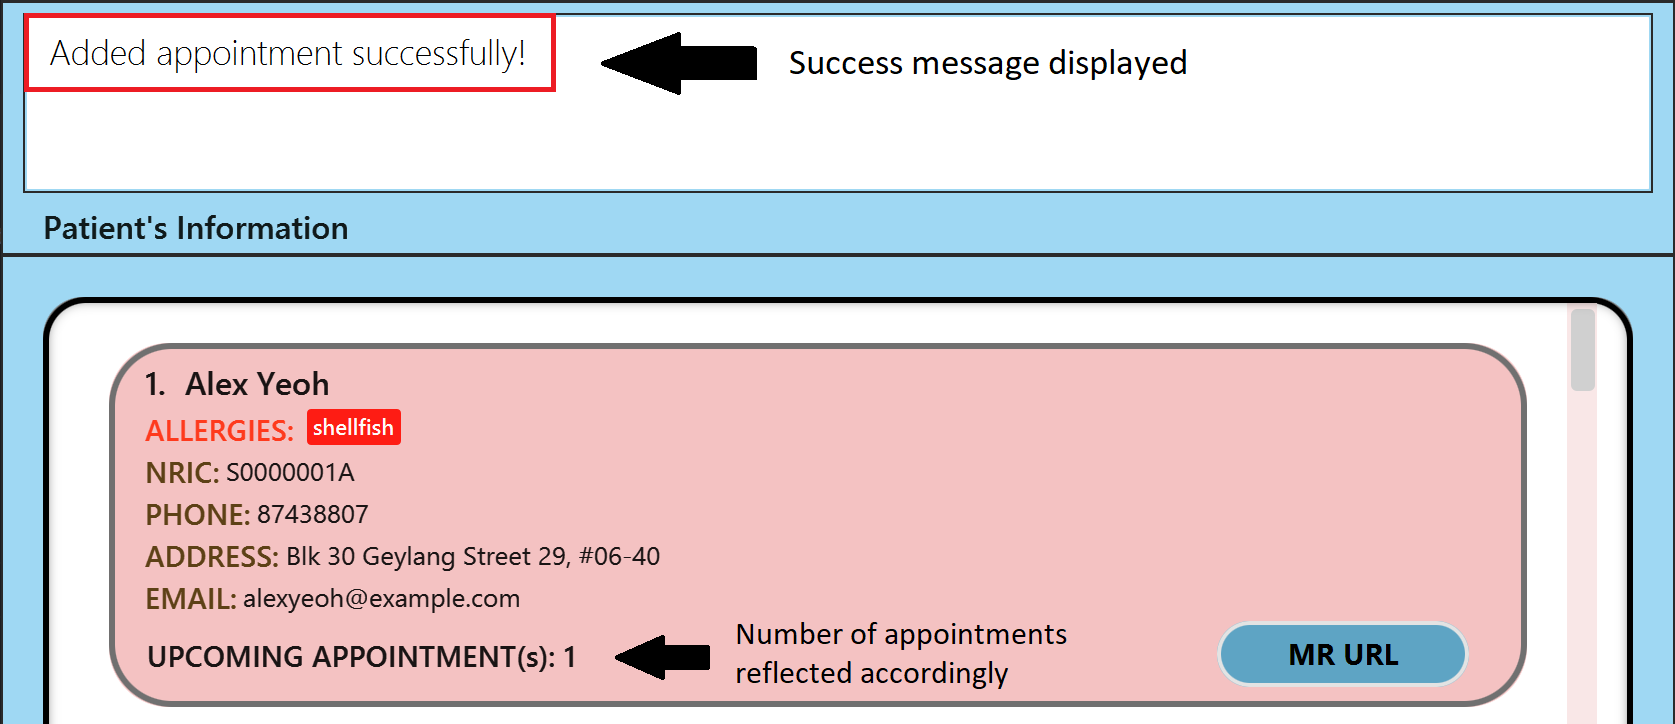 Figure 11.1 Adding an appointment (success scenario)
3.11 Editing an Appointment: editAppt (by Gabriel Teo Yu Xiang)
This command allows you to edit an existing Appointment for a patient in Hospify.
Format: editAppt NRIC oldappt/DATE TIME newappt/DATE TIME [d/DESCRIPTION]
![]() Note on different appointment parameters:
Note on different appointment parameters:
-
There are two separate
Appointmenttimings specified in the format -
The old
Appointmenttiming is preceded by aoldappt/prefix -
The new
Appointmenttiming is preceded by anewappt/prefix -
The new
Appointmentdescription is optional
i.e. you can choose whether or not to edit the description
- The
Appointmentto edit must be an existing appointment of the patient. -
NRICrepresents theNRICof the patient whoseAppointmentyou are editing. -
DATEandTIMEformats follow the same format as specified in theaddApptcommand section. -
DESCRIPTIONrepresents the description of the newAppointmentto be changed to.
Examples:
editAppt S0000001A oldappt/28/09/2022 20:00 newappt/30/09/2022 15:00editAppt S1234567A oldappt/25/12/2020 20:00 newappt/10/01/2021 14:00 d/Revisit
When an Appointment is successfully edited, a success message will appear in the message box as shown in figure 12.1 below.
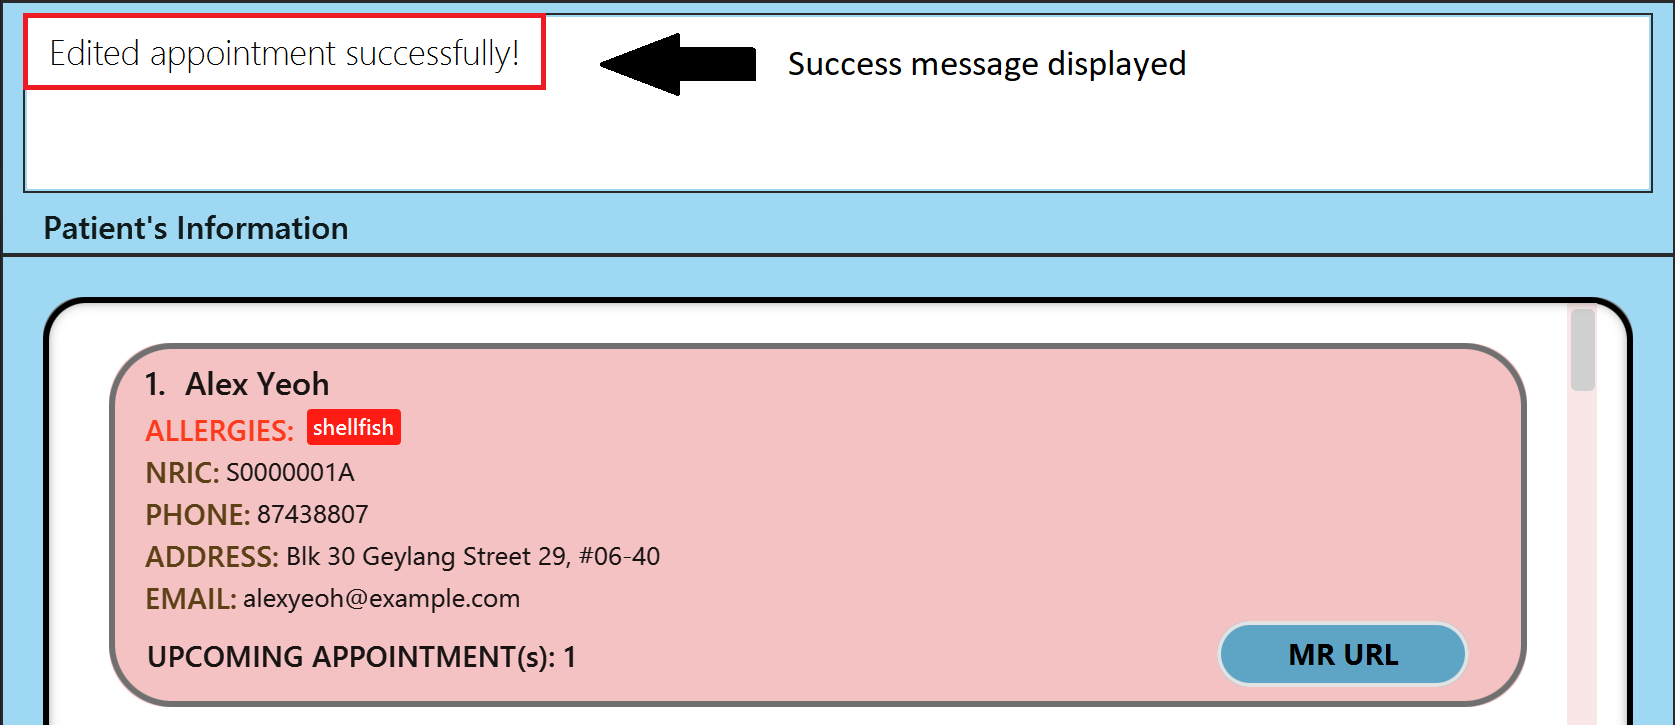 Figure 12.1 Editing an appointment (success scenario)
3.12 Deleting an Appointment: deleteAppt (by Gabriel Teo Yu Xiang)
This command allows you to delete an existing Appointment for a patient in Hospify.
Format: deleteAppt NRIC appt/DATE TIME
- The
Appointmentto delete must be an existing appointment of the patient. - The
Appointmentname/description does not need to be specified, since Hospify does not allow multiple appointments of the same timing for the same patient, and every appointment will have a unique timing. -
NRICrepresents theNRICof the patient whoseAppointmentyou are deleting. -
DATEandTIMErepresent the date and time of theAppointmentto be deleted. -
DATEandTIMEformats follow the same format as specified in theaddApptcommand section.
Example:
deleteAppt S0000001A appt/28/09/2022 20:00
When an Appointment is successfully deleted, a success message will appear in the message box, and the number of upcoming appointments will be updated and reflected as shown in figure 13.1 below.
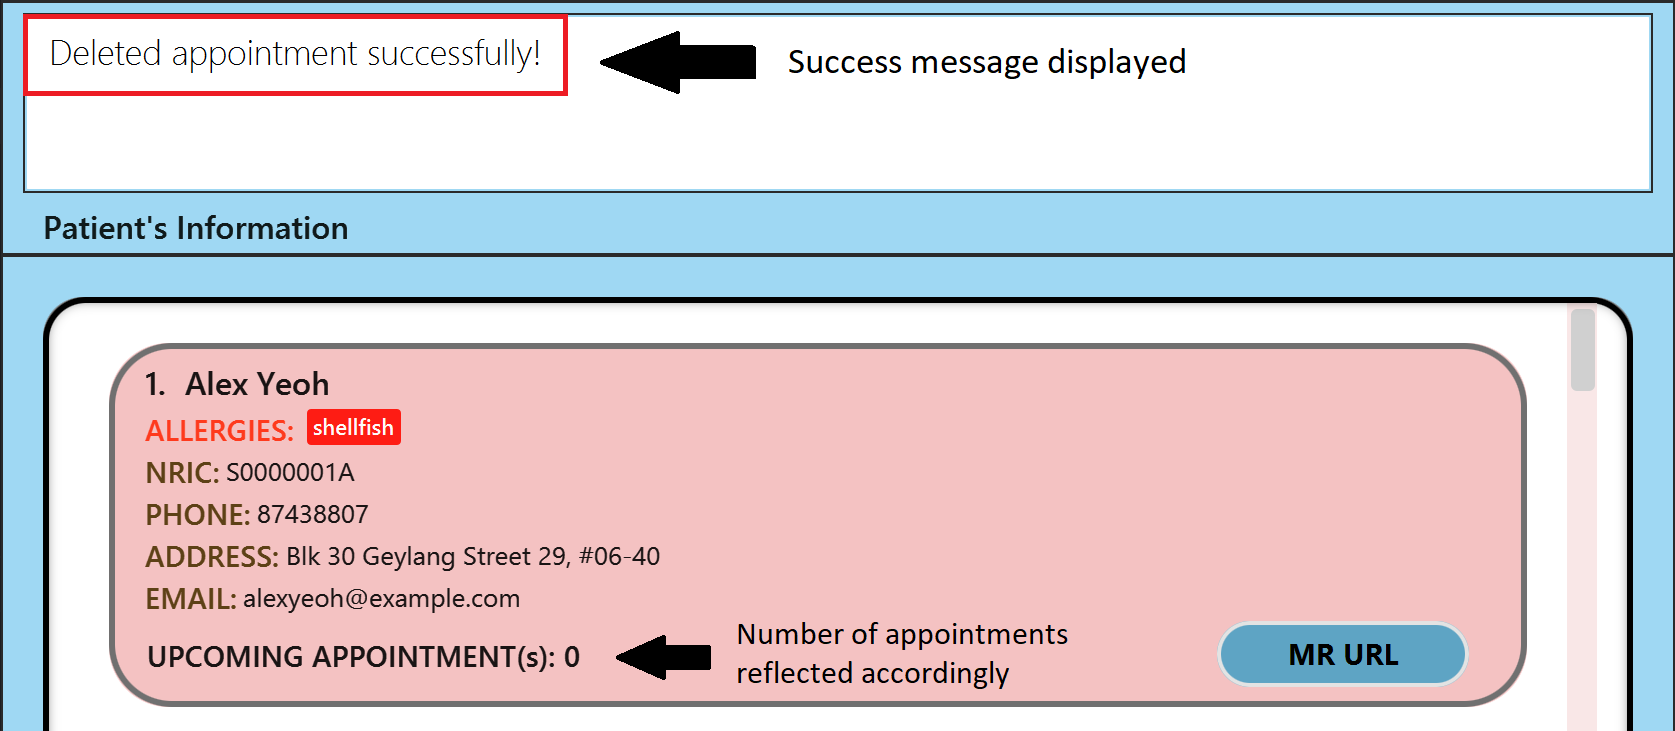 Figure 13.1 Deleting an appointment (success scenario)
3.13 Using the Medical Record feature: mr/ (by Cedric Lim Jun Wei)
By now we have learnt that we can add and edit patients by including the mr/MEDICAL_RECORD_URL field. Recall that this is a compulsory field for the add command while it is an optional field for the edit command and we can summarise the command formats as shown below.
Format: add n/NAME … mr/MEDICAL_RECORD_URL … or edit INDEX … [mr/MEDICAL_RECORD_URL] …
Example: add n/John Doe … mr/www.samplemedicalrecord.com/01 … or edit 1 … mr/www.samplemedicalrecord.com/02 …
With this field, you can store the url to the online medical record of the patient and can access this url in the patient’s tab whenever necessary. Now, let us explore how we can make use of this feature to edit patients’ online medical record.
![]() Note on choice of medical record url:
Note on choice of medical record url:
-
It is helpful to generate the medical record url before adding or editing a patient.
-
We recommend using a secure online documenting software to store the patients’ medical record for privacy purposes.
In the following example, we will be using Google Docs to store the medical record of patient John Doe.
-
First, we add patient
John Doeusing theaddcommand. For this step, we will be using the urlhttps://docs.google.com/document/d/1cWm83218iwKEzNHP41vHFWLukaDn6eYompjyCcJxBiA/edit. Upon successful addition, you should be able to see a success message including theMEDICAL_RECORD_URLyou have just added when you scroll the message box to the bottom as shown in figure 14.1 below.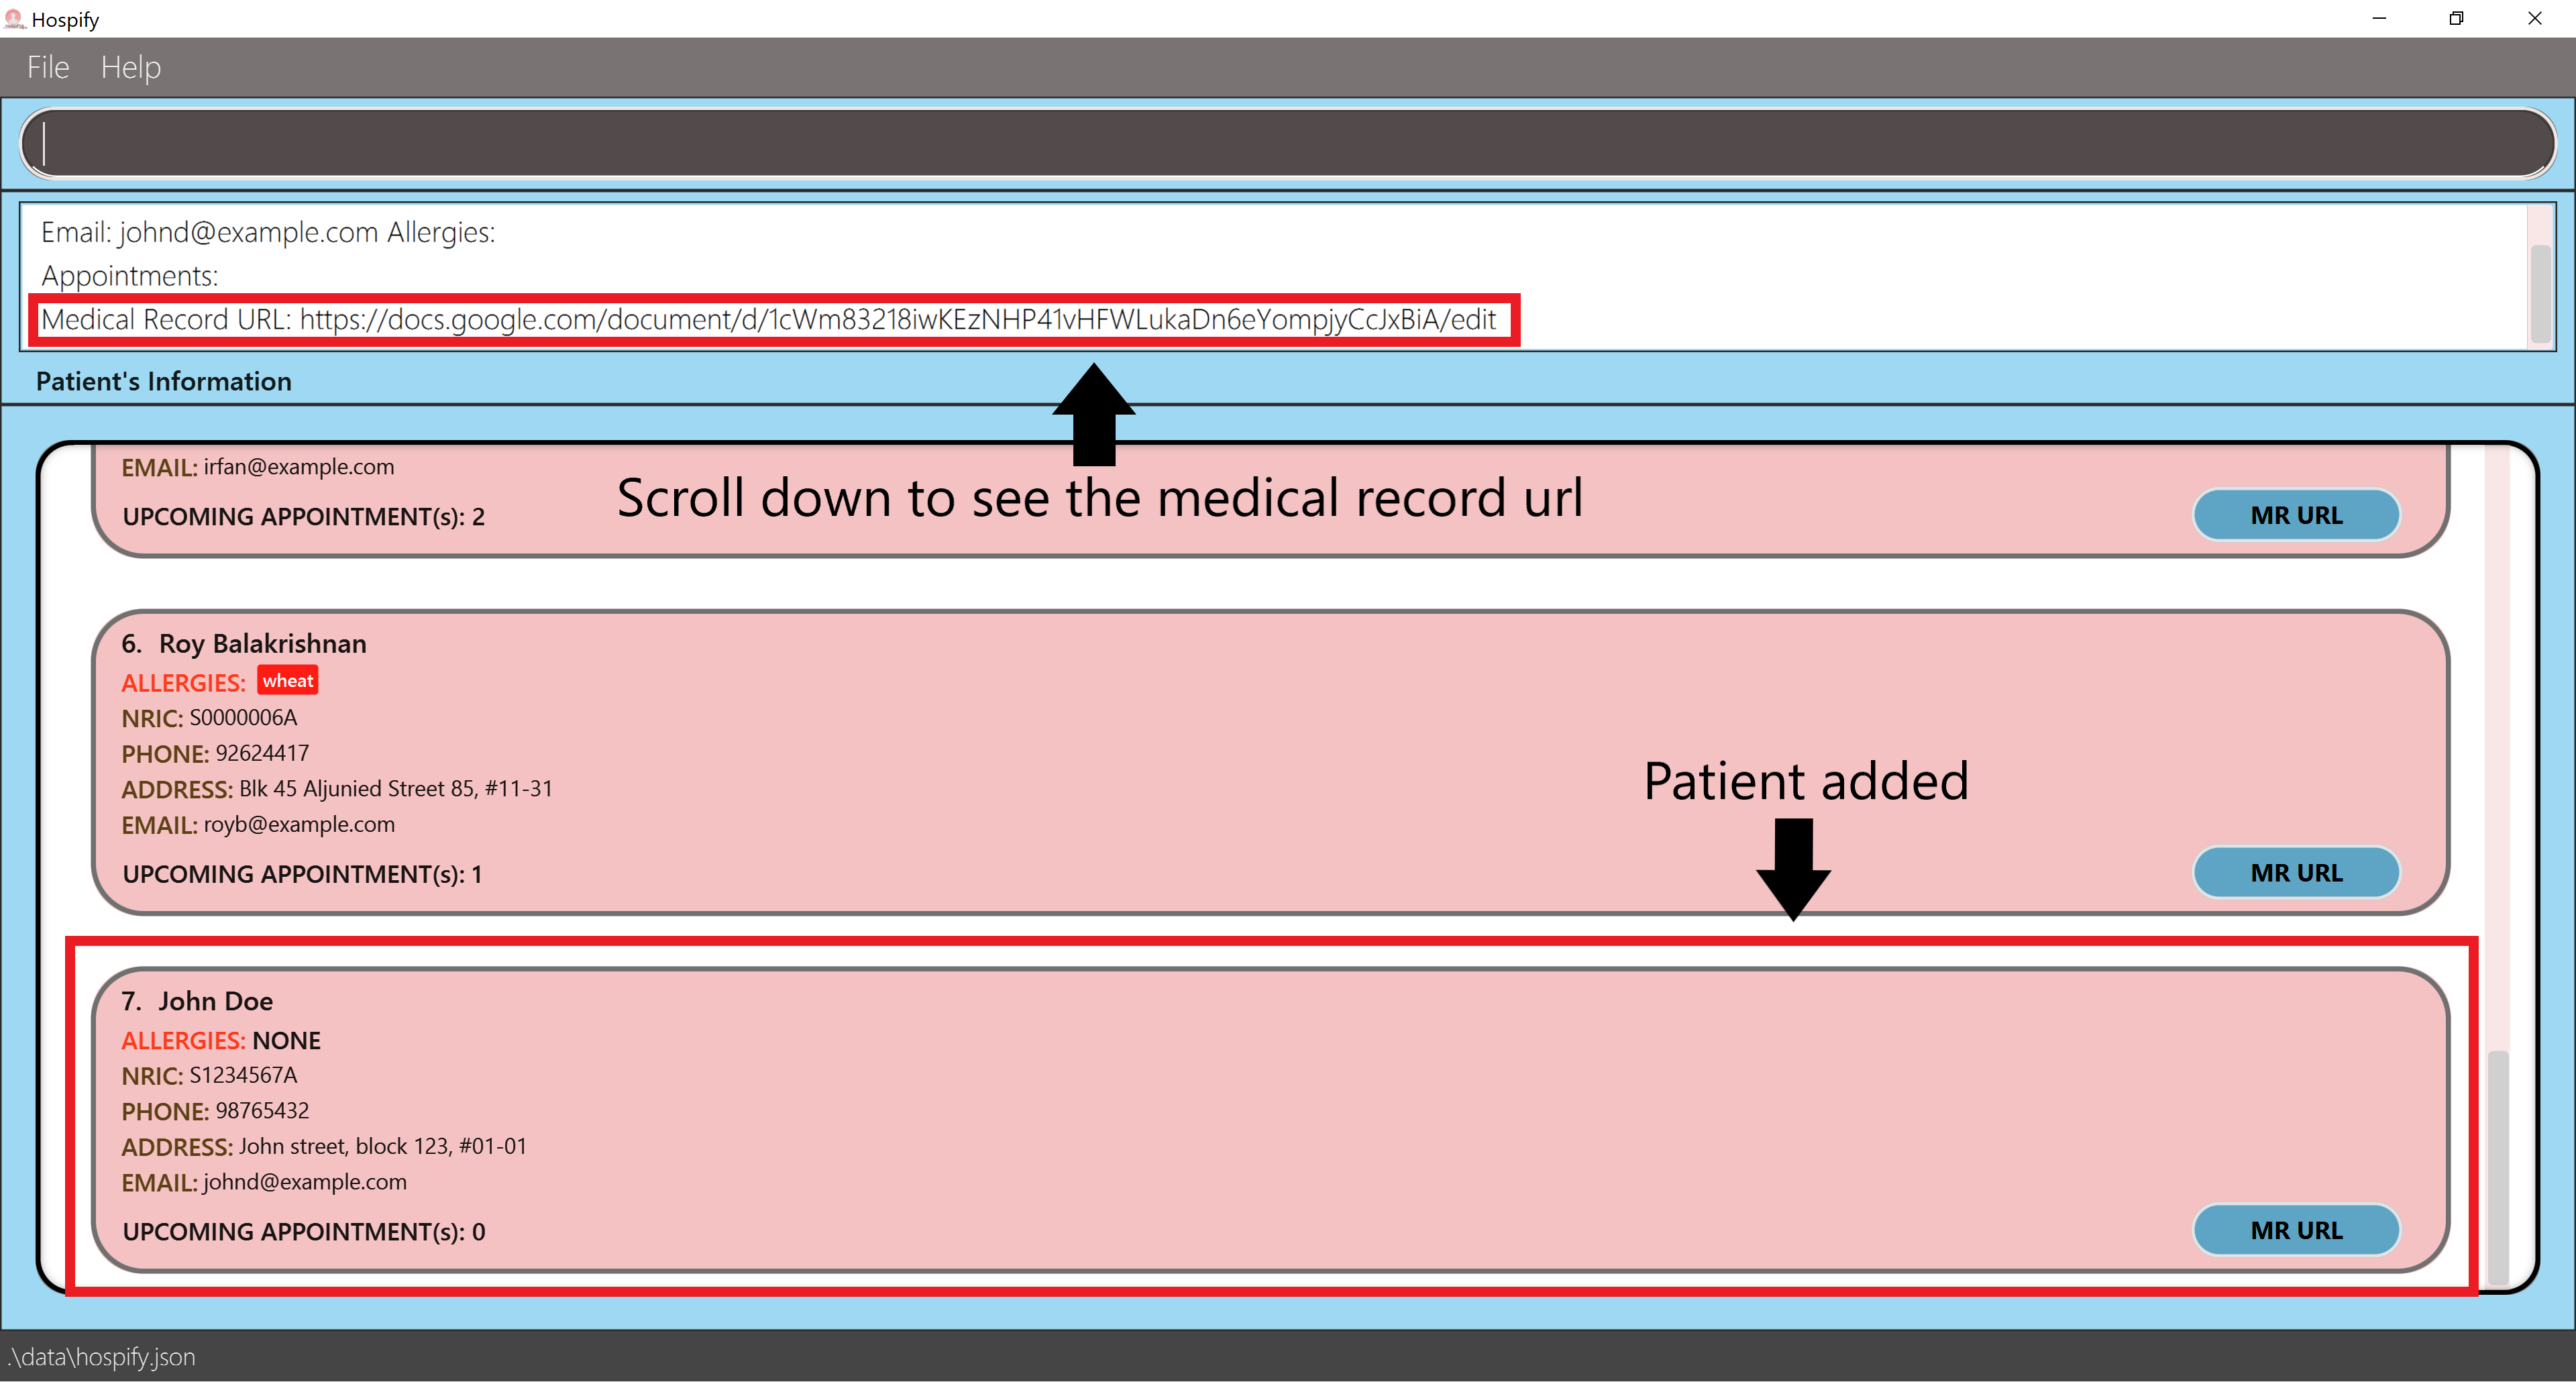 Figure 14.1 Adding patient John Doe
 -
Next, to copy the medical record url of patient
John Doethat we have just added, locate the patient in the list and click on theMR URLbutton located on the bottom right corner as shown in figure 14.2 below. ALink Copied!success message should appear once clicked, indicating that the link has been copied to the system clipboard. Figure 14.2 Copying medical record url of John Doe
 -
Then, open the web browser of your choice and paste the medical record url onto the search bar as shown in figure 14.3 below.
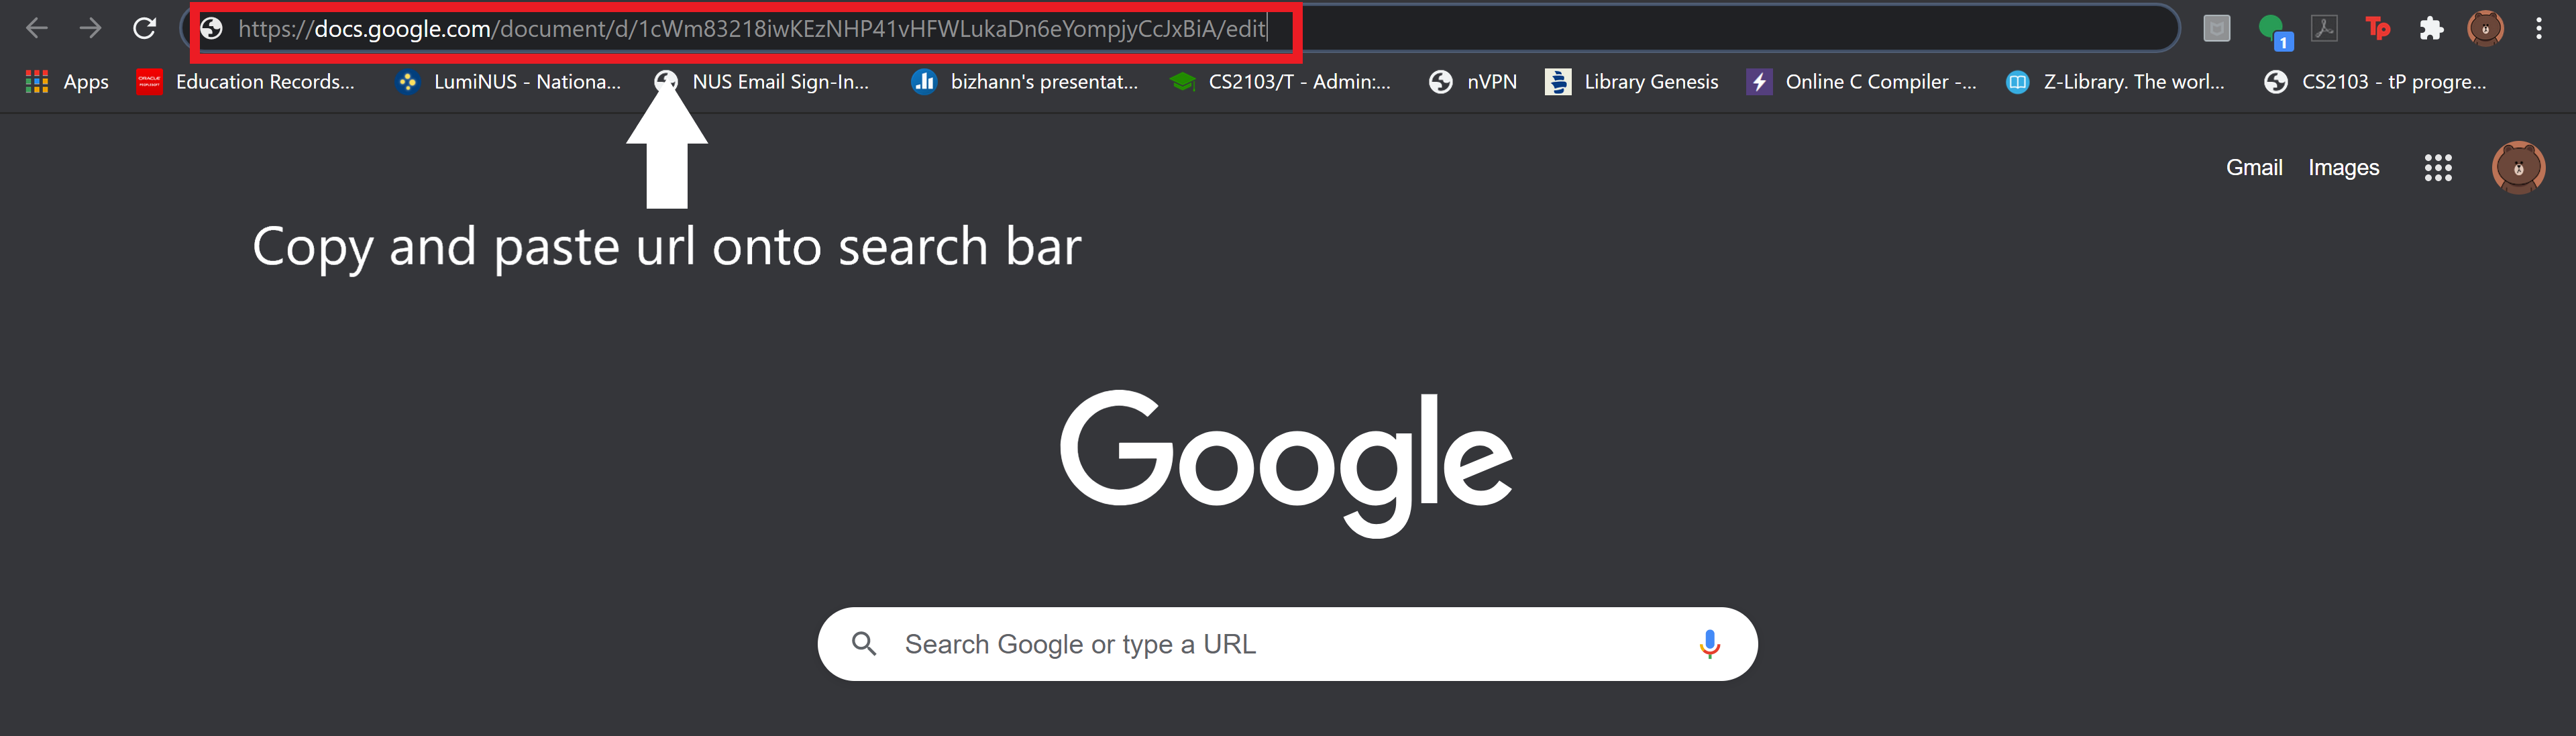 Figure 14.3 Pasting medical record url of John Doe onto search bar
 -
Finally, you can access the medical record of the patient and make edits if applicable. A sample medical record is shown in figure 14.4 below for your reference.
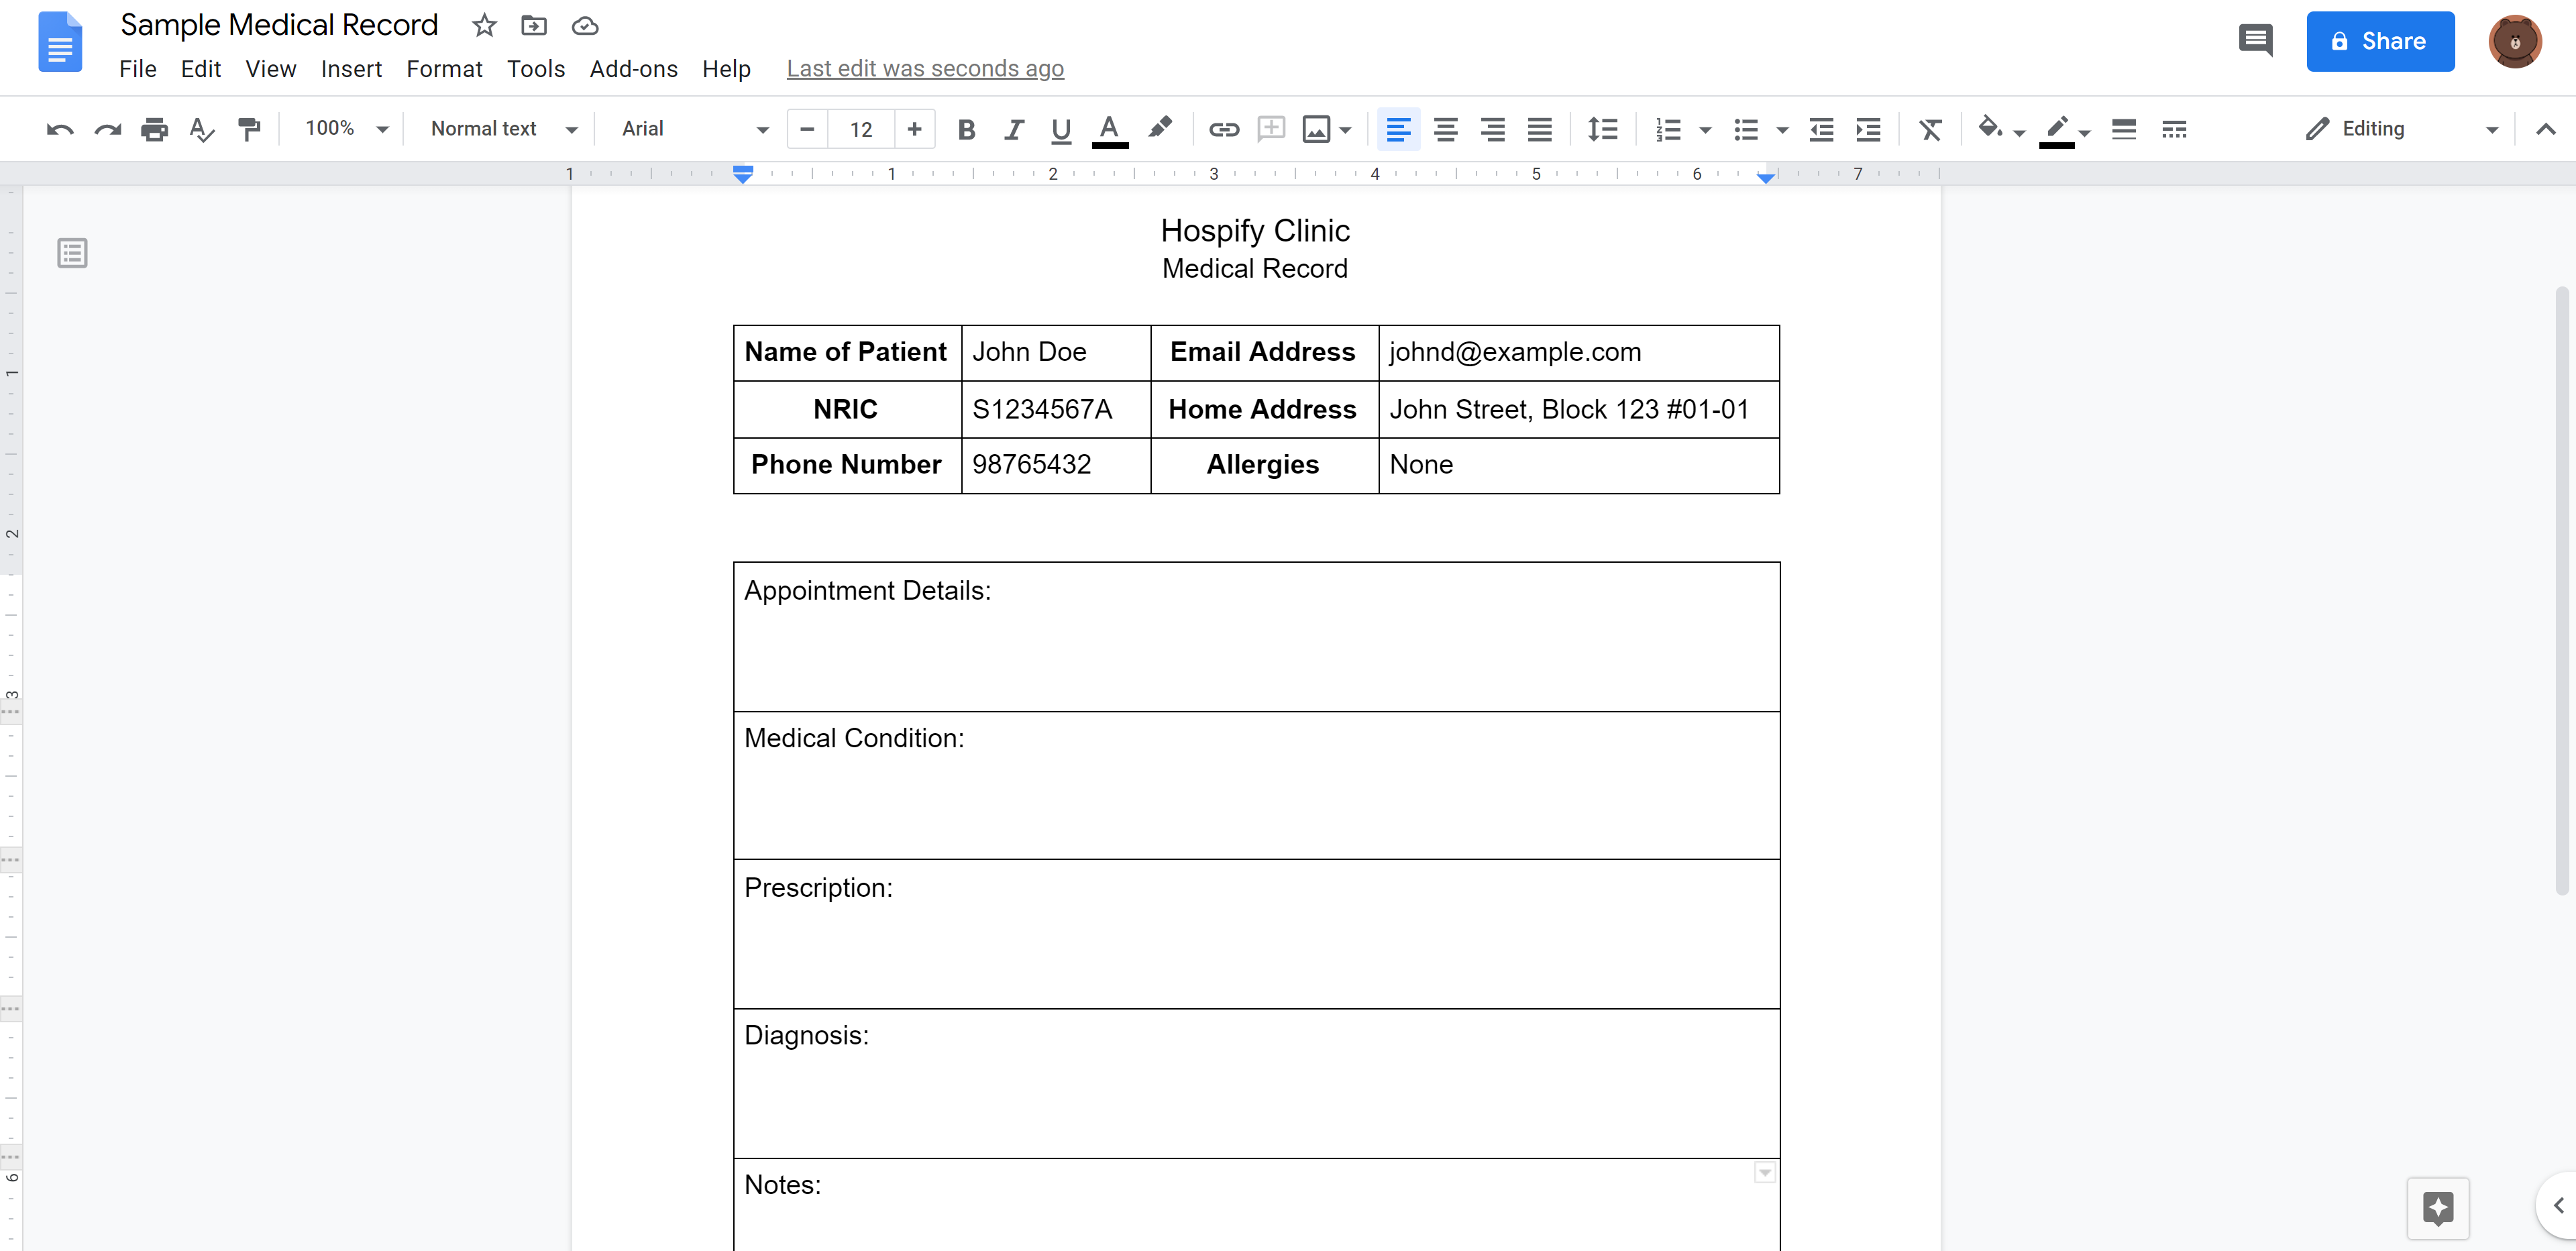 Figure 14.4 Sample medical record of John Doe on Google Docs
The example we have just discussed uses the add command. The usage of the MEDICAL_RECORD_URL field in edit works in the same way as described in the add example as well.
Another method to access the online medical record of the patient directly (without the copy-and-paste mechanism) is shown in the showMr command section below.
3.14 Show medical record directly: showMr (by Peh Jun Siang)
We understand that it might be quite a hassle to copy the URL and paste it in your browser manually. Therefore, we
implemented a short cut so that you can open up your default browser with the URL to the medical record directly from Hospify with the showMr
command!
Format: showMr NRIC
Example: showMr s1234567A
Running the command as shown below will open your computer’s default browser with the patient’s medical record.
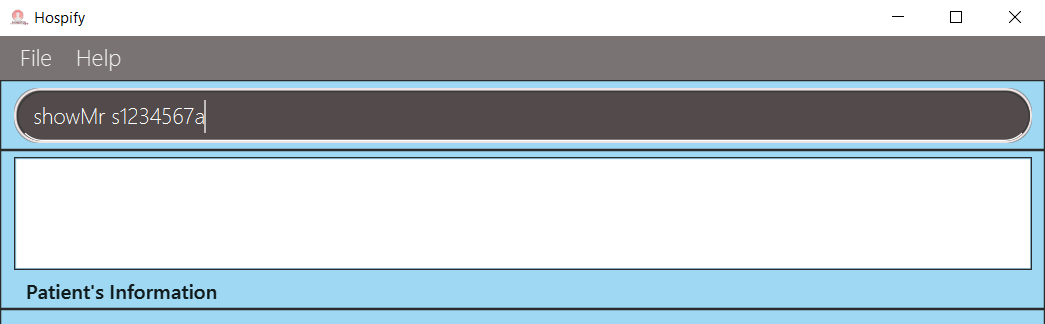 Figure 15.1 Using the
 showMr command to open patient’s medical record.
In the unlikely event that showMr command does not open up the medical record in your default browser,
use the manual method described in the above section
on the medical record feature.
![]() Important: - Check that your URL is valid if the medical record does not open on your browser.
Important: - Check that your URL is valid if the medical record does not open on your browser.
Depending on the Operating System you are using, the showMr command may not work
sometimes because there might be some issues with your default browser. Do drop us an email
at hospify_enquiry@gmail.com to notify the tech team if it does not open on your browser.
3.15 Clearing all entries: clear (by Cao Qin)
This command allows you to clear all patients’ information from Hospify. It is very useful when you want to clear all the sample data in the system and start using Hospify in your own clinic!
To use this command, simply type in clear, and all the patients’ information will be removed from the system.
Format: clear
To help you understand this command, here is an example of using it, as shown below.
Example:
execute clear(shown in Figure 16.1 below) command will empty the patient list (shown in Figure 16.2 below).
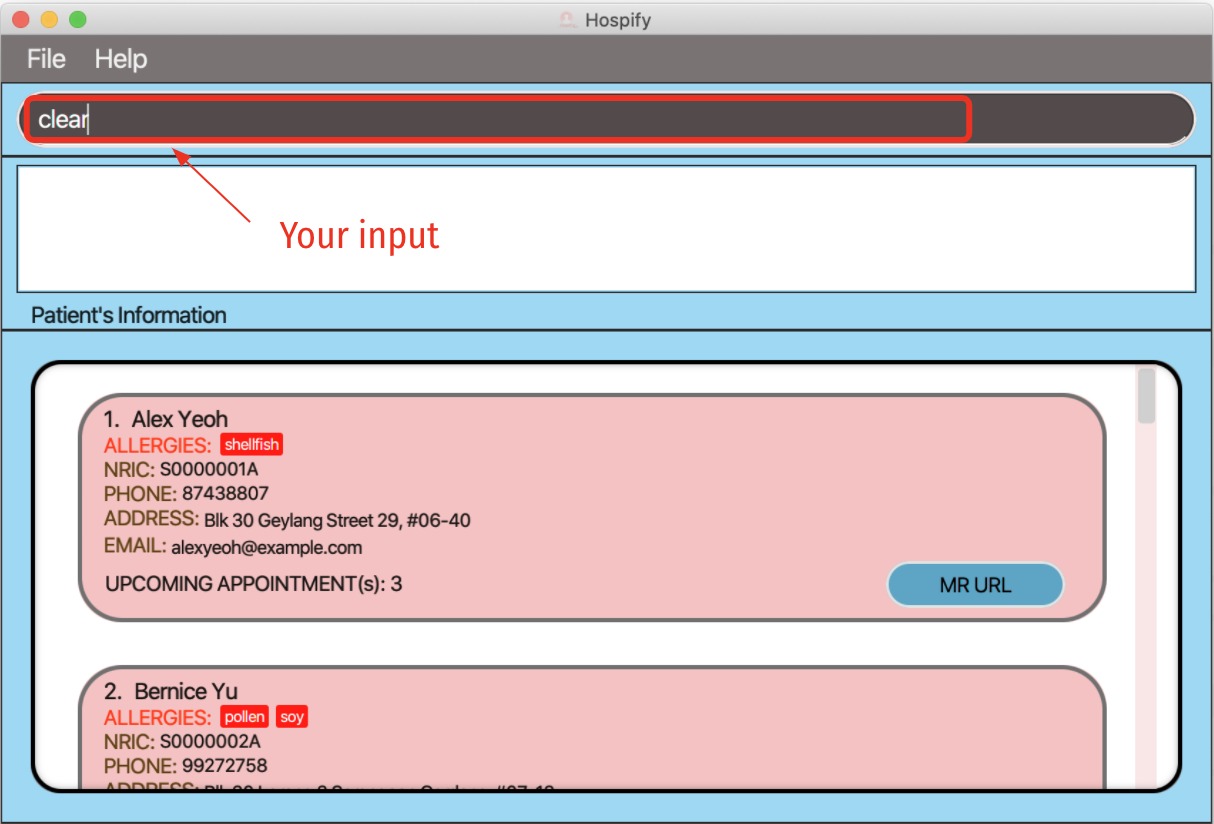 Figure 16.1 clear command
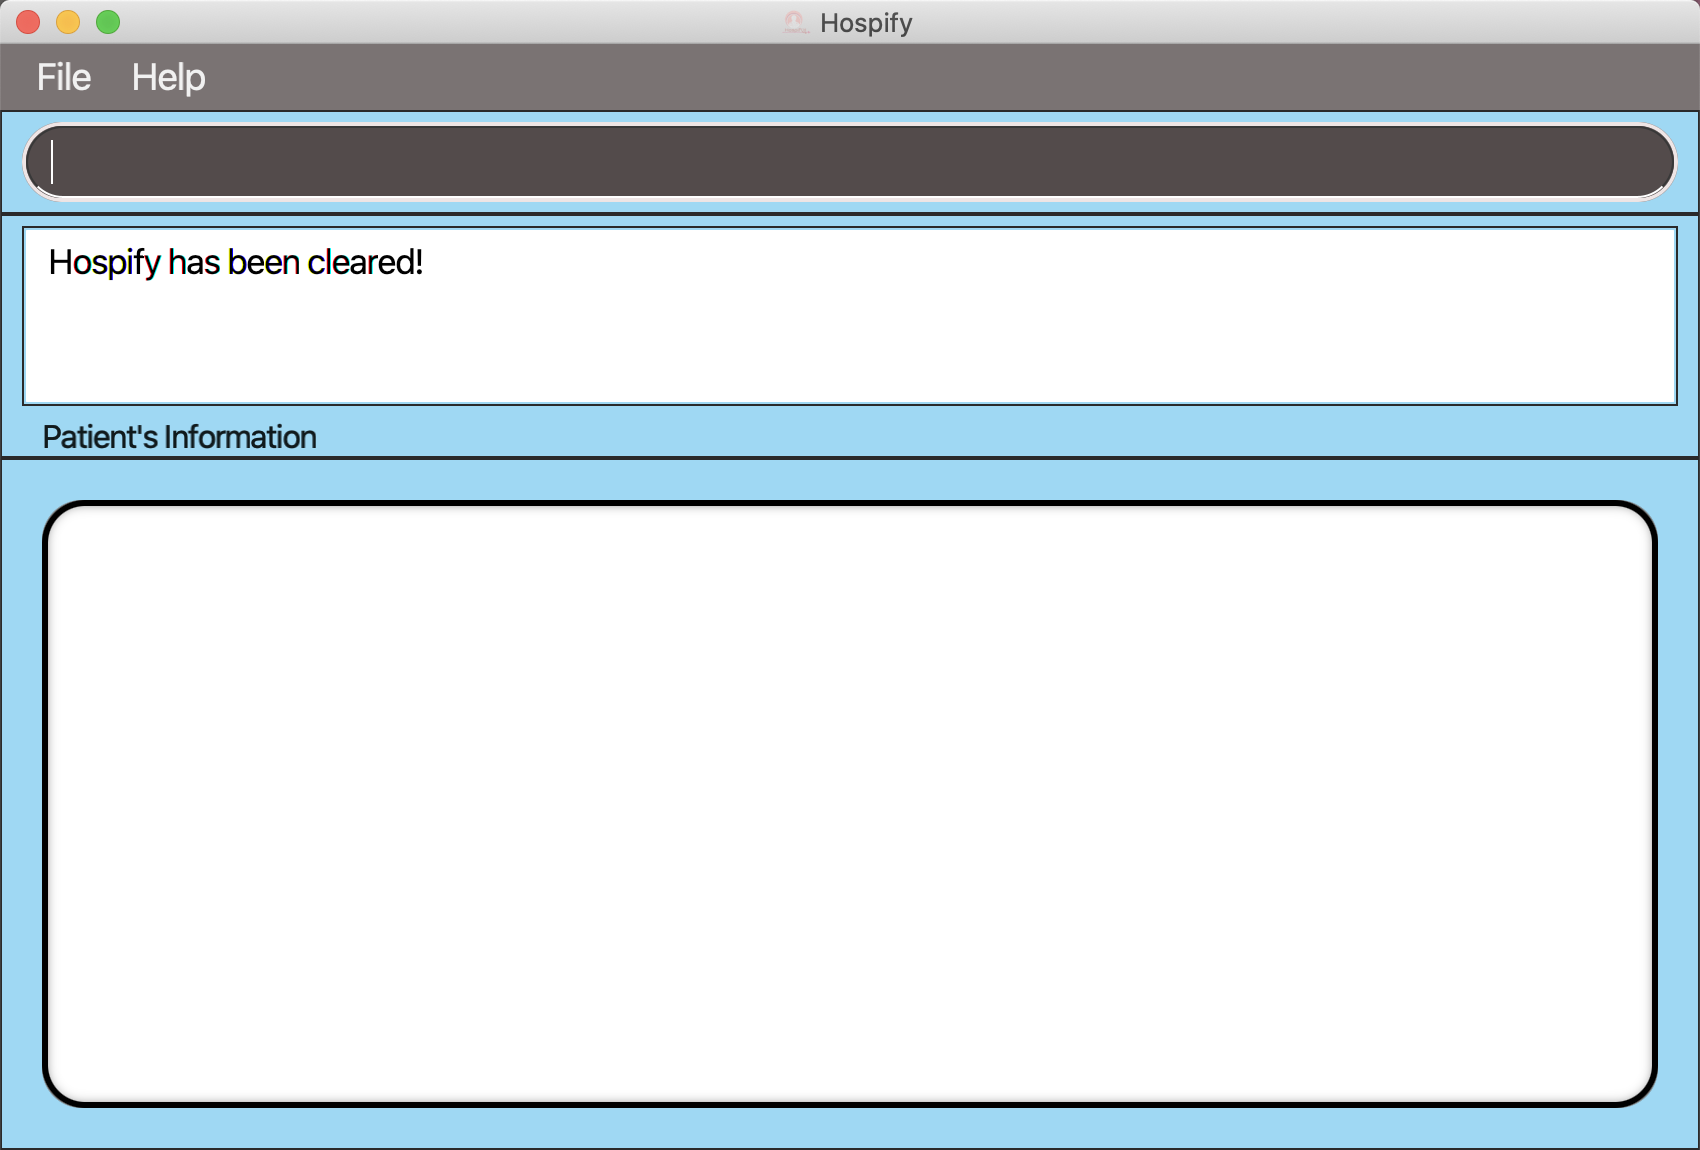 Figure 16.2 clear command result
3.16 Exiting the program: exit
You can exit the program by typing exit on the command line. Alternatively, you can close the window directly. Don’t worry, either way, your data is automatically saved in the program!
Format: exit
3.17 Saving the data
Hospify data are saved in the hard disk automatically after any command that changes the data. There is no need to save manually.
4. FAQ (by Peh Jun Siang)
In this section, we will be looking at some of the frequently asked questions from our users.
Q: How do I transfer my data to another Computer?
A: Install the app in the other computer and overwrite the data file with the hospify.json
that is in the data file of your other computer.
-
Step 1. Go into the data file in the previous home directory of the Hospify app.
 Figure 17.1.1 Go to the Data File
 -
Step 2. Transfer the
hospify.jsonfile to your other computer through a flash drive or the web and paste thehospify.jsonfile in the data file of your new Hospify app. Figure 17.1.2 Replace
 hospify.jsonfile
Q: I cannot run the JAR file! How do I get the program to run?
A: Check if you have at least Java 11 installed on your Computer.
-
On Windows
Step 1. Open up Command Prompt by searching for command prompt in the task bar shown below.
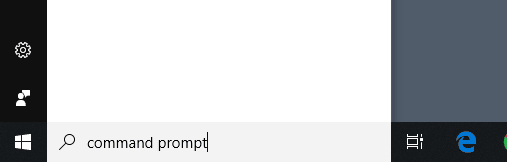
Figure 17.2.1 Windows search for command promptStep 2. Type the command
java -versionto check for the version.

Figure 17.2.2 Check windows java version
![]() Important: Ensure that the java version is at least
Important: Ensure that the java version is at least 11. If your version is less than 11,
scroll down to the ![]() Note to the view the download link.
Note to the view the download link.
After verifying that you have at least java 11 installed, double click on the hospify.jar to run the app.
If it still does not run, type the command java -jar hospify.jar in the command prompt in the SAME directory
containing your hospify.jar file shown below.
 Figure 17.2.3 Running jar from windows prompt
- On MAC
Step 1. Open up Terminal by searching for terminal in the search bar shown below.
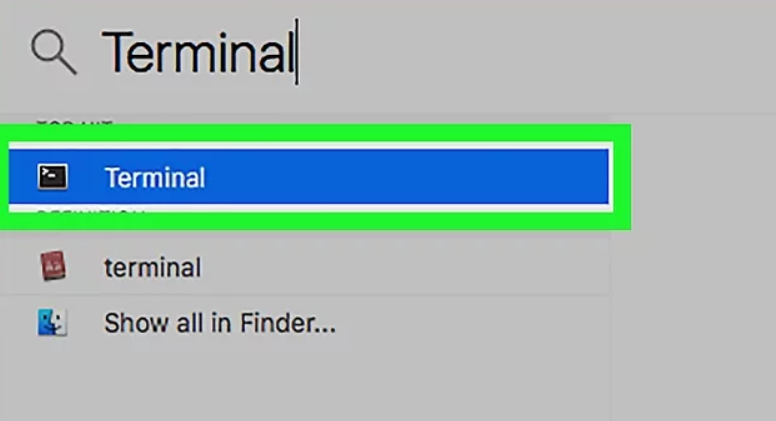
Figure 17.2.4 mac search bar
Step 2. Type the command java -version to check for the version shown below.
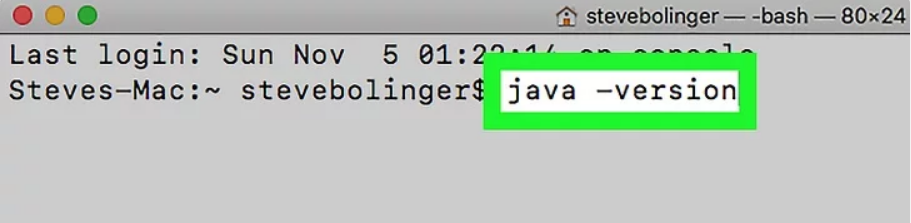
Figure 17.2.5 Mac java version command
![]() Important: Ensure that the java version is at least
Important: Ensure that the java version is at least 11. If your version is less than 11,
scroll down to the ![]() Note to the view the download link.
Note to the view the download link.
After verifying that you have at least java 11 installed, double click on the hospify.jar to run the app.
If it still does not run, type the command java -jar hospify.jar in the TERMINAL in the SAME directory
containing your hospify.jar file.
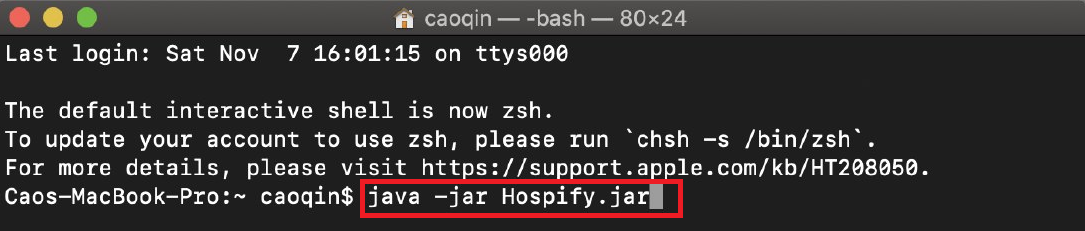 Figure 17.2.6 Running jar from Mac terminal
![]() Note: If your java version is less than 11, download from
the official Java website here.
Note: If your java version is less than 11, download from
the official Java website here.
Q: How do I get the latest version of Hospify?
A: As of the latest version, Hospify does not support updating within the application. In order to get the
latest version, go to the GitHub releases
here to download the latest version.
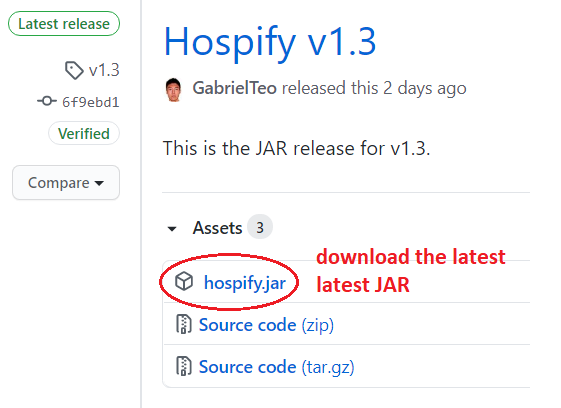
Figure 17.3.1 Download latest jar file
Q: My question is not listed in the FAQ. What should I do?
A: For inquires, please send email to our developer team at hospify_enquiry@gmail.com.
5. Command summary
In this section, we have summarised all the commands and their formats into a table for easy reference. The commands are arranged in alphabetical order. Additionally, you may refer to the specific requirements of a valid email and url (for the Medical Record feature) if you are encountering problems with using these fields.
| Action | Format, Examples |
|---|---|
| Add |
add n/NAME ic/NRIC p/PHONE_NUMBER e/EMAIL a/ADDRESS mr/MEDICAL_RECORD_URL [t/TAG]… e.g., add n/James Ho ic/S1234567A p/22224444 e/jamesho@example.com a/123, Clementi Rd, 1234665 mr/www.samplerecord/100 t/shellfish
|
| Add Appointment |
addAppt NRIC appt/DATE TIME [d/DESCRIPTION] e.g., addAppt S1234567A appt/30/12/2020 18:00 d/foot surgery
|
| Clear | clear |
| Count | count |
| Delete |
delete INDEXe.g., delete 3delete NRICe.g., delete S1234567A
|
| Delete Appointment |
deleteAppt NRIC appt/DATE TIME e.g., deleteAppt S1234567A appt/30/12/2020 18:00
|
| Edit |
edit INDEX [n/NAME] [p/PHONE_NUMBER] [e/EMAIL] [a/ADDRESS] [ic/NRIC] [t/TAG]…e.g., edit 2 n/James Lee e/jameslee@example.com ic/S1234567A
|
| Edit Appointment |
editAppt NRIC oldappt/DATE TIME newappt/DATE TIME [d/DESCRIPTION] e.g., editAppt S1234567A oldappt/30/12/2020 18:00 newappt/27/11/2020 20:30 d/Revisit
|
| Exit | exit |
| Find |
find KEYWORD [MORE_KEYWORDS] [NRIC] [MORE_NRICs]e.g., find James Jakee.g., find Curry Davis Heskey S1234567A
|
| Help | help |
| List | list |
| Show Appointment |
showAppt NRIC or double click on patient e.g., showAppt S1234567A
|
| Show Medical Record |
showMr NRIC or double click MR URL button to copy the url and paste onto web browser manually e.g., showMr S1234567A
|
| Sort |
sort name or sort NRIC
|
-
Valid email format
- Emails should be of the format local-part@domain.topleveldomain
- The local-part (upper limit of 64 characters) only contains alphanumeric characters or special characters including !#$%&’*+/=?`{}~^.- and the vertical line symbol
- The domain should be between 2 and 255 characters long (inclusive), start and end with alphanumeric characters, and consist of alphanumeric characters, a period or a hyphen for the characters in between, if any
- The top level domain should be between 2 and 6 (inclusive) characters long and only contain alphabets
-
Valid URL format
- URL should be of the format (http:// or https://)(www.)domain.topleveldomain/path
- The URL can start with
http://,https://,www.or any of the first two paired withwww. - The domain should be between 2 and 256 characters long (inclusive) and should only contain alphanumeric characters or special characters including @:%._+~#?&=/
- The top level domain should be between 2 and 6 (inclusive) characters long and only contain alphabets
- The path follows the same rule as the domain except there is no restriction in its length